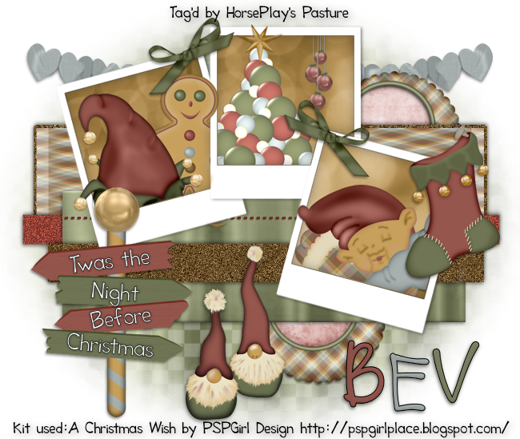
Supplies
Font of choice - I used Tooney Loons here and LD Gregarious which is a pay font
Weescotlass Mask 208 here
Dee and Kandi’s collab template here - you can find it under August 25, 2011. There are 4 templates in the download. This tutorial uses kkdeecollab2.
“A Christmas Wish” is a tagger size scrap kit created by Lis of PSPGirl Design. This portion is part of a huge mega collab to help a fellow designer in her time of need. It can be purchased from TKO Scraps. You can visit Lis’ blog here.
Thank you Lis for your fantastic portion!
This tutorial was written assuming you have a working knowledge of PSP.
~♥~ Let’s get started ~♥~
Open up the template.
Shift +D.
Close out the original.
Delete the top 8 layers.
Highlight Blue Circle layer.
Click on it with your Magic Wand.
New Raster layer.
Copy and paste Ele25 Into Selection.
Deselect.
Delete the template layer.
Click inside the frame with your Magic Wand.
Selections/Modify/Expand by 4.
New Raster layer below the frame.
Copy and paste Paper 4 Into Selection.
Deselect.
Highlight Pink Circle layer.
Repeat the above step.
Highlight White Rectangle layer.
Click on it with your Magic Wand.
New Raster layer.
Copy and paste Paper 6 Into Selection.
Adjust/Add Remove Noise/Add Noise:
Gaussian and Monochrome checked.
Noise: 33%
OK
Deselect.
Delete the template layer.
Highlight Pink Rectangle layer.
Click on it with your Magic Wand.
New Raster layer.
Copy and paste Paper 1 Into Selection.
Deselect.
Delete the template layer.
Highlight Blue Glitter Bar.
In your color pallet change the Foreground color to #6f3027.
Make your Target Tool active and change the color of the glitter bar.
Highlight Black Rectangle layer.
Click on it with your Magic Wand.
New Raster layer.
Copy and paste paper 5 Into Selection.
Deselect.
Delete the template layer.
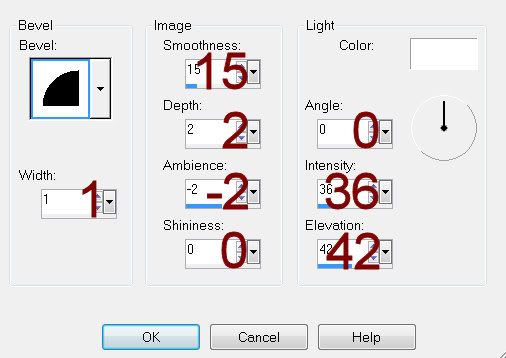
Give it a slight Inner Bevel:

Make a new canvas - any size.
Flood fill with your foreground color.
Copy.
Close this canvas out as you won’t be needing it any more.
Highlight Dotted Line layer.
Click anywhere outside of it with your Magic Wand.
Selections/Invert
New Raster layer.
Paste Into Selection - you should now have your foreground color in the dots.
Deselect.
Delete the template layer.
Highlight Pink Bar layer.
Click on it with your Magic Wand.
New Raster layer.
Copy and paste Paper 6 Into Selection.
Give it the same noise effect.
Deselect.
Delete the template layer.
Highlight Photos layer.
Use your Magic Wand and click on each Black square.
Copy and paste Paper 2 Into Selection.
We’re going to add the elements to each square starting with the far left one.
Open up Ele 17
Shift + D.
Close out the original.
Mirror
Add your drop shadow to it.
Copy
Paste on your working canvas.
Resize 35%
Move into position - Don’t worry about what overhangs.
Open up Ele19
Shift + D.
Close out the original.
Give it a drop shadow.
Copy
Paste on your working canvas position it behind the elf hat - see my tag for reference.
Resize 40%
Make your Eraser Tool active and erase everything you don’t want overhanging the picture square.
You’ll see a bit of the gingerbread man in the middle frame. So you can erase that go to Selections/Invert. Erase the gingerbread that’s in the middle frame being careful not to erase any of him from the left frame.
Selections/Invert
Time to move onto the middle frame.
Open up Ele5.
Shift + D.
Close out the original.
Give it a drop shadow.
Copy
Paste on your working canvas.
Resize 40%
Position in the middle frame - see my tag for reference.
Open up Ele8.
Shift + D.
Close out the original.
Give it a drop shadow.
Copy
Paste on your working canvas.
Resize 25%
Move into position - see my tag for reference.
Make your Eraser Tool active and erase the parts of the element you don’t want to overhang the picture.
Selections/Invert
Erase any of the tree that overlaps the left picture frame.
Selections/Invert
Time to move onto the right frame.
Open up Ele20.
Shift + D.
Close out the original.
Give it a drop shadow.
Paste on your canvas.
Resize 50%
Move into position.
Use your Eraser Tool and erase the part of the elf you don’t want to overhang the frame.
Deselect.
Add your elements. I used:
Ele24: Resize 50%/Duplicate/Mirror
Ele18: Resize 40%
Ele30: Resize 25% and 80%/Duplicate/Mirror
Ele12: Resize 60%
Ele6: Resize 40%
Ele7: Resize 35%
Color Pallet:
Foreground: #000000
Background: #eaf6f5
Stroke: 1
Using the Tooney Loons font type the words as you see on my tag - or use your own words.
Before rasterizing each word layer turn it this way or that so that the words slant the same as the boards on the sign.
Highlight your white canvas.
New Raster layer.
Select All.
Copy and paste Paper 5 Into Selection.
Deselect.
Apply the mask.
Resize 115%
Merge Group.
Add your copyrights.
Add your name.
I made each letter a different color.
Resize all layers 80%.
I hope you enjoyed this tutorial.
I’d love to see your results.
Email me!
Hugs,
Bev

thanks for using my kit .... just love what you made with it
ReplyDeletehugs lis
You're welcome Lis :)
ReplyDelete