Supplies
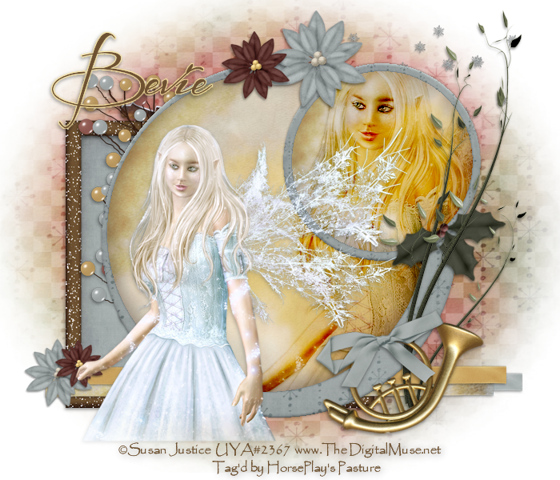
1 tube of choice - I used the beautiful artwork of Susan Justice which can be purchased from Up Your Art. You must have a license to use.
Font of choice - I used Before the Rain here
Becky Mask 22 here
Toxic Desirez Template 114 here
Plug Ins:
Eyecandy 3.1 - Glow
“A Christmas Wish” is a tagger size scrap kit created by DeLoris of Del‘s PSP Emporium. This portion is part of a huge mega collab to help a fellow designer in her time of need. It can be purchased from TKO Scraps. You can visit DeLoris’ blog here.
Thank you DeLoris for your terrific portion.
This tutorial was written assuming you have a working knowledge of PSP.
~♥~ Let’s get started ~♥~
Open up the template.
Shift + D.
Close out the original.
Image/Canvas Size:
700 x 600
OK
Delete the top 2 layers, Thin Rectangle, and Rectangle.
Highlight Purple Circle layer.
Click on it with your Magic Wand.
New Raster layer.
Copy and paste Paper 3-8 Into Selection.
Deselect.
Delete the template layer.
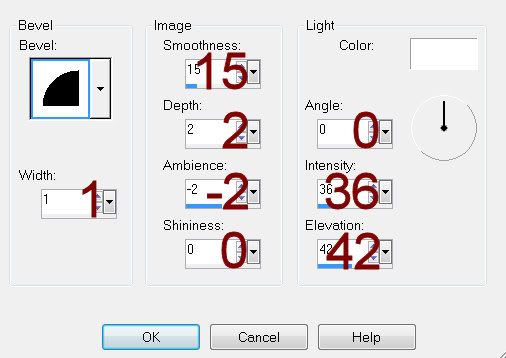
Give it a slight Inner Bevel:

Highlight green Circle layer.
Repeat the above step.
Highlight Lrg White Circle layer.
Click on it with your Magic Wand.
New Raster layer.
Copy and paste Paper 1-3 Into Selection.
Deselect.
Delete the template layer.
Highlight Sm White Circle layer.
Repeat the above step.
Copy and paste your tube as a new layer - this tube you want to move into a position that looks good on both circles - See my tag for reference (it’s the tube that you can see through).
Once you have the tube in a position you like, duplicate.
Change the Properties to Burn.
In your layers pallet you want one tube just above the small round paper layer and the other just above the large round paper layer.
Highlight the small round paper layer.
Click anywhere outside of it with your Magic Wand.
Highlight the tube that’s just above the paper.
Tap the delete key.
Deselect.
Duplicate.
Highlight the large round paper layer.
Repeat the above step.
Copy and paste Frame 2 as a new layer.
Resize 70%
Move into position behind the large circle - see my tag for reference.
Click inside of it with your Magic Wand.
Selections/Modify/Expand by 4.
New Raster layer below the frame.
Copy and paste Paper 3-1 Into Selection.
Deselect.
Copy and paste your tube as a new layer.
Add your elements. I used:
Holy 1: Resize 40%/Flip/Free rotate Right 20 degrees
Greenery 1
Snowflake Scatter
Berries Spray
Ribbon 2, 5, and 7: Resize 70%
French Horn 3: Resize 70%
Poinsettia 2: Resize 25%/Duplicate/Resize 70%
Poinsettia 1: Resize 25% and 70%/Duplicate/Resize 70%
Highlight your white canvas.
New Raster layer.
Select All.
Copy and paste Paper 1-5 Into Selection.
Deselect.
Apply the mask.
Resize 120%
Merge Group.
Add your copyrights.
Add your name:
Color Pallet -
Foreground & Background: #e7d196
Convert to Raster layer.
Apply Eyecandy 3.1 - Glow:
Width: 3
Opacity: 100
Opacity Drop off: Medium
Color: #fae5a2
OK
Resize all layers 80%.
I hope you enjoyed this tutorial.
I’d love to see your results.
Email me!
Hugs,
Bev

No comments:
Post a Comment