Supplies
1 tube of choice – I used the beautiful artwork of Rachael Tallamy
which can be purchased from Up Your Art. You must have
a license to use.
Font of choice - I used Before the Rain here
Weescotlass Mask 208 here
“Magic Under the Sea” is a full size
scrap kit created by Lins of Lins Creations and can be purchased from Scrappin Naturally. You can visit her blog here.
Thank you Lins for a really beautiful kit.
Thank you Lins for a really beautiful kit.
This tutorial was written assuming you have a working knowledge of PSP.
~♥~ Let’s get started ~♥~
Open up the template.
Shift + D.
Close the original.
Image/Canvas Size:
750 x 650
Highlight the background layer.
Flood fill white.
Delete the following layers:
Top 2 layers, Hearts, Pixel Kinky Valentine, Hearts, Thin Rectangle,
Rectangle 2, and Pixel Words layer.
Highlight Glittered Rectangle layer.
Use your Target Tool and change the color to #769c2b.
Adjust/Brightness Contrast
Brightness: -130
Contrast: 15
OK
Repeat the above step with Glittered Circle and Glittered Circle 2
layers.
Highlight Rectangle layer.
Click anywhere outside of it with your Magic Wand.
Copy and paste Paper 12 as a new layer.
Resize 15%
Move into position.
Tap the delete key.
Deselect.
Delete the template layer.
Highlight Rectangle layer.
Click anywhere outside of it with your Magic Wand.
Selections/Invert
New Raster layer.
Copy and paste Paper 7 Into Selection.
Adjust/Add Remove Noise/Add Noise:
Uniform and Monochrome checked
Noise: 20%
OK
Deselect.
Delete the template layer.
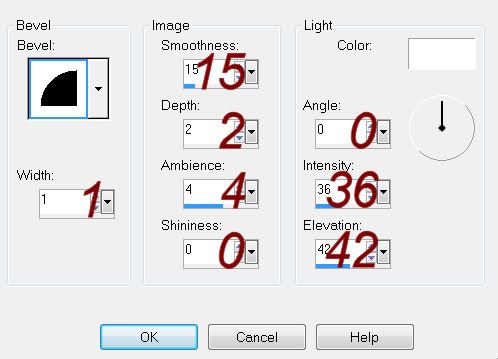
Give it a slight Inner Bevel:

Highlight Circle 1 layer.
Click on it with your Magic Wand.
New Raster layer.
Copy and paste Paper 7 Into Selection.
Deselect.
Delete the template layer.
Give it the same Noise effect.
Highlight Circle 2 layer.
Click on it with your Magic Wand.
New Raster layer.
Copy and paste Paper 12 Into Selection.
Copy and paste Element 35 as a new layer.
Resize 20%
Change the Properties to Soft Light.
Move into position – see my tag for reference.
Selections/Invert
Tap the delete key.
Deselect.
Delete the template layer.
Highlight Gradient Circle layer.
Click anywhere outside of it with your Magic Wand.
Selections/Invert
New Raster layer.
Copy and paste Paper 4 Into Selection.
Copy and paste your tube as a new layer over the paper layer.
Change the Properties to Overlay.
Selections/Invert
Tap the delete key.
Deselect.
Delete the template layer.
Repeat the above step with Small Circle layer accept place a different
area of the tube within the circle.
Copy and paste your tube as a new layer.
Add your elements. I used:
6: Resize 10% and 60%/Use your Target Tool to change the color if you
like.
36: Resize 10% and
80%/Duplicate/Flip/Resize 70%/Duplicate both flower layers
34: Resize 10%
7: Resize 30%
17: Resize 30%
Highlight your white canvas.
New Raster layer.
Select All.
Copy and paste the Paper 5 Into Selection.
Deselect.
Apply the mask.
Resize 115%
Merge Group.
Add your credits.
Add your name.
Resize all layers 75%


No comments:
Post a Comment