

Supplies
1 tube and 1 close up image of choice -
I used the awesome artwork of Arthur Crowe which can be purchased
here. You must have a license to use.
Font of choice - I used Intima Script Two
Insatiable Dreams mask 222 here
Divine Intention Template 327 here
Plug Ins used:
DSB Flux – Bright Noise
Greg’s Factory Output Vol. II – Pool Shadow
Eyecandy 3.1 - Glow
“White Fantasy” is a scrap kit
created by Cindy of ChiChi Designz and can be purchased from Lollipops n Gumdrops. You can visit her blog here.
Thank you Cindy for another fantastic kit!
This tutorial was written assuming you have a working knowledge of PSP.
~♥~ Let’s get started ~♥~
Open up the template.
Shift + D.
Close out the original.
Image/Canvas Size
700 x 650
OK
Open up the background layer and flood fill white.
Delete the credit layer and Word Art by Missy layer.
Color Pallet:
Foreground: #ff6fb7
Background: #000000
Make your Color Replacer Tool active.
Highlight Dotted Line 2 layer.
Hold your mouse over it. Double
right click twice.
Highlight Raster 1 layer.
Click on it with your Magic Wand.
New Raster layer.
Copy and paste Paper 11 Into Selection.
Copy and paste Grass as a new layer.
Move into position over the paper layer
- see my tag for reference.
Change the Properties to Burn.
Selections/Invert
Tap the delete key.
Deselect.
Delete the template layer.
Give the paper a slight Inner Bevel:
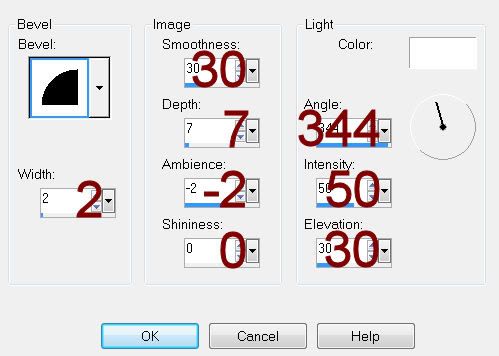
Highlight Frame Background 1 layer.
Click on it with your Magic Wand.
New Raster layer.
Copy and paste Paper 15 Into Selection.
Apply Greg’s Factory Output Vol. II – Pool Shadow:
Use Default Settings.
Copy and paste your tube as a new layer.
Move into position over the paper.
Selections/Invert
Tap the delete key.
Deselect.
Delete the template layer.
Change the Properties to Overlay.
Repeat the above step with Frame Background 2 layer.
Highlight Circle 1 layer.
Click on it with your Magic Wand.
New Raster layer.
Copy and paste Paper 15 Into Selection.
Apply Greg’s Factory Output Vol. II – Pool Shadow:
Use same settings.
Deselect.
Delete the template layer.
Give it the same Inner Bevel.
Highlight Circle 2 layer.
Click on it with your Magic Wand.
New Raster layer.
Copy and paste Paper 15 Into Selection.
Apply DSB Flux – Bright Noise:
Intensity: 36
Darker checked
OK
Deselect.
Delete the template layer.
Highlight Circle 3 layer.
Click on it with your Magic Wand.
New Raster layer.
Copy and paste Paper 15 Into Selection.
Apply the Pool Shadow Effect again – same settings.
Copy and paste your close up image as a new layer.
Move into position.
Selections/Invert
Tap the delete key.
Copy and paste Bricks as a new layer.
Resize 60%
Change the Properties to Burn.
Move into position behind the image so that you can see it in the
background of the circle. Duplicate and
move into position again if you have to.
To each brick wall layer tap the delete key.
Deselect.
Delete the template layer.
Highlight the paper layer.
Apply Eyecandy 3.1 – Glow:
Width: 3
Opacity: 100%
Opacity Drop Off: Fat
Color: #000000
OK
Highlight Hearts layer.
Click anywhere outside of it with your Magic Wand.
Selections/Invert
New Raster layer.
Copy and paste Paper 15 Into Selection.
Apply DSB Flux – Bright Noise:
Same Settings.
Give it the same slight Inner Bevel.
Deselect.
Delete the template layer.
Repeat the above step with Hearts 2 layer.
Add your elements. I used:
Leaves 1: Resize 70%/Free Rotate
Left 90 degrees/Duplicate/Mirror
Paper Heart Trail: Resize
40%/Duplicate/Mirror
Bird: Resize 50%
Butterfly: Resize
25%/Duplicate/Mirror/Resize 70%
Branches: Erase what sticks out
at the bottom
Highlight your white canvas.
New Raster layer.
Select All.
Copy and paste Paper 15 Into Selection.
Deselect.
Apply the mask.
Merge Group.
Duplicate
Add your credits.
Add your name.
Apply Eyecandy 3.1 – Glow:
Width: 3
Opacity: 100%
Opacity Drop Off: Fat
Color: #ffffff
Resize all layers 80%
No comments:
Post a Comment