Supplies
1 tube of choice – I used the awesome artwork of Ronnie Werner which
can be purchased from Up Your Art. You must have
a license to use.
Font of choice - I used Oh Lara – a pay font
Monti Circular Mask here
Scroll down the page under Monday April 25, 2011
Plug Ins Used:
Eyecandy 3.1 - Glow
“One Moment in Time” is a tagger size
scrap kit created by Stephanie of Stef’s Scrap Kits and can be purchased from Twilight Scraps. You can visit her blog here.
Thank you Stef for a really beautiful kit.
Thank you Stef for a really beautiful kit.
This tutorial was written assuming you have a working knowledge of PSP.
~♥~ Let’s get started ~♥~
Open up the template.
Shift + D.
Close the original.
Resize all layers 85%
Image/Canvas Size:
700 x 600
Highlight bg layer.
New Raster layer.
Flood fill white.
Delete the following layers:
Top 4 layers, Glittered Grunge layer, Small White Circle, and bg layer.
Color Pallet:
Foreground: #000000
Background: #ae2a68
Highlight Dotted Circle layer.
Make your Color Replacer Tool active.
Double Right click over the dotted line layer.
Repeat the above step with Dotted Square layer.
Highlight White Rectangle layer.
Click on it with your Magic Wand.
Copy and paste Paper 1 Into Selection.
Deselect.
Delete the template layer.
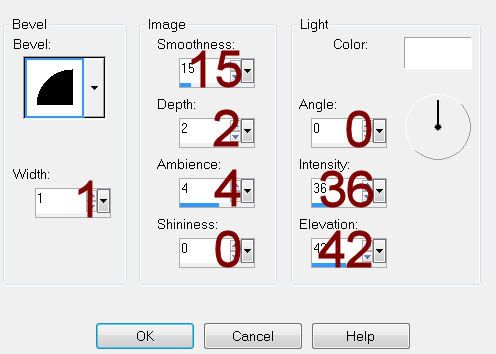
Give it a slight Inner Bevel:

Highlight Gradient Rectangle layer.
Click anywhere outside of it with your Magic Wand.
Selections/Invert
New Raster layer.
Copy and paste Paper 2 Into Selection.
Deselect.
Delete the template layer.
Give it the same slight Inner Bevel.
Highlight Yellow Rectangle layer.
Click on it with your Magic Wand.
New Raster layer.
Copy and paste Paper 12 Into Selection.
Deselect.
Delete the template layer.
Give it the same slight Inner Bevel.
Highlight Gradient Strips layer.
Click anywhere outside of it with your Magic Wand.
Selections/Invert
New Raster layer.
Copy and paste Paper 2 Into Selection.
Deselect.
Delete the template layer.
Give it the same slight Inner Bevel.
Highlight Orange Matt layer.
Click on it with your Magic Wand.
New Raster layer.
Copy and paste Paper 11 Into Selection.
Deselect.
Delete the template layer.
Give it the same slight Inner Bevel.
Give it the same slight Inner Bevel.
Highlight White Circle layer.
Adjust/Add Remove Noise/Add Noise:
Uniform and Monochrome checked
Noise: 20%
OK
Highlight Yellow Circle layer.
Click on it with your Magic Wand.
New Raster layer.
Copy and paste Paper 6 Into Selection.
Copy and paste Element 21 as a new layer over the paper layer.
Resize 50%
Move into position.
Selections/Invert
Tap the delete key.
Deselect.
Delete the template layer.
Change the Properties of the element to Lighten.
Highlight Small Orange Circle layer.
Click on it with your Magic Wand.
New Raster layer.
Copy and paste Paper 12 Into Selection.
Copy and paste your tube as a new layer.
Position within the circle.
Duplicate/Resize just a bit larger.
Change the Properties to Overlay.
Move below the original tube layer in your layers pallet.
Position slightly to the right a bit.
Selections/Invert
Tap the delete key.
Highlight the original tube layer.
Tap the delete key.
Deselect.
Highlight the Paper layer.
Apply Eyecandy 3.1 – Glow:
Width: 3
Opacity: 100%
Opacity Drop Off: Fat
Color: #ffffff
OK
Delete the template layer.
Highlight Frames bg layer.
Click on each square with your Magic Wand.
New Raster layer.
Copy and paste Paper 6 Into Selection.
Deselect.
Delete the template layer.
Highlight Yellow Frames layer.
Click on it with your Magic Wand.
New Raster layer.
Copy and paste Paper 1 Into Selection.
Deselect.
Delete the template layer.
Give it the same slight Inner Bevel.
Apply the same Noise effect.
Add your elements. I used:
2: Resize 20%/Duplicate/Mirror
3: Resize 15%/Duplicate/Mirror
2 again: Resize 25% and
50%/Duplicate/Resize 70%/Duplicate
3 again: Resize 25% and 50%
39
38: Duplicate
40: Duplicate
30: Resize 60%
22: Resize 25%
8: Resize 20%/duplicate/Mirror
6: Resize 20%/Duplicate/Resize
70%/Mirror
45: Resize 80%
Highlight your white canvas.
New Raster layer.
Select All.
Copy and paste the Paper 1 Into Selection.
Deselect.
Apply the mask.
Merge Group.
Add your credits.
Add your name.
Give it the same Glow effect.
Resize all layers 80%


No comments:
Post a Comment