Supplies
1 tube of choice – I used the artwork of PinUpToons which can be
purchased from CDO. You must have
a licen to use.
Font of choice - I used Chicken Basket here
Designs by Vaybs mask 80 here
Plug Ins used:
Eyecandy 3.1 - Glow
DSB Flux – Bright Noise
“Love Bug” is a full size FTU kit which was created by My Heart in
Paper and can be downloaded here. Please leave a thank you after
download. It’s a small gesture for a
gift that’s freely given.
This tutorial was written assuming you have a working knowledge of PSP.
~♥~ Let’s get started ~♥~
Open up a 700 x 700 blank canvas.
Flood fill white.
New Raster layer.
Make your Selection Tool active set on Circle.
Create a circle approximately 475 pixels.
Copy and paste Paper 2 Into Selection.
Deselect.
Apply Eyecandy 3.1 – Glow:
Width: 3
Opacity: 100%
Opacity Drop off: Fat
Color: white
Copy and paste Frame as a new layer.
Resize 25% and 70%
Click inside of it with your Magic Wand.
Selections/Modify/Expand by 4.
New Raster layer below the frame.
Copy and paste Paper 3 Into Selection.
Deselect.
Merge visible the frame and paper.
Duplicate
Move both merged layers into position – see my tag for reference.
Add your elements. I used:
Journal Strips: Resize
25%/Duplicate 3x’s
Tag: Resize 25% and
85%/Duplicate/Mirror/Flip
Straw: Resize 25% and
70%/Duplicate/Resize 70%/Duplicate/Mirror
Heart: Resize 25%
Heart again: Resize 10% and
30%/Duplicate 3x’s/Place in vertical line – see my tag for reference. Merge Visible all 4 hearts. Duplicate/Resize 70%
Caterpillar: Resize 10% and
40%/Duplicate/Mirror/Duplicate
Highlight your white canvas.
New Raster layer.
Select All.
Copy and paste Paper 4 Into Selection.
Deselect.
Apply the mask.
Merge Group.
Duplicate
Add your credits.
Add your name.
Foreground: #6e5d84
Background: Pattern/Paper 2
Stroke width: 1
Color Pallet:
Foreground: #000000
Background: Null
Make your Ellipse Tool active set on Circle.
Line Style: Solid
Width: 2
Create a circle about the same size as the circle paper on your pallet.
Color Pallet:
Foreground: Black
Background: #bcda71
Stroke: 1
Make your Text Tool active and run it along the center top of the
circle. When you see a rocking A click
your mouse.
A text box will appear.
Type your name.
Apply
In your layer’s pallet click on the + sign.
Close out the New Ellipse layer.
Highlight and right click on Vector 1 layer.
Convert to Raster layer.
Select All/Float/Defloat
Selections/Modify/Contract by 1
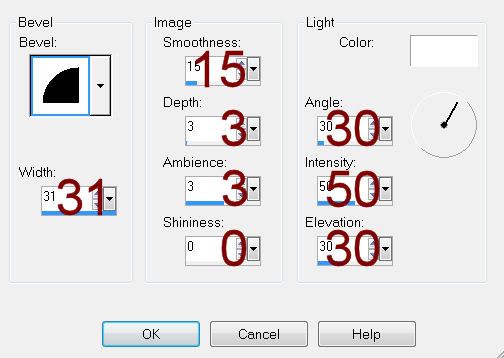
Give it a slight Inner Bevel:

Apply DSB Flux – Bright Noise:
Intensity: 47
Mix checked
OK
Move your name into position – see my tag for reference.
Resize all layers 80%


No comments:
Post a Comment