

Clicking on the image will allow you to enlarge for bigger view.
Supplies
1 tube of choice - I used the artwork of Elizabeth Austin that can now be purchased at Up Your Art
Font of Choice - I used Super Retro M54 here
My mask 27 here
Brush Strokes - Cross Hatch
Greg’s Factory Output Vol. II - Pool Shadow
“Splash of Colour” is a PTU scrap kit available in both full and tagger size created by Julie of Bits N Bobs and can be purchased from Exquisite Scraps. You can visit her blog here.
Thank you Julie for such a vibrant kit. Perfect for lifting the spirits this time of year!
This tutorial was written assuming you have a working knowledge of PSP.
~♥~ Let’s get started ~♥~
Open up a 700 x 700 blank canvas.
Flood fill white.
Copy and paste you tube as a new layer.
Center it on your canvas.
Copy and paste 27 as a new layer.
Position at the bottom of your tube.
Copy and paste 28 as a new layer just above your white canvas.
Highlight your white canvas.
New Raster layer.
Select All.
Copy and paste Paper 9 Into Selection.
Deselect.
Apply Brush Strokes - Cross Hatch:
Stroke Length: 35
Sharpness: 11
Strength: 1
OK
Apply the mask.
Merge Group.
Highlight you tube layer.
Duplicate.
Move it to the left and up slightly.
In your Layers pallet, move it below the original tube layer.
Apply the mask (to the duplicate layer)
Change the Properties to Luminance Legacy.
Lower the Opacity to about 40.
Copy and paste 12 as a new layer.
Move into position just below the original tube layer.
Lower the Opacity to about 42.
Color Pallet:
Foreground: Patten/Paper 9
Background: Patten/Paper 8
Stroke set at 2
Set the direction of your font to go up and down.
Type your name out.
If the letters are too far apart play around with your Kerning setting -
The negative numbers bring the letters closer together.
Convert your name to a Raster layer.
Select All/Float/Defloat
Selections/Modify/Contract by 2
Give it a slight Inner Bevel:
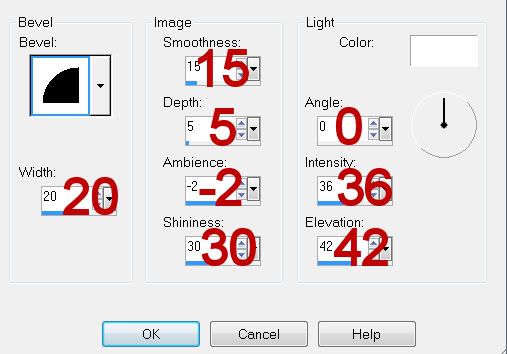
Apply Greg’s Factory Output Vol. II - Pool Shadow:
Use Default Settings accept lower the Intensity bar to 57.
OK
Deselect.
Add your copyrights.
Crop your Image.
Resize all layers 85%.
I hope you enjoyed this tutorial.
I’d love to see your results and show it off in my gallery.
Email me!
Hugs,
Bev
Supplies
1 tube of choice - I used the artwork of Elizabeth Austin that can now be purchased at Up Your Art
Font of Choice - I used Super Retro M54 here
My mask 27 here
Brush Strokes - Cross Hatch
Greg’s Factory Output Vol. II - Pool Shadow
“Splash of Colour” is a PTU scrap kit available in both full and tagger size created by Julie of Bits N Bobs and can be purchased from Exquisite Scraps. You can visit her blog here.
Thank you Julie for such a vibrant kit. Perfect for lifting the spirits this time of year!
This tutorial was written assuming you have a working knowledge of PSP.
~♥~ Let’s get started ~♥~
Open up a 700 x 700 blank canvas.
Flood fill white.
Copy and paste you tube as a new layer.
Center it on your canvas.
Copy and paste 27 as a new layer.
Position at the bottom of your tube.
Copy and paste 28 as a new layer just above your white canvas.
Highlight your white canvas.
New Raster layer.
Select All.
Copy and paste Paper 9 Into Selection.
Deselect.
Apply Brush Strokes - Cross Hatch:
Stroke Length: 35
Sharpness: 11
Strength: 1
OK
Apply the mask.
Merge Group.
Highlight you tube layer.
Duplicate.
Move it to the left and up slightly.
In your Layers pallet, move it below the original tube layer.
Apply the mask (to the duplicate layer)
Change the Properties to Luminance Legacy.
Lower the Opacity to about 40.
Copy and paste 12 as a new layer.
Move into position just below the original tube layer.
Lower the Opacity to about 42.
Color Pallet:
Foreground: Patten/Paper 9
Background: Patten/Paper 8
Stroke set at 2
Set the direction of your font to go up and down.
Type your name out.
If the letters are too far apart play around with your Kerning setting -
The negative numbers bring the letters closer together.
Convert your name to a Raster layer.
Select All/Float/Defloat
Selections/Modify/Contract by 2
Give it a slight Inner Bevel:
Apply Greg’s Factory Output Vol. II - Pool Shadow:
Use Default Settings accept lower the Intensity bar to 57.
OK
Deselect.
Add your copyrights.
Crop your Image.
Resize all layers 85%.
I hope you enjoyed this tutorial.
I’d love to see your results and show it off in my gallery.
Email me!
Hugs,
Bev
No comments:
Post a Comment