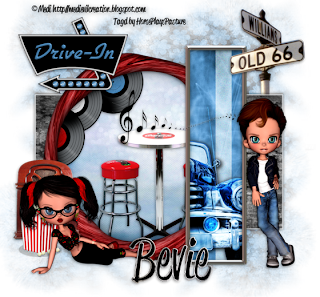
Clicking on the image will allow you to enlarge for bigger view.
Supplies
Font of Choice - I used Reklame Demo here. Add the free version to your cart and check out.
Gem mask 54 here
Creative Misfits Template here. Scroll down the blog and look for Nanc. It’s pink and says Heartbreaker on it.
Eyecandy 4000 - Chrome
Eyecandy 3,1 - Glow
Transparency - Eliminate White
“Route 66” is a PTU tagger size scrap kit created by Kara of Sweet Cravings Scraps and can be purchased from TKO Scraps. You can visit her blog here.
Thank you Kara for a kit that shouts “blast from the past“! This was so much fun to work with!
This tutorial was written assuming you have a working knowledge of PSP.
~♥~ Let’s get started ~♥~
Open up the template.
Shift + D.
Close out the original.
Image/Canvas Size
700 650
OK
Highlight the very bottom layer - Raster 12.
New Raster layer
Flood fill white.
Delete the following layers.
(starting at the top of the layers pallet)
Top 8 layers.
Splat
Tone
Heart Front
Heart Bg
White
Tone
Circle Front
Dots
Circle Med
Splat
Splat
Text
Rectangle Bg
Raster 12
Yikes! Doesn’t leave much of the template, does it?
Highlight Rectangle Front layer.
Click on it with your Magic Wand.
New Raster layer.
Copy and paste Paper 12 Into Selection.
Deselect.
Delete the template layer.
Apply Eyecandy 3.1 - Glow:
Width: 3
Opacity: 100
Opacity Dropoff: Fat
Color: White
Highlight Circle Bg layer.
Copy and paste Frame 2 as a new layer.
Resize 60% - Move into position over the Circle template layer.
Delete Circle Bg template layer - you only needed it for placement of the frame.
Highlight the frame layer.
Click inside of it with your Magic Wand.
New Raster layer below the frame.
Copy and paste Paper 1 Into Selection.
Copy and paste Table as a new layer over the paper.
Resize 40% - Move into position - see my tag for reference.
Copy and paste Records 1, 2, and 3 as new layers.
Resize each of them 35% - move into position - see my tag for reference.
Highlight the paper layer.
Click anywhere outside of it with your Magic Wand.
Highlight each of the element layers below the frame and tap the delete key.
Deselect.
Highlight Frame bg layer.
Click on it with your Magic Wand.
Copy and paste 4 as a new layer.
Resize 60% - move into position.
Selections/Invert
Tap the delete key.
Copy and paste Car as a new layer.
Resize 60% - move into position - see my tag for reference.
Tap the delete key.
Deselect.
Change the Properties to Hard Light.
Duplicate.
Highlight White Rectangle layer.
Adjust/Add Remove Noise/Add Noise:
Uniform checked
Noise: 35%
OK
Move below the bottom car layer.
Duplicate.
Highlight Frame 3 layer.
Select All/Float/Defloat
New Raster layer.
Flood fill with any color.
Deselect.
Apply Eyecandy 4000 - Chrome
Choose Outdoor from the Basic tab
Use Default Settings
Delete the template layer.
Open up Music Notes.
Shift + D.
Close out the original.
New Raster layer - move below the music note - flood fill white.
Merge Visible.
Apply Transparency - Eliminate White.
Like magic you should now just have the music notes.
Copy and paste onto your working canvas.
Resize 40%
Add your embellishments. I used:
DriveIn Sign 1: Resize 40%
Radio: Resize 35%
Popcorn: Resize 35%
Street Sign: Resize 60%
BillyBo 5: Resize 50%
Cheribomb 8: Resize 40%
Highlight your white canvas.
New Raster layer.
Select All.
Copy and paste Paper 10 Into Selection.
Deselect.
Apply the mask.
Resize 115%
Merge Group.
Add your copyrights.
Add your name.
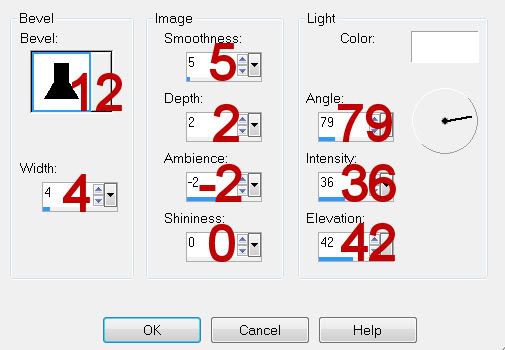
Give it a slight Inner Bevel:

Resize all layers 80%.
I hope you enjoyed this tutorial.
I’d love to see your results and show it off in my gallery.
Email me!
Hugs,
Bev
Supplies
Font of Choice - I used Reklame Demo here. Add the free version to your cart and check out.
Gem mask 54 here
Creative Misfits Template here. Scroll down the blog and look for Nanc. It’s pink and says Heartbreaker on it.
Eyecandy 4000 - Chrome
Eyecandy 3,1 - Glow
Transparency - Eliminate White
“Route 66” is a PTU tagger size scrap kit created by Kara of Sweet Cravings Scraps and can be purchased from TKO Scraps. You can visit her blog here.
Thank you Kara for a kit that shouts “blast from the past“! This was so much fun to work with!
This tutorial was written assuming you have a working knowledge of PSP.
~♥~ Let’s get started ~♥~
Open up the template.
Shift + D.
Close out the original.
Image/Canvas Size
700 650
OK
Highlight the very bottom layer - Raster 12.
New Raster layer
Flood fill white.
Delete the following layers.
(starting at the top of the layers pallet)
Top 8 layers.
Splat
Tone
Heart Front
Heart Bg
White
Tone
Circle Front
Dots
Circle Med
Splat
Splat
Text
Rectangle Bg
Raster 12
Yikes! Doesn’t leave much of the template, does it?
Highlight Rectangle Front layer.
Click on it with your Magic Wand.
New Raster layer.
Copy and paste Paper 12 Into Selection.
Deselect.
Delete the template layer.
Apply Eyecandy 3.1 - Glow:
Width: 3
Opacity: 100
Opacity Dropoff: Fat
Color: White
Highlight Circle Bg layer.
Copy and paste Frame 2 as a new layer.
Resize 60% - Move into position over the Circle template layer.
Delete Circle Bg template layer - you only needed it for placement of the frame.
Highlight the frame layer.
Click inside of it with your Magic Wand.
New Raster layer below the frame.
Copy and paste Paper 1 Into Selection.
Copy and paste Table as a new layer over the paper.
Resize 40% - Move into position - see my tag for reference.
Copy and paste Records 1, 2, and 3 as new layers.
Resize each of them 35% - move into position - see my tag for reference.
Highlight the paper layer.
Click anywhere outside of it with your Magic Wand.
Highlight each of the element layers below the frame and tap the delete key.
Deselect.
Highlight Frame bg layer.
Click on it with your Magic Wand.
Copy and paste 4 as a new layer.
Resize 60% - move into position.
Selections/Invert
Tap the delete key.
Copy and paste Car as a new layer.
Resize 60% - move into position - see my tag for reference.
Tap the delete key.
Deselect.
Change the Properties to Hard Light.
Duplicate.
Highlight White Rectangle layer.
Adjust/Add Remove Noise/Add Noise:
Uniform checked
Noise: 35%
OK
Move below the bottom car layer.
Duplicate.
Highlight Frame 3 layer.
Select All/Float/Defloat
New Raster layer.
Flood fill with any color.
Deselect.
Apply Eyecandy 4000 - Chrome
Choose Outdoor from the Basic tab
Use Default Settings
Delete the template layer.
Open up Music Notes.
Shift + D.
Close out the original.
New Raster layer - move below the music note - flood fill white.
Merge Visible.
Apply Transparency - Eliminate White.
Like magic you should now just have the music notes.
Copy and paste onto your working canvas.
Resize 40%
Add your embellishments. I used:
DriveIn Sign 1: Resize 40%
Radio: Resize 35%
Popcorn: Resize 35%
Street Sign: Resize 60%
BillyBo 5: Resize 50%
Cheribomb 8: Resize 40%
Highlight your white canvas.
New Raster layer.
Select All.
Copy and paste Paper 10 Into Selection.
Deselect.
Apply the mask.
Resize 115%
Merge Group.
Add your copyrights.
Add your name.
Give it a slight Inner Bevel:

Resize all layers 80%.
I hope you enjoyed this tutorial.
I’d love to see your results and show it off in my gallery.
Email me!
Hugs,
Bev

No comments:
Post a Comment