
 Supplies
1 tube of choice - I used the artwork of PinUpToons which can be purchased from CDO. You must have a license to use.
Font of choice - I used Dancing Script here and Jellyka Delicious Cake here
Designs by Vaybs Mask 2 here
Scraps of Enchantment Template 122 here
“Calming Waters” is a scrap kit available in both tagger and full size created by Dawn of Sunshine Daze and can be purchased from Aussie Scrap Designs. You can visit her blog here.
Thank you Dawn for another beautiful kit!
This tutorial was written assuming you have a working knowledge of PSP.
~♥~ Let’s get started ~♥~
Open up the template.
Shift + D.
Close out the original.
Resize all layers 90%
Image/Canvas Size
700 x 700
Ok
Flood fill the background layer white.
Delete the top 2 layers and Skullz layer
Highlight Large Background layer.
Click on it with your Magic Wand.
New Raster layer.
Copy and paste Paper 8 Into Selection.
Copy and paste Element 38 as a new layer.
Resize 70%
Move into position - see my tag for reference.
Selections/Invert
Tap the delete key.
Copy and paste your tube as a new layer.
Move into position - see my tag for reference.
Tap the delete key.
Change the Properties to Screen.
Deselect.
Delete the template layer.
Highlight Large Frame layer.
Click on it with your Magic Wand.
New Raster layer.
Copy and paste Paper 4 Into Selection.
Deselect.
Delete the template layer.
Adjust/Add Remove Noise/Add Noise:
Gaussian and Monochrome checked
Noise: 63%
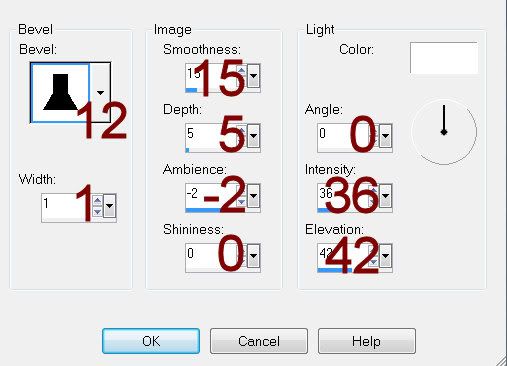
Give it a slight Inner Bevel:

Highlight Small Frame layer.
Repeat the above step.
Highlight Small BK Background layer.
Click on it with your Magic Wand.
Copy and paste Paper 2 Into Selection.
Deselect.
Delete the template layer.
Highlight Dotted Frame layer.
Select All/Float/Defloat
New Raster layer
Copy and paste Paper 5 Into Selection.
Deselect.
Delete the template layer.
Add your embellishments. I used:
9: Resize 60%
24
40: Resize 30%/Duplciate/Resize 70%
26: Resize 30%/Duplicate/Resize 70%
Highlight your white canvas.
New Raster layer.
Select All.
Copy and paste Paper 3 Into Selection.
Deselect.
Apply the mask.
Resize 105%
Merge Group.
Color Pallet:
Foreground: #000000
Background: Null
To make the tranquility quote wavy…
Make your Pen Tool active set on Freehand.
Line: Solid
Width: 2
Draw a wavy line across the canvas - see my tag for reference.
Make your Text Tool active using Dancing Script font.
Move your mouse along the center of the line until you see a Rocking A.
Click the mouse.
A text box will open up.
Type: We fluctuate long between love and hatred before we arrive at tranquility.
OK
In your layers pallet click on the + sign.
Close out the New Path layer.
Highlight Vector 1 layer.
Right Click
Convert to Raster layer.
Add your copyrights.
Add your name:
Give it a slight Inner Bevel:
Resize all layers 80%.
I hope you enjoyed this tutorial.
I’d love to see your results and show it off in my gallery.
Email me!
Hugs,
Bev
No comments:
Post a Comment