Supplies
4 tubes of choice - I used the artwork of Anna marine which can be purchased from CDO. You must have a license to use.
Font of choice - I used Wretched here
Becky Mask 22 here
“The Season‘s Colors” is a FTU tagger size scrap kit created by me, Bev of HorsePlay’s Pasture Designs and can be downloaded from my design blog here.
This tutorial was written assuming you have a working knowledge of PSP.
~♥~ Let’s get started ~♥~
Open up a 700 x 700 blank canvas.
Flood fill white.
Copy and paste 24 as a new layer.
Resize 60%
Free rotate Left 10 degrees
Paste 24 again.
Resize 25%
Free rotate Left 5 degrees
Copy and paste 25 as a new layer.
Resize 35%
Free rotate Right 5 degrees
Copy and paste 23 as a new layer.
Resize 65%
Arrange all the frames on your canvas - see my tag for reference.
The order of them in your layers pallet from bottom top to bottom is:
Littlest Frame
Medium Frame
Large Frame
Round Leaf frame.
Highlight the round leaf frame.
Click inside of it with your Magic Wand.
Selections/Modify/Expand by 4.
New Raster layer below the frame.
Copy and paste Paper 1 Into Selection.
Copy and paste your tube as a new layer above the paper.
Selections/Invert
Tap the delete key.
Deselect.
Change the Properties to Overlay.
Highlight the largest square frame.
Click inside of it with your Magic Wand.
Selections/Modify/Expand by 4.
New Raster layer below the frame.
Copy and paste Paper 6 Into Selection.
Copy and paste your tube as a new layer above the paper.
Selections/Invert
Tap the delete key.
Deselect.
Highlight the medium square frame.
Click inside of it with your Magic Wand.
Selections/Modify/Expand by 4.
New Raster layer below the frame.
Copy and paste Paper 4 Into Selection.
Copy and paste your tube as a new layer above the paper.
Selections/Invert
Tap the delete key.
Deselect.
Change the Properties to Luminance.
Highlight the smallest square frame.
Click inside of it with your Magic Wand.
Selections/Modify/Expand by 4.
New Raster layer below the frame.
Copy and paste Paper 6 Into Selection.
Copy and paste your tube as a new layer above the paper.
Selections/Invert
Tap the delete key.
Deselect.
Change the Properties to Luminance (Legacy).
Open up 19.
Use your Selection Tool and section off the rock area of the left side.
Copy
Paste on your working canvas and position behind the bottom of the largest frame.
Duplicate/Mirror
Add your embellishments. I used:
16: Resize 70%
19: Resize 45%
18: Resize 25%
27: Resize 45%
28: Resize 35%
5: Resize 40%
15: Resize 35%/Duplciate/Mirror/Resize 70%
32: Resize 60%
20, 21, and 22: Resize 70%
Highlight your white canvas.
New Raster layer.
Select All
Copy and paste Paper 3 Into Selection.
Deselect.
Apply the mask.
Merge Group.
Add your copyrights.
Add your name:
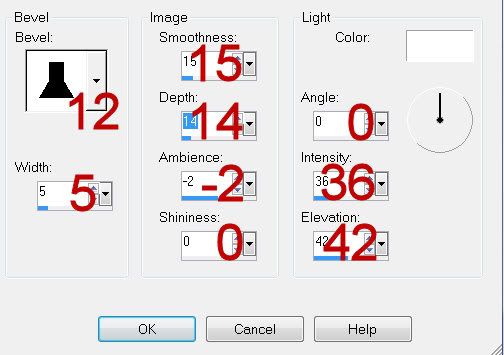
Give it a slight Inner Bevel:

Resize all layers 80%.
I hope you enjoyed this tutorial.
I’d love to see your results and show it off in my gallery.
Email me!
Hugs,
Bev


No comments:
Post a Comment