

Supplies
1 tube of choice - I used the artwork of Jessica Dougherty which can be purchased from CDO. You must have a license to use.
Font of choice - I used Scotosaurus here
Designs by Vaybs Template 0510 here. It’s part of a 3 piece forum set.
Plug Ins:
Greg’s Factory Output Vol. II - Pool Shadow
“Bad Candy” is a tagger size scrap kit created by Aurelie of Pink Candy Designs and can be purchased from Twilight Scraps. You can visit her blog here.
Thank you Aurelie for another fantastic kit!!
This tutorial was written assuming you have a working knowledge of PSP.
~♥~ Let’s get started ~♥~
Open up template 0510.
Shift + D.
Close out the original.
Resize all layers 85%
Image/Canvas Size
700 x 600
Ok
Flood fill Raster 1 layer white.
Delete the following layers:
Delete the top 7 layers, Circle 3, Circle 4, and Circle 5 layers.
Highlight Circle 1 layer.
Click on it with your Magic Wand.
New Raster layer.
Copy and paste Paper 2 Into Selection.
Deselect.
Delete the template layer.
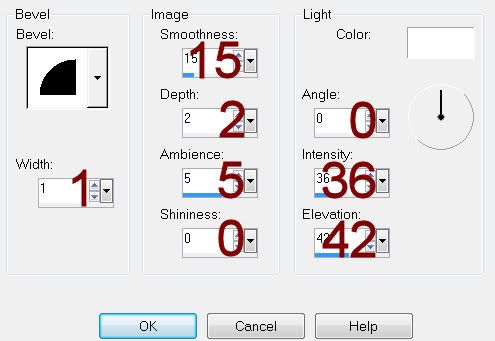
Give it a slight Inner Bevel:
Highlight Circle 2 layer.
Repeat the above step.
Highlight Rectangle 1 layer.
Click on it with your Magic Wand.
New Raster layer.
Copy and paste Paper 5 Into Selection.
Deselect.
Delete the template layer.
Give it the same slight inner bevel.
Highlight Rectangle 3 layer.
Repeat the above step.
Highlight Rectangle 2 layer.
Click anywhere outside of it with your Magic Wand.
Selections/Invert
New Raster layer.
Copy and paste Paper 6 Into Selection.
Deselect.
Delete the template layer.
Adjust/Add Remove Noise/Add Noise:
Gaussian and Monochrome checked:
Noise: 43%
OK
Highlight Rectangle Brace layer.
Click on it with your Magic Wand.
New Raster layer.
Copy and paste Paper 1 Into Selection.
Apply Greg’s Factory Output Vol. II - Pool Shadow:
Use Default Settings.
Deselect.
Delete the template layer.
Highlight Circle 7 layer.
Click anywhere outside of it with your Magic Wand.
Selections/Invert
New Raster layer.
Copy and paste Paper 6 Into Selection.
Add the same noise effect.
Deselect.
Highlight Circle 7 layer again.
Click on it with your Magic Wand.
New Raster layer above the round noise paper.
Copy and paste Paper 2 Into Selection.
Apply the same Pool Shadow effect.
Deselect.
Delete the template layer.
Highlight Rectangle 4 layer.
Click on it with your Magic Wand.
New Raster layer.
Copy and paste Paper 10 Into Selection.
Deselect.
Delete the template layer.
Give it the same slight Inner Bevel.
Copy and paste your tube as a new layer.
Add your embellishments. I used:
Fluffy Heart: Free rotate Left 15 degrees/Duplicate/Mirror
Candy: Free rotate Left 45 degrees - erase wrapper ends of candy if they stick out from behind the hearts
Flame: Resize 60%/Duplicate/Change the Properties to Soft Light
Bow 2: Resize 30%/Duplicate/Mirror
Martini: Resize 25%
Roses 2: Duplicate/Mirror
Butterfly 3: Resize 40%/Duplicate/Mirror
Sparkles
Hearts: Resize 40%/Free rotate Left 90 degrees/Duplicate twice for a total of 3 heart layers. Arrange them along the bottom of the rectangle. Erase what overhangs. Merge Visible all 3 layers.
Highlight your white canvas.
New Raster layer.
Select All.
Copy and paste Paper 4 Into Selection.
Deselect.
Apply the mask.
Merge Group.
Add your copyrights.
Add your name:
Foreground: Black
Background: White
Stroke: 2
Type your name.
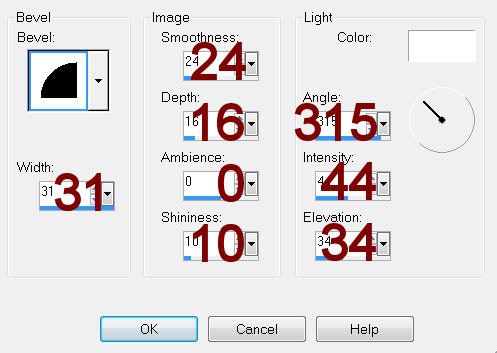
Give it a slight Inner Bevel:
Resize all layers 80%.
I hope you enjoyed this tutorial.
I’d love to see your results and show it off in my gallery.
Email me!
Hugs,
Bev
1 tube of choice - I used the artwork of Jessica Dougherty which can be purchased from CDO. You must have a license to use.
Font of choice - I used Scotosaurus here
Designs by Vaybs Template 0510 here. It’s part of a 3 piece forum set.
Plug Ins:
Greg’s Factory Output Vol. II - Pool Shadow
“Bad Candy” is a tagger size scrap kit created by Aurelie of Pink Candy Designs and can be purchased from Twilight Scraps. You can visit her blog here.
Thank you Aurelie for another fantastic kit!!
This tutorial was written assuming you have a working knowledge of PSP.
~♥~ Let’s get started ~♥~
Open up template 0510.
Shift + D.
Close out the original.
Resize all layers 85%
Image/Canvas Size
700 x 600
Ok
Flood fill Raster 1 layer white.
Delete the following layers:
Delete the top 7 layers, Circle 3, Circle 4, and Circle 5 layers.
Highlight Circle 1 layer.
Click on it with your Magic Wand.
New Raster layer.
Copy and paste Paper 2 Into Selection.
Deselect.
Delete the template layer.
Give it a slight Inner Bevel:
Highlight Circle 2 layer.
Repeat the above step.
Highlight Rectangle 1 layer.
Click on it with your Magic Wand.
New Raster layer.
Copy and paste Paper 5 Into Selection.
Deselect.
Delete the template layer.
Give it the same slight inner bevel.
Highlight Rectangle 3 layer.
Repeat the above step.
Highlight Rectangle 2 layer.
Click anywhere outside of it with your Magic Wand.
Selections/Invert
New Raster layer.
Copy and paste Paper 6 Into Selection.
Deselect.
Delete the template layer.
Adjust/Add Remove Noise/Add Noise:
Gaussian and Monochrome checked:
Noise: 43%
OK
Highlight Rectangle Brace layer.
Click on it with your Magic Wand.
New Raster layer.
Copy and paste Paper 1 Into Selection.
Apply Greg’s Factory Output Vol. II - Pool Shadow:
Use Default Settings.
Deselect.
Delete the template layer.
Highlight Circle 7 layer.
Click anywhere outside of it with your Magic Wand.
Selections/Invert
New Raster layer.
Copy and paste Paper 6 Into Selection.
Add the same noise effect.
Deselect.
Highlight Circle 7 layer again.
Click on it with your Magic Wand.
New Raster layer above the round noise paper.
Copy and paste Paper 2 Into Selection.
Apply the same Pool Shadow effect.
Deselect.
Delete the template layer.
Highlight Rectangle 4 layer.
Click on it with your Magic Wand.
New Raster layer.
Copy and paste Paper 10 Into Selection.
Deselect.
Delete the template layer.
Give it the same slight Inner Bevel.
Copy and paste your tube as a new layer.
Add your embellishments. I used:
Fluffy Heart: Free rotate Left 15 degrees/Duplicate/Mirror
Candy: Free rotate Left 45 degrees - erase wrapper ends of candy if they stick out from behind the hearts
Flame: Resize 60%/Duplicate/Change the Properties to Soft Light
Bow 2: Resize 30%/Duplicate/Mirror
Martini: Resize 25%
Roses 2: Duplicate/Mirror
Butterfly 3: Resize 40%/Duplicate/Mirror
Sparkles
Hearts: Resize 40%/Free rotate Left 90 degrees/Duplicate twice for a total of 3 heart layers. Arrange them along the bottom of the rectangle. Erase what overhangs. Merge Visible all 3 layers.
Highlight your white canvas.
New Raster layer.
Select All.
Copy and paste Paper 4 Into Selection.
Deselect.
Apply the mask.
Merge Group.
Add your copyrights.
Add your name:
Foreground: Black
Background: White
Stroke: 2
Type your name.
Give it a slight Inner Bevel:
Resize all layers 80%.
I hope you enjoyed this tutorial.
I’d love to see your results and show it off in my gallery.
Email me!
Hugs,
Bev
No comments:
Post a Comment