

Clicking on the image will allow you to enlarge for bigger view.
Supplies
1 tube of choice - I used the artwork of Gary George which can be purchased from My Tubed Art. You must obtain a license to use.
Font of Choice - I used Dancing Script OT here and Clive Barker here
Divine Intentionz Template 308 here
My Mask 9 here
“Cherry Blossom” is a PTU scrap kit created by Susan of TootyPups Scraps and can be purchased from Twilight Scraps. You can visit her blog here.
This kit is truly beautiful. Thank you Susan!
This tutorial was written assuming you have a working knowledge of PSP.
~♥~ Let’s get started ~♥~
Open up the template.
Shift + D.
Close out the original.
Resize all layers 85%
Image/Canvas size 700 x 600
OK
Highlight and open up the background layer.
Flood fill white.
Delete the top 6 layers, ho ho ho, Star 2, Star 1, and Naughty.
Highlight Glittered Oval Shape layer.
Click anywhere outside of it with your Magic Wand.
Selections/Invert
New Raster layer
Copy and paste Paper 11 Into Selection.
Adjust/Add Remove Noise/Add Noise:
Uniform and Monochrome checked
Noise: 43%
OK
Deselect.
Delete the template layer.
Repeat the above step with Glittered Circle 1 layer, Large Glittered Circle layer, and Glittered Circle 3 layer.
Highlight Oval layer.
Click on it with your Magic Wand.
New Raster layer.
Copy and paste Paper 12 Into Selection.
Deselect.
Highlight Circle 1 layer.
Click on it with your Magic Wand.
New Raster layer.
Copy and paste Paper 10 Into Selection.
Deselect.
Copy and paste Lantern 7 as a new layer.
Resize 30%
Move into position over the paper layer.
Change the Properties to Overlay.
Highlight Large Circle layer.
Click on it with your Magic Wand.
New Raster layer.
Copy and paste Paper 8 Into Selection.
Copy and paste your tube as a new layer.
Move into position over the paper layer.
Selection/Invert
Tap the delete key.
Change the Properties of the tube layer to Overlay.
Deselect.
Delete the template layer.
Highlight Circle 2 layer.
Click on it with your Magic Wand.
New Raster layer.
Copy and paste Paper 8 Into Selection.
Deselect for now.
Copy and paste Bird Branch 2
Mirror
Resize 60% - position over the paper layer.
Highlight the paper layer.
Click anywhere outside of the paper.
Highlight the bird layer.
Tap the delete key.
Deselect.
Highlight Dotted Circle layer.
Select All/Float/Defloat
New Raster layer.
Copy and paste Paper 11 Into Selection.
Apply the same Noise effect.
Deselect.
Delete the template layer.
Highlight Circle 3 layer.
Click on it with your Magic Wand.
New Raster layer.
Copy and paste Paper 9 Into Selection.
Deselect for now.
Copy and paste Blossom Tree 3 as a new layer.
Resize 70%/Mirror
Move into position over the paper layer..
Copy and paste your tube as a new layer just above the paper layer.
Move into position.
Highlight the paper layer.
Click anywhere outside of it with your Magic Wand.
Highlight the tube layer.
Tap the delete key.
Deselect.
Change the Properties to Soft Light.
Add your embellishments. I used:
Cherry Blossom Sprig 3 - Resize 60% - position at the left side just above the oval.
Cherry Blossom Sprig 3 again: Resize 60% and 90%/Mirror/Position at the right side behind the oval.
Butterfly 1: Resize 25% and 50%
Butterfly 2: Resize 25% and 35%
Bird Branch 2: Resize 50%/Mirror
Brella 5: Resize 25%
Pear Blossom 3: Resize 60%/Position just above the white canvas so leaves just peek out at the top of the oval. Erase the trunk/Duplicate/Mirror.
Make your Pen Tool active set on Freehand.
Color Pallet:
Foreground: Black
Background: closed off
Stroke 2
Draw out a wavy line.
Make your Text tool active using Dancing Script Font and move it along the center of the line until you see a Rocking A. When you do, click your mouse.
A text box will open up.
Type out the words “I will write peace on your wings and you will fly all over the world” or whatever quote/saying of your choice.
Apply.
In your layers pallet click on the plus sign.
Close out the New Path layer.
Highlight Vector 1 layer.
Right click on your mouse.
Convert to Raster layer.
Highlight your white background.
New Raster layer.
Select All.
Copy and paste a paper of choice Into Selection.
Deselect.
Apply the mask.
Use your Pick Tool and pull the sides out until they’re evenly showing around the oval layer.
Merge Group.
Add your copyrights.
Add your name.
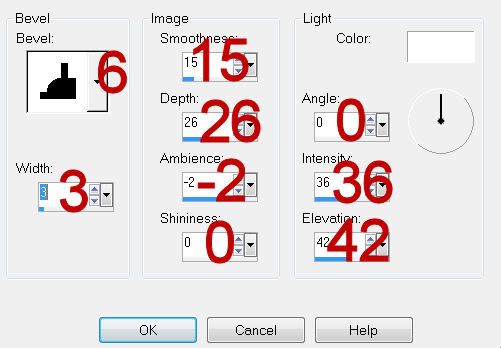
Give it the same Inner Bevel:
Resize all layers 85%.
I hope you enjoyed this tutorial.
I’d love to see your results and show it off in my gallery.
Email me!
Hugs,
Bev
Supplies
1 tube of choice - I used the artwork of Gary George which can be purchased from My Tubed Art. You must obtain a license to use.
Font of Choice - I used Dancing Script OT here and Clive Barker here
Divine Intentionz Template 308 here
My Mask 9 here
“Cherry Blossom” is a PTU scrap kit created by Susan of TootyPups Scraps and can be purchased from Twilight Scraps. You can visit her blog here.
This kit is truly beautiful. Thank you Susan!
This tutorial was written assuming you have a working knowledge of PSP.
~♥~ Let’s get started ~♥~
Open up the template.
Shift + D.
Close out the original.
Resize all layers 85%
Image/Canvas size 700 x 600
OK
Highlight and open up the background layer.
Flood fill white.
Delete the top 6 layers, ho ho ho, Star 2, Star 1, and Naughty.
Highlight Glittered Oval Shape layer.
Click anywhere outside of it with your Magic Wand.
Selections/Invert
New Raster layer
Copy and paste Paper 11 Into Selection.
Adjust/Add Remove Noise/Add Noise:
Uniform and Monochrome checked
Noise: 43%
OK
Deselect.
Delete the template layer.
Repeat the above step with Glittered Circle 1 layer, Large Glittered Circle layer, and Glittered Circle 3 layer.
Highlight Oval layer.
Click on it with your Magic Wand.
New Raster layer.
Copy and paste Paper 12 Into Selection.
Deselect.
Highlight Circle 1 layer.
Click on it with your Magic Wand.
New Raster layer.
Copy and paste Paper 10 Into Selection.
Deselect.
Copy and paste Lantern 7 as a new layer.
Resize 30%
Move into position over the paper layer.
Change the Properties to Overlay.
Highlight Large Circle layer.
Click on it with your Magic Wand.
New Raster layer.
Copy and paste Paper 8 Into Selection.
Copy and paste your tube as a new layer.
Move into position over the paper layer.
Selection/Invert
Tap the delete key.
Change the Properties of the tube layer to Overlay.
Deselect.
Delete the template layer.
Highlight Circle 2 layer.
Click on it with your Magic Wand.
New Raster layer.
Copy and paste Paper 8 Into Selection.
Deselect for now.
Copy and paste Bird Branch 2
Mirror
Resize 60% - position over the paper layer.
Highlight the paper layer.
Click anywhere outside of the paper.
Highlight the bird layer.
Tap the delete key.
Deselect.
Highlight Dotted Circle layer.
Select All/Float/Defloat
New Raster layer.
Copy and paste Paper 11 Into Selection.
Apply the same Noise effect.
Deselect.
Delete the template layer.
Highlight Circle 3 layer.
Click on it with your Magic Wand.
New Raster layer.
Copy and paste Paper 9 Into Selection.
Deselect for now.
Copy and paste Blossom Tree 3 as a new layer.
Resize 70%/Mirror
Move into position over the paper layer..
Copy and paste your tube as a new layer just above the paper layer.
Move into position.
Highlight the paper layer.
Click anywhere outside of it with your Magic Wand.
Highlight the tube layer.
Tap the delete key.
Deselect.
Change the Properties to Soft Light.
Add your embellishments. I used:
Cherry Blossom Sprig 3 - Resize 60% - position at the left side just above the oval.
Cherry Blossom Sprig 3 again: Resize 60% and 90%/Mirror/Position at the right side behind the oval.
Butterfly 1: Resize 25% and 50%
Butterfly 2: Resize 25% and 35%
Bird Branch 2: Resize 50%/Mirror
Brella 5: Resize 25%
Pear Blossom 3: Resize 60%/Position just above the white canvas so leaves just peek out at the top of the oval. Erase the trunk/Duplicate/Mirror.
Make your Pen Tool active set on Freehand.
Color Pallet:
Foreground: Black
Background: closed off
Stroke 2
Draw out a wavy line.
Make your Text tool active using Dancing Script Font and move it along the center of the line until you see a Rocking A. When you do, click your mouse.
A text box will open up.
Type out the words “I will write peace on your wings and you will fly all over the world” or whatever quote/saying of your choice.
Apply.
In your layers pallet click on the plus sign.
Close out the New Path layer.
Highlight Vector 1 layer.
Right click on your mouse.
Convert to Raster layer.
Highlight your white background.
New Raster layer.
Select All.
Copy and paste a paper of choice Into Selection.
Deselect.
Apply the mask.
Use your Pick Tool and pull the sides out until they’re evenly showing around the oval layer.
Merge Group.
Add your copyrights.
Add your name.
Give it the same Inner Bevel:
Resize all layers 85%.
I hope you enjoyed this tutorial.
I’d love to see your results and show it off in my gallery.
Email me!
Hugs,
Bev
Thank you so much dear Bev.
ReplyDeleteThe PUP loves your taggie to bits.
Hags from the PUP
Hi Susan,
ReplyDeleteThanks so much Susan. I'm thrilled you like it.
Bev
xoxo