

Clicking on the image will allow you to enlarge for bigger view.
Supplies
1 tube of choice - I used the artwork of Anna Marine which can be purchased from CDO. You must use a license to use.
Font of Choice - I used Epittazio here
Weescotlass Mask 297 here
Scrapity Scrap Template 22 here
“Seasons” is a massive collaboration put together by many many designers in the scrapping and tagging community to help with the devastation in New Zealand caused by the tragic earthquake. This collaboration is FTU after a donation of $10 USD to the Salavation Army of NZ is made. Please visit Taggers Together for New Zealand to read more on how these talented designers are helping with this cause and to make your donation. This portion of the collaboration was created by Tammy of TLP Designz. Please visit her blog here.
This tutorial was written assuming you have a working knowledge of PSP.
~♥~ Let’s get started ~♥~
Open up the template.
Shift + D.
Close out the original.
Delete the top layer.
Image/Canvas size:
700 x 500
OK
Highlight Raster 1 layer.
Flood fill white.
Highlight Top Thin Slats layer.
Select All/Float/Defloat
New Raster layer.
Copy and paste Paper 14 Into Selection.
Deselect.
Delete the template layer.
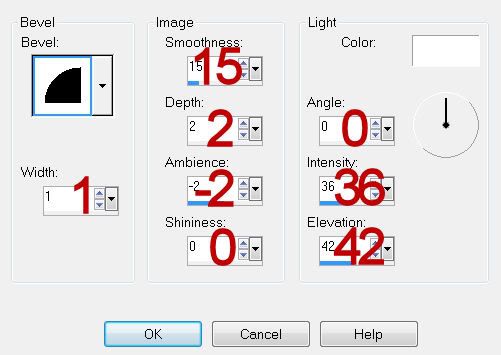
Give it a slight Inner Bevel:
Repeat the above step with Bottom Thin Slats
Highlight Circle layer.
Click on it with your Magic Wand.
New Raster layer.
Copy and paste Paper 9 Into Selection.
Copy and paste your tube as a new layer above the paper.
Duplicate/Close this layer off for now.
Selections/Invert
Highlight your original tube layer.
Selections/Invert
Tap the delete key.
Deselect.
Highlight Top Square layer.
In your layers pallet move it just above Bottom Square layer.
Merge Down.
Move this merged layer just above Middle Square layer.
Merge Down.
All 3 square should be on one layer now.
Click on it with your Magic Wand.
Copy and paste Paper 9 Into Selection.
Deselect.
Reopen your Duplicate tube layer.
Mirror/Move it just above the 3 square paper layer in your layers pallet.
Use your Arrow key to get it into position.
Highlight the paper layer.
Click anywhere outside of it with your Magic Wand.
Highlight the tube layer.
Tap the delete key.
Deselect.
Change the Properties to Hard Light.
Highlight Circle Border layer.
Select All/Float/Defloat
New Raster layer
Copy and paste Paper 4 Into Selection.
Deselect.
Delete the template layer.
Give it a slight Inner Bevel:
Same settings.
Repeat the above step with Border Top, Bottom, and Middle Square layers.
Add your embellishments. I used:
Butterfly 4: Resize 35%/Free rotate Left 15 degrees
Flower 3: Resize 35%
Flower 1: Resize 25%/Duplicate
Leaves 2: Position behind the triple frames/erase what you don’t want seen
Highlight the white background layer.
New Raster layer.
Select All.
Copy and paste Paper 15 Into Selection.
Deselect.
Apply the mask.
Merge Group.
Add your copyrights.
Add your name.
Give it the same Inner Bevel.
Resize all layers 80%.
I hope you enjoyed this tutorial.
I’d love to see your results and show it off in my gallery.
Email me!
Hugs,
Bev
No comments:
Post a Comment