Supplies
1 tube of choice - I’m using the wonderful artwork of Dave Nestler which you can purchase here.
Font of Choice - I used Ma Sexy here
Kreations Mask 71 here - If you know who this mask belongs to can you please email me so that I can give proper credit? Thanks.
Valentine Day Template (He Loves Me) by Country Bug here - you can find it under January 24th posting. Please leave a simple ty when downloading. It’s a small gesture for hard work given freely.
This tutorial was written assuming you have a working knowledge of PSP.
~♥~ Let’s get started ~♥~
Open up the template.
Resize all layers 120%.
Delete the credit and mask layers.
Highlight Rectangle Bg layer.
Select All/Float/Defloat
Flood fill with a gradient of your choice using 2 colors that will match your tube.
Deselect.
Select All/Float/Defloat
Flood fill with a gradient of your choice using 2 colors that will match your tube.
Deselect.
Copy and paste your tube as a new layer at the top of your layers pallet.
Move it into about the position you’ll want it.
Duplicate/Resize much larger and move into position just over the rectangle layer. (See my tag for reference)
Highlight the rectangle layer.
Select All/Float/Defloat
Selections/Invert
Highlight your enlarged tube layer and tap the delete key.
Deselect.
Change the Properties to Soft Light.
Highlight Rectangle Frame layer.
Select All/Float/Defloat
Flood fill with a dark color from your tube.
Deselect.
Delete the template layer.
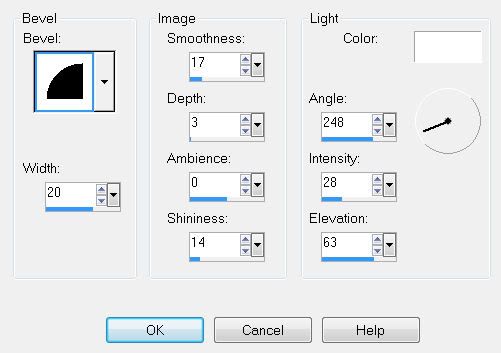
Give the frame a slight inner bevel:

Highlight Word Art 1 layer.
Select All/Float/Defloat
Flood fill with the same dark color you used for your frame.
Selections/Modify/Contract by 1.
Flood fill with the lightest color from your gradient.
Give it the same inner bevel.
Repeat the inner bevel.
Deselect.
Highlight Word Art 2 layer.
Repeat the above step.
Highlight Heart 2 layer.
Select All/Float/Defloat
New Raster layer
Use the same colors your did for the gradient in the rectangle accept change the angle and flood fill the heart.
DO NOT DESELECT
Adjust/Blur/Gaussian Blur:
Radius: 10
OK
Merge Down.
Give it the same Inner Bevel.
Repeat the above step with Heart layers 1 & 3 accept flood fill each with a plain color from your gradient.
Crop your image.
Highlight your white background.
New Raster layer.
Flood fill with the light color you used in your gradient.
New Raster layer.
Flood will with the dark color you used in your gradient.
To each layer:
Apply the mask.
Merge Group.
Move one mask slightly up and the to the left.
The other mask slightly down and to the right.
Add your copyrights.
Add your name.
Give it the same slight inner bevel.
Repeat the bevel.
Adjust/Add Remove Noise/Add Noise
Gaussian and Monochrome checked
Noise: 20%
OK
I hope you enjoyed this tutorial.
I’d love to see your results and show it off in my Show Arena.
Email me!
Hugs,
Bev
Bev


No comments:
Post a Comment