

Clicking on the image will allow you to enlarge for bigger view.
Supplies
3 tubes of choice - I used the artwork of Anna Marine at CILM
Font of Choice - I used Oh Lara - a pay font
Weescotlass mask 297 here
Brush Strokes: Sprayed Strokes - optional
Xenofex 2: Burnt Edges
Artmama Made Template 5 here - click on Templates at the top of the blog.
“Beary Autumn” is a PTU tagger size scrap kit created by Valerie of BabyV Dezigns and can be purchased from Stargazer Scraps. You can visit her site here.
Thank you Valerie for such a warm and wonderful autumn kit!
This tutorial was written assuming you have a working knowledge of PSP.
~♥~ Let’s get started ~♥~
Open up the template.
Shift + D.
Close out the original.
Delete the top layer and Dots layer.
Flood fill Raster 3 white.
In your Color Pallet:
Foreground: #c2610c
Background: #f4d0a9
Highlight Strips layer.
Select All/Float/Defloat
New Raster layer.
Flood fill with the foreground color.
Deselect.
Delete the template layer.
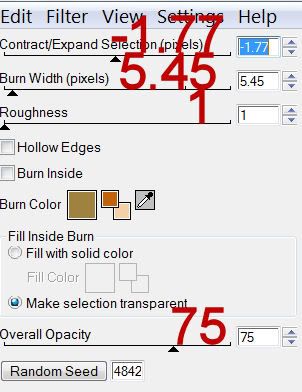
Apply Xenofex - Burnt Edges:
Highlight Oval layer.
Select All/Float/Defloat
New Raster layer.
Flood fill with #000000
Selections/Modify/Contract by 5
OK
New Raster layer.
Flood fill with #c2610c
Copy and paste your tube as a new layer - move into position over the oval.
Selections/Invert
Tap the delete.
Deselect.
Delete the template layer.
Highlight Back Rectangle layer.
Select All/Float/Defloat
New Raster layer.
Flood fill with #000000
Selections/Modify/Contract by 3
New Raster layer.
Make a gradient with your foreground and background colors I have at the beginning of this tutorial.
Angle: 45
Repeat: 1
Invert checked.
Flood fill the layer.
New Raster layer.
Flood fill again
Adjust/Blur/Gaussian blur:
Radius: 20
OK
Copy and paste another tube as a new layer above the blurred gradient.
Selections/Invert
Tap the delete key.
Deselect.
Delete the template layer.
Change the Properties to Multiply.
Highlight Front Rectangle.
Repeat the above steps using a different tube.
Add your embellishments. I used:
Trim: Resize 50%/Duplicate as needed to position over the strips
Butterfly Bling: Resize 80%
Ribbon: Resize 70%
Tree 2
Flower 1: Resize 50%/Duplicate/Resize 70%
Flower 6
Butterfly: Resize 50%/Free rotate right 30 degrees
Crop your image.
Highlight your white background.
Select All.
New Raster layer.
Copy and paste Paper 3 Into Selection.
Deselect.
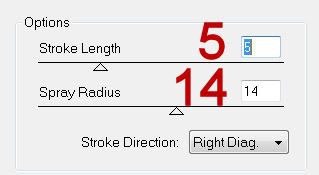
Apply Brush Strokes - Sprayed Strokes:
Apply the mask.
Merge Group.
Add your credits.
Add your name:
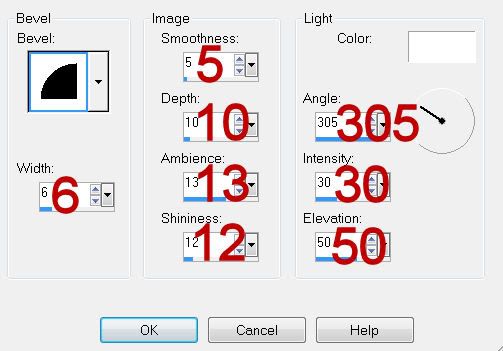
Give it a slight Inner Bevel:
Resize all layers 90%.
I hope you enjoyed this tutorial.
I’d love to see your results and show it off in my gallery.
Email me!
Hugs,
Bev
Supplies
3 tubes of choice - I used the artwork of Anna Marine at CILM
Font of Choice - I used Oh Lara - a pay font
Weescotlass mask 297 here
Brush Strokes: Sprayed Strokes - optional
Xenofex 2: Burnt Edges
Artmama Made Template 5 here - click on Templates at the top of the blog.
“Beary Autumn” is a PTU tagger size scrap kit created by Valerie of BabyV Dezigns and can be purchased from Stargazer Scraps. You can visit her site here.
Thank you Valerie for such a warm and wonderful autumn kit!
This tutorial was written assuming you have a working knowledge of PSP.
~♥~ Let’s get started ~♥~
Open up the template.
Shift + D.
Close out the original.
Delete the top layer and Dots layer.
Flood fill Raster 3 white.
In your Color Pallet:
Foreground: #c2610c
Background: #f4d0a9
Highlight Strips layer.
Select All/Float/Defloat
New Raster layer.
Flood fill with the foreground color.
Deselect.
Delete the template layer.
Apply Xenofex - Burnt Edges:
Highlight Oval layer.
Select All/Float/Defloat
New Raster layer.
Flood fill with #000000
Selections/Modify/Contract by 5
OK
New Raster layer.
Flood fill with #c2610c
Copy and paste your tube as a new layer - move into position over the oval.
Selections/Invert
Tap the delete.
Deselect.
Delete the template layer.
Highlight Back Rectangle layer.
Select All/Float/Defloat
New Raster layer.
Flood fill with #000000
Selections/Modify/Contract by 3
New Raster layer.
Make a gradient with your foreground and background colors I have at the beginning of this tutorial.
Angle: 45
Repeat: 1
Invert checked.
Flood fill the layer.
New Raster layer.
Flood fill again
Adjust/Blur/Gaussian blur:
Radius: 20
OK
Copy and paste another tube as a new layer above the blurred gradient.
Selections/Invert
Tap the delete key.
Deselect.
Delete the template layer.
Change the Properties to Multiply.
Highlight Front Rectangle.
Repeat the above steps using a different tube.
Add your embellishments. I used:
Trim: Resize 50%/Duplicate as needed to position over the strips
Butterfly Bling: Resize 80%
Ribbon: Resize 70%
Tree 2
Flower 1: Resize 50%/Duplicate/Resize 70%
Flower 6
Butterfly: Resize 50%/Free rotate right 30 degrees
Crop your image.
Highlight your white background.
Select All.
New Raster layer.
Copy and paste Paper 3 Into Selection.
Deselect.
Apply Brush Strokes - Sprayed Strokes:
Apply the mask.
Merge Group.
Add your credits.
Add your name:
Give it a slight Inner Bevel:
Resize all layers 90%.
I hope you enjoyed this tutorial.
I’d love to see your results and show it off in my gallery.
Email me!
Hugs,
Bev
No comments:
Post a Comment