Supplies
1 tube of choice - I used the artwork of Jennifer Janesko at CILM
Font of Choice - I used Oh Lara - a pay font
Monti Circular mask here
Greg’s Factory Output Vol. II - Pool Shadow
Eyecandy 5: Nature - Snow Drift
Snow Animation which I’ve supplied here
Animation Shop
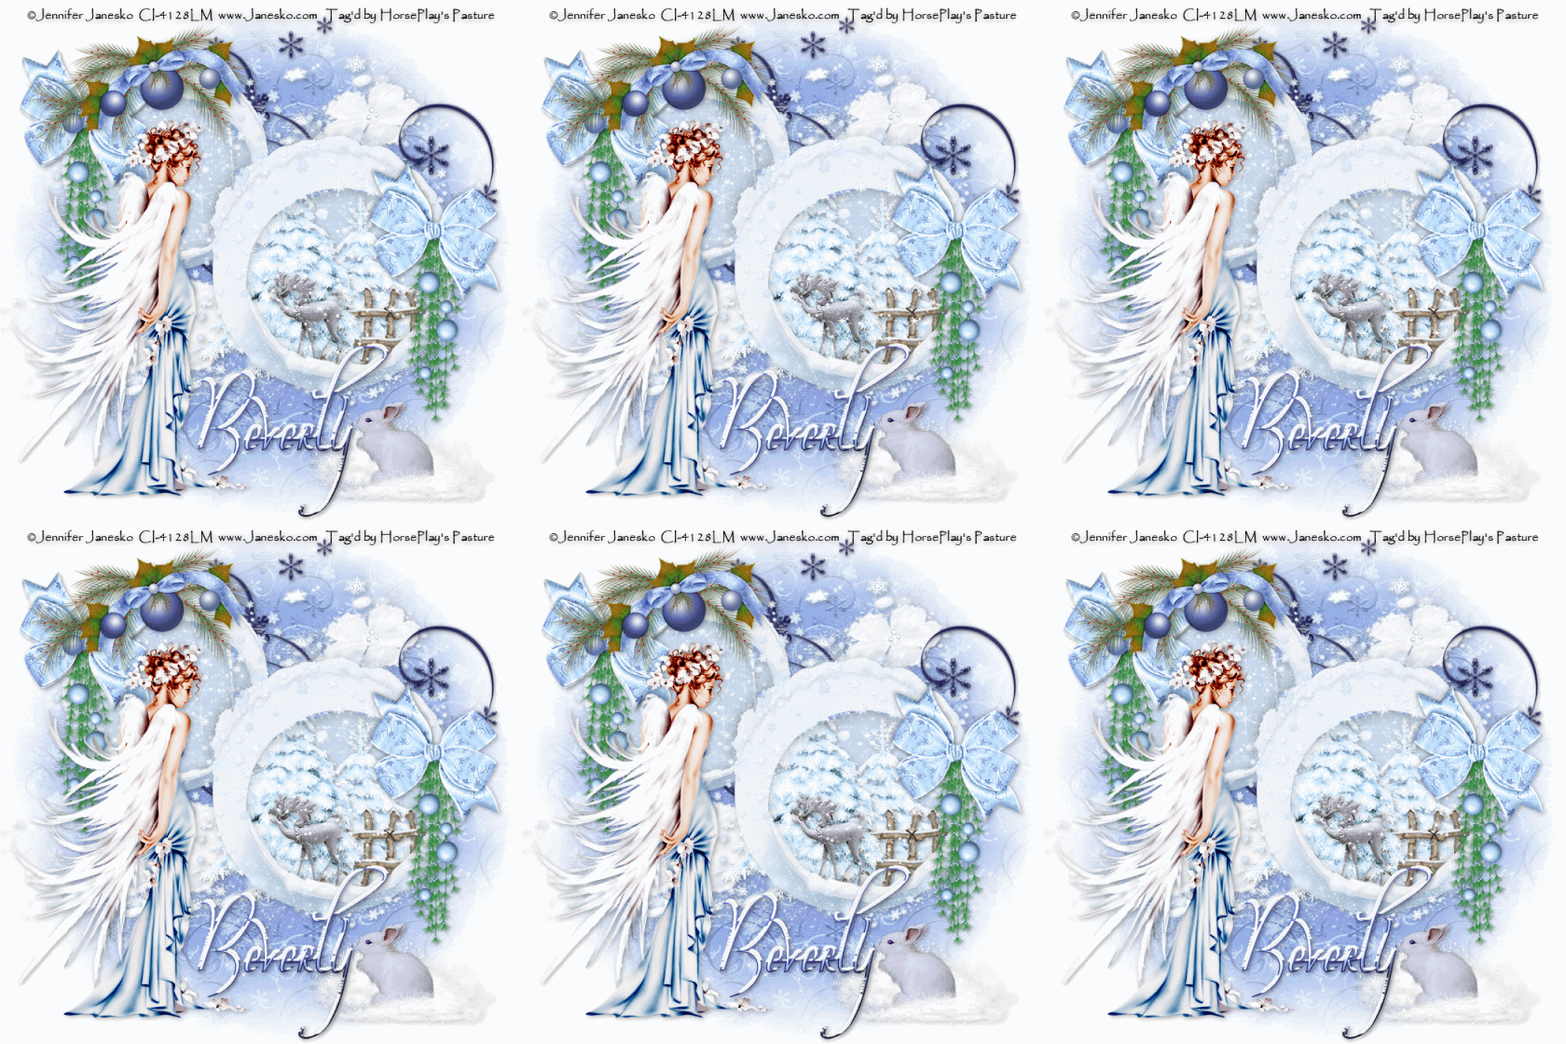
“Snowflakes Winter” is a PTU tagger size scrap kit created by Cindy of Puddicat Creations and can be purchased from Butterfly Blush Designs. You can visit her blog here.
Thank you Cindy for a kit that‘s as gentle and beautiful as a snowflake!
This tutorial was written assuming you have a working knowledge of PSP.
~♥~ Let’s get started ~♥~
Open up a 700 x 700 blank canvas.
Flood fill white.
I normally don’t apply the mask until the very end of my tutorials, but because the elements are light in color it might be easier to see so we’ll apply it now.
Select All.
New Raster layer
Copy and paste Paper 10 Into Selection.
Deselect.
Apply the Mask.
Merge Group.
Copy and paste Frame 4 as a new layer.
Resize 85%
Use your Magic Wand and click inside both of the frames.
Selections/Modify/Expand by 7.
New Raster layer below the frame.
Copy and paste Paper 12 Into Selection.
Deselect.
Copy and paste Tree 1 as a new layer.
Resize 50%
Move into position below the bottom frame at the left side - see my tag for reference.
Duplicate/lower it within the frame. If any part is peeking outside of the frame then use your Eraser Tool and erase it.
Copy and paste Deer 1 as a new layer below the frame.
Resize 25% - move into position - see my tag for reference.
Copy and paste Fence 1 as a new layer.
Resize 25%
Move into position between the trees - see my tag for reference.
Open up the snow animation that I’ve supplied.
Highlight Frame 1
Copy
Make your working canvas active and past just below the frame in your layers pallet.
Rename the layer Snow 1.
Make the animated snow frame active.
Highlight Snow 2.
Copy
Make your working canvas active and paste just above Snow 1.
Rename it Snow 2.
Repeat the above steps until you have all 10 snow frames copied onto your working canvas.
It looks like quite the mess, doesn’t it?! No worries. We’ll clean it up.
Highlight the frame paper layer.
Click anywhere outside of it with your Magic Wand.
Now highlight each Snow layer and tap the delete key.
Close out all snow layers accept for Snow 1.
Add your embellishments. I used:
Deco Ball 1: Resize 60%
Snow 2: Resize 80%
Doodle 2: Resize 60%/Mirror/Erase any of it that you can see through the frames.
Bunny 1: Resize 40%
Bow 1: Resize 40%
Heart Deco 1: Resize 70%/Move behind the bow and erase the Heart.
Copy and paste your tube as a new layer.
Add your credits.
Add your name.
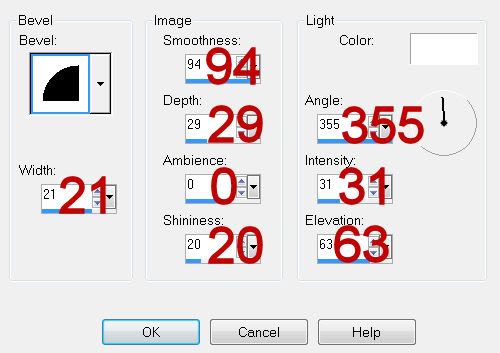
Give it a slight inner bevel:

Apply Greg’s Factory Output Vol. II - Pool Shadow:
Default Settings
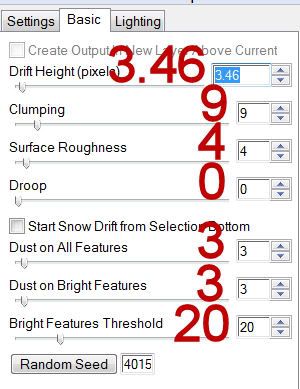
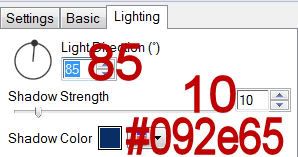
Apply Eyecandy 5: Nature - Snowdrift
Settings Tab:
Small, First Flakes
Basic Tab:

Lighting Tab:

Resize all layers 80%.
Copy Merge
~Time to Animate~
Open up AS
Edit/Paste/As New Animation
Back into PSP.
Close out Snow 1 layer.
Open up Snow 2 layer.
Copy Merge
Back into AS.
Edit/Paste/After Current Frame.
Back into PSP.
Close out Snow 2 layer.
Open up Snow 3 layer.
Copy Merge
Back into AS.
Edit/Paste/After Current Frame.
Repeat the above steps until you have all 10 frames pasted in AS.
View your Animation.
If you’re happy then resize:
Animation/Resize Animation
Percentage of Original checked.
Width x Height: 80
OK
Save your animation.
I hope you enjoyed this tutorial.
I’d love to see your results and show it off in my gallery.
Email me!
Hugs,
Bev

Great tutorial as usual! You are a wonderful tut writer! Thanks for all you do!
ReplyDeleteHey Chez :)
ReplyDeleteThank you for such kind words♥ I'm truly thrilled you enjoy my tutorials :)