

Clicking on the image will allow you to enlarge for bigger view.
Supplies
1 tube of choice - I used the artwork of Elias Chatzoudis - this particular tube was a Xmas Gift from MPT
Font of Choice - I used St. Nicholas here
Weescotlass Mask 138 here
“Christmas Past” is a PTU tagger size scrap kit created by Pixie of Kissed by Pix Design and can be purchased from her store TKO Scraps. You can visit her blog here.
Thank you Pix for a terrific Christmas kit!
This tutorial was written assuming you have a working knowledge of PSP.
~♥~ Let’s get started ~♥~
Open up a 700 x 700 blank canvas.
Flood fill white.
Copy and paste Green Curly as a new layer.
Resize 80%
Move it up slightly on your canvas.
Copy and paste Glitterbulb 2 as a new layer.
Position it so that it in front of the curly ribbon - see my rag for reference.
Duplicate the bulb - In your layers pallet move it below the ribbon.
Highlight the bulb above the ribbon and erase a small part of the topper to give it the effect as if the ribbon is curled through it.
Copy and paste Blank Button Green as a new layer.
Resize 60%
Center it over the bulb.
Copy and paste your tube as a new layer - center it over the button.
Highlight the button.
Select All/Float/Defloat
Selections/Invert
Highlight your tube.
Merge Down.
Tap the delete key.
Selections/Modify/Feather:
Number of Pixels:
53
OK
Tap the delete key until you have a nice feathered effect.
Select none.
Close out your white canvas.
Merge Visible.
Reopen your canvas.
Add your embellishments. I used:
Gift 3: Resize 60%
Snowman: Resize 60%/Mirror
Gold Cone
Red Cone/Mirror
Elf Hat: Resize 70%
Golden Deer: Resize 40%
Beads 2: Duplicate/Mirror/Flip
Snowflakes Gold, Red, and Green: Resize all 25%
Highlight your white background.
Select All.
New Raster layer.
Copy and paste a paper of choice Into Selection.
Deselect.
Apply the mask.
Resize 125%
Merge Group.
Add your credits.
Add your name.
Foreground: Black
Background: I used the yellow color from the snowman’s hat
Stroke Width: 2
Type out your name.
Convert to Raster layer.
Select All/Float/Defloat
Selections/Modify/Contract by 2
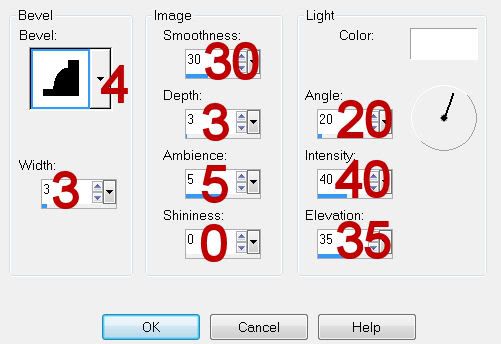
Give it a slight inner bevel:
Deselect.
Resize all layers 80%.
I hope you enjoyed this tutorial.
I’d love to see your results and show it off in my gallery.
Email me!
Hugs,
Bev
Supplies
1 tube of choice - I used the artwork of Elias Chatzoudis - this particular tube was a Xmas Gift from MPT
Font of Choice - I used St. Nicholas here
Weescotlass Mask 138 here
“Christmas Past” is a PTU tagger size scrap kit created by Pixie of Kissed by Pix Design and can be purchased from her store TKO Scraps. You can visit her blog here.
Thank you Pix for a terrific Christmas kit!
This tutorial was written assuming you have a working knowledge of PSP.
~♥~ Let’s get started ~♥~
Open up a 700 x 700 blank canvas.
Flood fill white.
Copy and paste Green Curly as a new layer.
Resize 80%
Move it up slightly on your canvas.
Copy and paste Glitterbulb 2 as a new layer.
Position it so that it in front of the curly ribbon - see my rag for reference.
Duplicate the bulb - In your layers pallet move it below the ribbon.
Highlight the bulb above the ribbon and erase a small part of the topper to give it the effect as if the ribbon is curled through it.
Copy and paste Blank Button Green as a new layer.
Resize 60%
Center it over the bulb.
Copy and paste your tube as a new layer - center it over the button.
Highlight the button.
Select All/Float/Defloat
Selections/Invert
Highlight your tube.
Merge Down.
Tap the delete key.
Selections/Modify/Feather:
Number of Pixels:
53
OK
Tap the delete key until you have a nice feathered effect.
Select none.
Close out your white canvas.
Merge Visible.
Reopen your canvas.
Add your embellishments. I used:
Gift 3: Resize 60%
Snowman: Resize 60%/Mirror
Gold Cone
Red Cone/Mirror
Elf Hat: Resize 70%
Golden Deer: Resize 40%
Beads 2: Duplicate/Mirror/Flip
Snowflakes Gold, Red, and Green: Resize all 25%
Highlight your white background.
Select All.
New Raster layer.
Copy and paste a paper of choice Into Selection.
Deselect.
Apply the mask.
Resize 125%
Merge Group.
Add your credits.
Add your name.
Foreground: Black
Background: I used the yellow color from the snowman’s hat
Stroke Width: 2
Type out your name.
Convert to Raster layer.
Select All/Float/Defloat
Selections/Modify/Contract by 2
Give it a slight inner bevel:
Deselect.
Resize all layers 80%.
I hope you enjoyed this tutorial.
I’d love to see your results and show it off in my gallery.
Email me!
Hugs,
Bev
No comments:
Post a Comment