2 tubes of choice - I used the beautiful artwork of Jay Trembly at CILM
Font of Choice - I used Tabitha Regular here
Gem’s Mask 116 here
My Template 95 here
“Spring Fever” is a FTU scrap kit created by Creation by Sanie and can be downloaded from here.
Please leave a thank you when downloading as it’s a small gesture for hard work given freely.
This tutorial was written assuming you have a working knowledge of PSP.
~♥~ Let’s get started ~♥~
Open up my template.
Shift + D.
Close out the original.
Delete the credit layer, Heart Front, and Heart Back layers.
Close out the words layer “Wild Innocence”.
Highlight Vertical Lines layer.
Select All/Float/Defloat
New Raster layer.
Copy and paste a paper of choice Into Selection.
Deselect.
Delete the template layer.
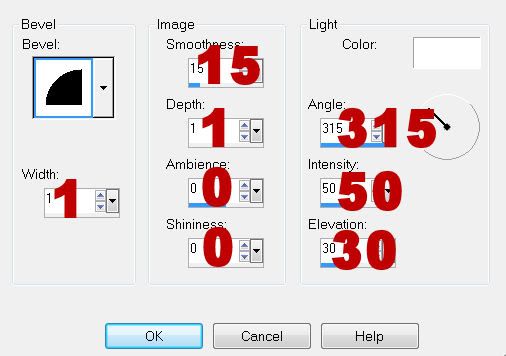
Give it an inner bevel:

Highlight Horizontal Lines layer.
Repeat the above step using the same paper.
Highlight Top Circle Frame layer.
Select All/Float/Defloat
New Raster layer.
Copy and paste a paper of choice Into Selection.
Deselect.
Delete the template layer.
Give it the same inner bevel.
Highlight Bottom Circle Frame layer.
Repeat the above step using the same paper.
Highlight Top Circle layer.
Select All/Float/Defloat
New Raster layer.
Copy and paste a paper of choice Into Selection.
Deselect.
Delete the template layer.
Highlight Bottom Circle layer.
Repeat the above step using the same paper.
Highlight the Top circle layer paper.
Copy and paste your tube as a new layer.
Move it into position below the frame.
Duplicate.
Resize the bottom tube 130% and move slightly to the side.
Position both tubes below the frame into exact position.
Highlight the paper.
Select All/Float/Defloat
Selections/Invert
Highlight each tube and tap the delete key.
Deselect.
Highlight Bottom circle layer paper.
Repeat the above step using a different tube.
Color Pallet:
Foreground - choose a dark color
Background - Set to pattern and use a paper from the kit.
Stroke: 2
Type out the words - a word on each layer:
Wild
Innocence
Merge the word layers visible once you’ve moved them into position
Convert to Raster layer.
Select All/Float/Defloat
Selections/Modify/Contract by 2
Give it the same inner bevel.
Deselect.
Add your embellishments. I used:
Element 36: Resize 50%
Element 4: Resize 40%
Element 6: Resize
Element 32: Resize 50% Duplicate/Mirror/Resize 80%
Highlight your white background.
New Raster layer.
Select All.
Copy and paste a paper of choice Into Selection.
Deselect.
Apply the mask.
Merge Group.
Add your copyrights.
Add your name and use the same steps we did for the “Wild Innocence” words.
Resize all layers 90%.
I hope you enjoyed this tutorial.
I’d love to see your results and show it off in my gallery.
Email me!
Hugs,
Bev


No comments:
Post a Comment