Supplies
1 tube of choice - I used the wonderful artwork of Michael Calandra at MPT
Font of Choice - I used Ar Blanca which came with my PC
Becky Mask 9 here
“Cherry Blossom” is a FTU scrap kit created by Sabre of Sabre’s Quill and Parchment and can be downloaded from here.
Please leave a thank you when downloading as it’s a small gesture for hard work given freely.
This tutorial was written assuming you have a working knowledge of PSP.
~♥~ Let’s get started ~♥~
Open up a 700 X 700 blank canvas.
Flood fill white.
Copy and paste Frame 4 as a new layer.
Resize 70%
Use your Magic Wand and click inside each of the frames.
Selections/Modify/Expand by 6.
New Raster layer below the frame.
Copy and paste a paper of choice Into Selection.
Deselect.
Copy and paste your tube as a new layer below the frame.
Resize if needed and position it exactly where you want it.
Duplicate/Resize much larger and move behind the smaller tube in your layers pallet.
Change the Properties to Soft Light.
Highlight the frame.
Click inside the frame with your Magic Wand.
Selections/Modify/Expand by 6.
Selections/Invert
Highlight each of your tubes and tap the delete key.
Deselect.
Add your embellishments. I used:
Bonsai Tree
Cat Tail: Mirror
Easter Kit Sabre Flower 3: Resize 80% Duplicate/Mirror/Move behind the frame to the upper left area.
Easter Kit Sabre Flower 2: Resize 40% - Move behind the frame to the lower left area. Duplciate/Flip/position where you like
Eastern Kit Sabre Feaf: Resize 40% - position near Flower 2.
Dragonfly Easter Kit Sabre: Resize 70%
Highlight your white background.
New Raster layer.
Select All.
Copy and paste a paper of choice Into Selection.
Deselect.
Apply the mask.
Merge Group.
Add your copyrights.
Add your name.
Stroke: 2
Foreground: #3e1e01
Background: Open up the frame. Choose an area with your Selection Tool and set your patten to it. Scale it to your liking.
Type your name.
Convert to Raster layer.
Select All/Float/Defloat
Selections/Modify/Contract by 2.
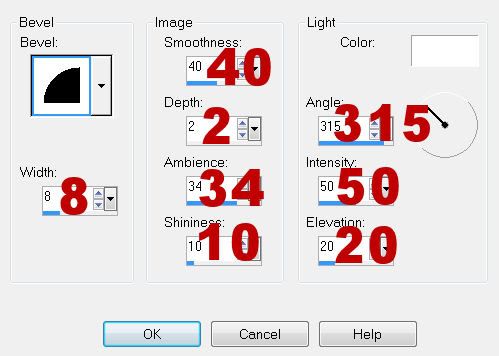
Give it an inner bevel:

Deselect.
Resize all layers 80%.
I hope you enjoyed this tutorial.
I’d love to see your results and show it off in my gallery.
Email me!
Hugs,
Bev


No comments:
Post a Comment