

Clicking on the image will enlarge to full view.
Supplies
1 tube of choice - I used the beautiful artwork of Gary George here
Font of choice - I used Kells here
Gem’s Mask 166 here
Essence of Creativity Template 73 here
DSB Flux - Bright Noise - optional
“Golden Moments” is a FTU scrap kit created by Sabre of Sabre’s Quill and Parchment and can be downloaded from here.
Please leave thank you when downloading as it‘s a small gesture for hard work given freely.
This tutorial was written assuming you have a working knowledge of PSP.
~♥~ Let’s get started ~♥~
Open up the template.
Shift + D
Close out the original.
Delete the Copyright and text layers.
Image/Canvas Size
600 X 450
Flood fill the background layer white.
Highlight Rectangles layer.
Use your Magic Wand and click on both of the rectangles.
New Raster layer.
Copy and paste a paper of choice Into Selection.
Deselect.
Delete the template layer.
Highlight Dotted Rectangles layer.
Select All/Float/Defloat
Create a new canvas - any size - and flood fill with a very dark color.
Copy
Highlight your working canvas.
New Raster layer.
Paste Into Selection
Deselect.
Delete the template layer.
Highlight Squares layer.
Use your Magic Wand and click on each square.
New Raster layer.
Copy and paste a paper of choice Into Selection.
DO NOT DESELECT.
Copy and paste your tube as a new layer.
Keep it slightly larger than what you really want.
Move it into position over the squares.
Selections/Invert
Tap the delete key.
Change the Properties to Luminance Legacy.
Delete the template layer.
Copy and pate your tube as a new layer again.
Resize smaller than what you have in your squares.
Copy and paste Ribbon 1 as a new layer.
Resize 25%
Move it into position over the top of the rectangle layer.
See my tag for reference.
Duplicate
Zoom in very close and move the duplicated ribbon layer over and match the ends up.
Merge Down.
Duplicate
Free rotate right 90 degrees.
Move this ribbon into position down the left size of the rectangle.
See my tag for reference.
We’re not done with the ribbons yet - just giving a break in the directions so you won’t get lost on me!
Highlight the top horizontal ribbon.
Using your Selection tool section off the portion that overhangs the rectangle - although DO LEAVE a tad to overhang the rectangle - see my tag for reference.
Tap the delete key.
Duplicate/Flip
Move into position at the bottom of the rectangle.
Here’s another break in the directions - I hope I didn’t lose you!
Highlight the vertical ribbon.
Using your Selection Tool again, do the same with this as you did with the other - sectioning off the ribbon that overhangs.
Tap the delete key.
Duplicate - move it to the middle of the rectangles to hide the gap in between.
Highlight the original vertical ribbon and duplicate again - move this one to the far side of the rectangles.
Copy and paste Golden Rope as a new layer.
Resize 25%
Move into position at the side of the left square.
Duplicate/Free rotate right 90 degrees
Move into position at the top of the left square.
See my tag for reference.
Merge Down.
Duplicate/Mirror/Flip
Move into position at the bottom of the right square.
Copy and paste Stick Pin as a new layer.
Free rotate right 35 degrees
Resize 70%
Move into position near the bottom right corner of the square.
Using your Eraser Tool erase a bit of the middle of the pin to make it look as if it’s stuck through.
Using your Burn Tool with these settings:
Shape: Round
Size: (will explain in a minute)
Hardness: 40
Step: 1
Density: 64
Thickness: 100
Rotation: 0
Opacity: 9
For the size: Center the burn tool over the gap in the pin. Holding down the Alt key, move your mouse to make the circle get larger or smaller. You want the circle to barely touch the pin ends.
Now click your mouse until you have the darkened effect you like on the pin.
Add your embellishments. I used:
Circle 1: Resize 50%
String Pearl Bow: Resize 50%
Flower 1: Resize 25% Duplicate/Resize 80%/Mirror
Golden Branch: Resize 70%
Highlight your white canvas.
New Raster layer.
Select All.
Copy and paste a paper of choice Into Selection.
Deselect.
Apply the mask.
Merge Group.
Add your copyrights.
Add your name.
Foreground: Dark color of choice
Background: Pattern - paper of choice
Stroke: 2
Type out your name.
Convert to Raster layer.
Select All/Float/Defloat
Selections/Modify/Contract by 2
OK
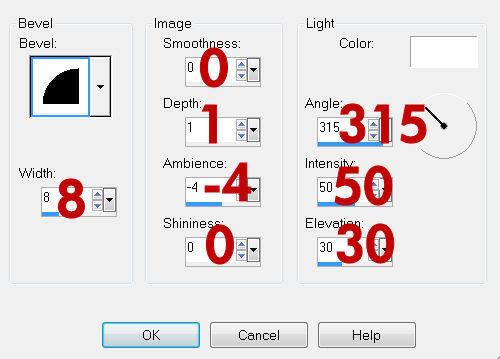
Give it a slight inner bevel:
Apply DSB Flux - Bright Noise:
Intensity: 31
Mix checked
OK
Deselect.
I hope you enjoyed this tutorial.
I’d love to see your results and show it off in my gallery.
Email me!
Hugs,
Bev
No comments:
Post a Comment