Supplies
1 tube of choice - I used the wonderful artwork of Ray Leaning here
Font of choice - I used Dream Orphans here
Gem’s Mask 136 here
“Elegance” is a FTU scrap kit created by Bluedream Designs and can be downloaded from here.
Please leave thank you when downloading as it‘s a small gesture for hard work given freely.
This tutorial was written assuming you have a working knowledge of PSP.
~♥~ Let’s get started ~♥~
Open up a 700 X 700 blank canvas.
Flood fill white.
Copy and paste Cluster Frame as a new layer.
Free rotate right 90 degrees
Resize 70%
Position to the right of your canvas.
Use your Magic Wand and click inside of each frame.
Selections/Modify/expand by 6.
New Raster layer below the frame.
Copy and paste a paper of choice Into Selection.
Deselect.
Copy and paste your tube as a new layer.
Move it into position to the left of the frame.
Duplicate/Mirror
Move the duplicate below the frame.
Highlight the frame layer.
Use your Magic Wand again and click inside of each square.
Selections/Modify/Expand by 6.
Selections/Invert
Highlight the duplicated tube layer.
Tap the delete key.
Deselect.
Lower the opacity to about 42 or so.
Merge Visible the frame, duplicated tube, and paper layers.
Copy and paste Gem as a new layer.
Resize 25% and 30%
Position the gem at the corner of the top frame.
Duplicate as many times as you need to place the gem at the corner of each of the frames.
Copy and paste Blossom as a new layer.
Mirror and position it below the merged frame layer.
Now we’re going to feather the bottom part of the blossom…
Using your Freehand Selection Tool go around the entire blossom - DON’T let the line touch any of the blossoms…only the bottom portion of the stem so you want to make sure you keep that dotted line away from the flowers.
Selections/Modify/Feather
Number of Pixels: 23
OK
Selections/Invert
Tap the delete key until you have a nice feathered look to the bottom of the blossom branch.
Deselect.
Paste the Blossom again as a new layer.
Resize 80%.
This time arrange it in your layers pallet so that it’s at the very top - in front of your tube.
Copy and paste Butterfly 1 as a new layer.
Resize 50%.
Duplicate and resize as much as you like.
Highlight your white canvas.
New Raster layer.
Select All.
Copy and paste a paper of choice Into Selection.
Deselect.
Apply the mask.
Merge Group.
Add your copyrights.
Add your name.
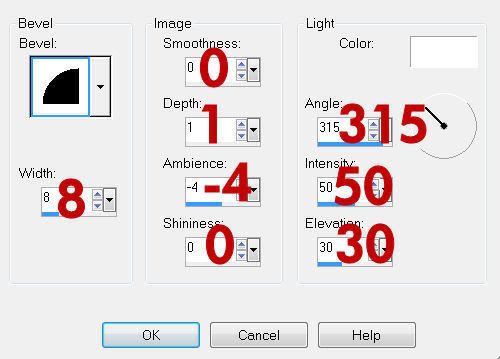
Give it a slight Inner Bevel:

Resize all layers 80%.
I hope you enjoyed this tutorial.
I’d love to see your results and show it off in my gallery.
Email me!
Hugs,
Bev


No comments:
Post a Comment