Supplies
1 tube of choice - I used the wonderful artwork of Jo Lunch here
Font of choice - I used Dream Orphans Italic here
Gem’s Mask 164 here
Essence of Creativity Template 17 here
DSB Flux - Bright Noise - Optional
“Hint of Spring” is a FTU scrap kit created by Snappy Scrappy and can be downloaded from here.
Please leave a thank you when downloading as it‘s a small gesture for hard work given freely.
This tutorial was written assuming you have a working knowledge of PSP.
~♥~ Let’s get started ~♥~
Open up the template.
Shift + D.
Close out the original.
Delete the copyright and doodle layer.
Image/Canvas Size
500 X 600
OK
Flood fill the background layer white.
The colors I used in this tutorial were chosen from the tulips in this kit.
Highlight Heart layer.
Click on it with your Magic Wand.
New Raster layer.
Flood fill with a gradient of choice.
Deselect.
Delete the template layer.
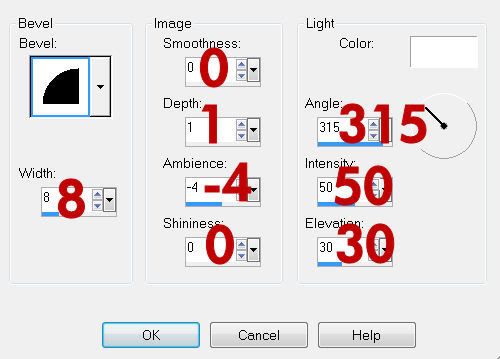
Give it a slight inner bevel:

Apply DSB Flux - Bright Noise:
Intensity: 10
Mix checked
OK
Highlight Heart Frame 1.
Click on it with your Magic Wand.
New Raster layer.
Invert your gradient and flood fill.
Deselect.
Delete the template layer.
Apply DSB Flux - Bright Noise:
Same settings.
Highlight Heart Frame Top
Click on it with your Magic Wand.
New Raster layer.
Flood fill with your gradient.
Deselect.
Delete the template layer.
Apply DSB Flux - Bright Noise:
Same settings.
Highlight Rectangle 1 layer.
Click on it with your Magic Wand.
New Raster layer.
Flood fill with a gradient of choice.
DO NOT DESELECT.
Copy and paste your tube as a new layer.
Resize as needed.
Selections/Invert
Tap the delete key.
Deselect.
Highlight Rectangle 2 layer.
Repeat the above 2 steps.
Highlight Frame 1 layer.
Click on it with your Magic Wand.
New Raster layer.
Flood fill with a color of choice.
Deselect.
Give it the same inner bevel.
Highlight Frame 2 layer.
Repeat the above step.
Add your embellishments. I used:
Blossoms: Resize 25% and 50% - Mirror
Blossom 1: Resize 40%
Blossom 2: Resize 35%
Tulip 1: Resize 25% and 50%
Tulip 2: Resize 25% and 40%
Butterflies 1 & 2: Resize 25% and 70%
Highlight your white canvas.
New Raster layer.
Flood fill with a color of choice.
Apply the mask.
Merge Group.
Add your copyrights.
Add your name.
I hope you enjoyed this tutorial.
I’d love to see your results and show it off in my gallery.
Email me!
Hugs,
Bev
This tutorial was written assuming you have a working knowledge of PSP.
~♥~ Let’s get started ~♥~
Open up the template.
Shift + D.
Close out the original.
Delete the copyright and doodle layer.
Image/Canvas Size
500 X 600
OK
Flood fill the background layer white.
The colors I used in this tutorial were chosen from the tulips in this kit.
Highlight Heart layer.
Click on it with your Magic Wand.
New Raster layer.
Flood fill with a gradient of choice.
Deselect.
Delete the template layer.
Give it a slight inner bevel:

Apply DSB Flux - Bright Noise:
Intensity: 10
Mix checked
OK
Highlight Heart Frame 1.
Click on it with your Magic Wand.
New Raster layer.
Invert your gradient and flood fill.
Deselect.
Delete the template layer.
Apply DSB Flux - Bright Noise:
Same settings.
Highlight Heart Frame Top
Click on it with your Magic Wand.
New Raster layer.
Flood fill with your gradient.
Deselect.
Delete the template layer.
Apply DSB Flux - Bright Noise:
Same settings.
Highlight Rectangle 1 layer.
Click on it with your Magic Wand.
New Raster layer.
Flood fill with a gradient of choice.
DO NOT DESELECT.
Copy and paste your tube as a new layer.
Resize as needed.
Selections/Invert
Tap the delete key.
Deselect.
Highlight Rectangle 2 layer.
Repeat the above 2 steps.
Highlight Frame 1 layer.
Click on it with your Magic Wand.
New Raster layer.
Flood fill with a color of choice.
Deselect.
Give it the same inner bevel.
Highlight Frame 2 layer.
Repeat the above step.
Add your embellishments. I used:
Blossoms: Resize 25% and 50% - Mirror
Blossom 1: Resize 40%
Blossom 2: Resize 35%
Tulip 1: Resize 25% and 50%
Tulip 2: Resize 25% and 40%
Butterflies 1 & 2: Resize 25% and 70%
Highlight your white canvas.
New Raster layer.
Flood fill with a color of choice.
Apply the mask.
Merge Group.
Add your copyrights.
Add your name.
I hope you enjoyed this tutorial.
I’d love to see your results and show it off in my gallery.
Email me!
Hugs,
Bev


No comments:
Post a Comment