
 Clicking on the image will enlarge to full view.
Supplies
1 tube of choice - I’m using the awesome artwork of Keith Garvey here
Font of Choice - I’m using New York Deco here
Weescotlass mask 297 here
Divine Intentions Template 294 here
“Cat Walk” is a FTU tagger size scrap kit created by Cadi’s Fun Scraps and can be downloaded from her blog here. Please leave a thank you when downloading. It’s a small gesture for hard work given freely and it would really make the designer feel appreciated.
This tutorial was written assuming you have a working knowledge of PSP.
~♥~ Let’s get started ~♥~
Open up the template.
Shift + D
Close out the original.
Resize all layers 90%
Image/Canvas Size
700 X 600
OK
Highlight and open the Background layer.
Flood fill white.
Delete By Missy Layer and Dangerous Layer
Highlight the Background layer.
Delete the following layers:
By Missy, Word Art by Missy, Suckers, Raster 1, Small Heart, Heart, and Pixel Words.
Highlight Oval layer.
Use your Magic Wand and click on the template.
New Raster layer.
Copy and paste Paper 8 Into Selection.
Deselect.
Delete the template layer.
Highlight Circle 1 layer.
Use your Magic Wand and click on the template.
New Raster layer.
Flood fill with #4593b7.
Deselect.
Delete the template layer.
Highlight Circle 2 layer.
Click on it with your Magic Wand.
New Raster layer.
Flood fill with a gradient of choice.
Delete the template layer.
DO NOT DESELECT.
Copy and paste your tube as a new layer.
Position it over the circle.
Resize your tube larger if you have to.
Selections/Invert
Tap the delete key.
Deselect.
Change the Properties to Luminance.
Delete the template layer.
Highlight Shape layer.
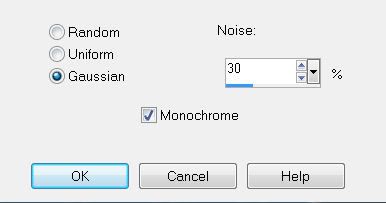
Adjust/Add Remove Noise/Add Noise:
Highlight Glittered Hearts Layer.
Select All/Float/Defloat
New Raster layer.
Copy and paste Paper 8 Into Selection
Deselect.
Delete the template layer.
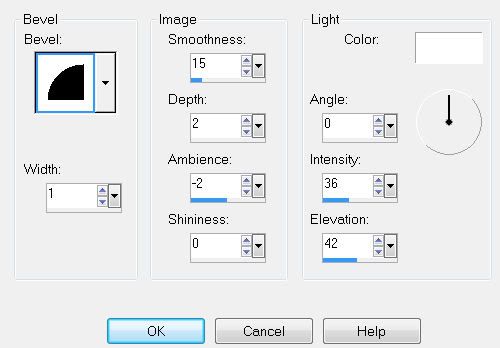
Give it a slight inner bevel:
Copy and paste your tube as a new layer.
Add your embellishments. I used:
Clip 3: Resize 60% Free rotate left 40 degrees
Ribbon 3: Resize 60% Free rotate left 90 degrees
Heart String 2: Resize 50%
Flower 8 and 12: Resize 25% and 85%
Flower 6 & 13: Resize 25%
Butterfly 2: Resize 25% and 75%
Hearts 2: Resize 25% Free rotate right 25 degrees
Highlight your white background.
New Raster layer.
Select All.
Copy and paste a Paper 5 Into Selection.
Deselect.
Apply the Mask.
Merge Group.
Duplicate
Add your copyrights.
Add your name.
Convert to Raster layer.
Select All/Float/Defloat
Selections/Modify/Contract by 2
Copy and paste Paper 6 Into Selection
Give it the same slight inner bevel.
Deselect.
Resize all layers 80%.
I hope you enjoyed this tutorial.
I’d love to see your results and show it off in my gallery.
Email me!
Hugs,
Bev
Thank you so much for this great tut. I just thought I'd let you know that you used template 294 and not 291, like you stated in the tut. ;)
ReplyDelete