Supplies
2 tubes of choice and 1 close-up - I’m using the beautiful artwork of Jennifer Janesko here
Font of Choice - I’m using Circus here
Mask 71 Kreations here - if you know who this belongs to can you please email me. Thank you.
Xerox - Porcelain
Greg’s Factory Output Vol. II - Pool Shadow
“Orange Juicy” is a FTU tagger size scrap kit created by Cadi’s Fun Scraps and can be downloaded from her blog here. Please leave a thank you when downloading. It’s a small gesture for hard work given freely and it would really make the designer feel appreciated.
This tutorial was written assuming you have a working knowledge of PSP.
~♥~ Let’s get started ~♥~
Open up a 700 X 700 blank canvas.
Flood fill white.
Flood fill white.
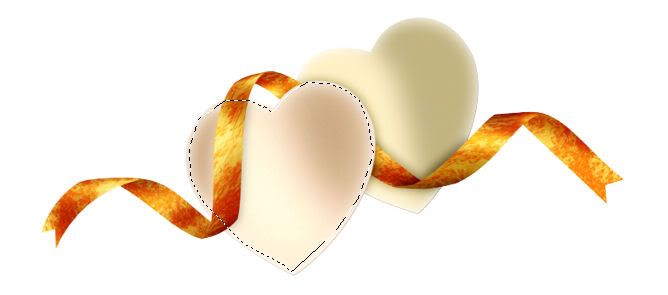
Copy and paste Hearts 2 as a new layer.
Resize 85%
Using your Freehand Selection Tool, outline the heart on the left:

Copy and paste your tube as a new layer.
Resize as needed and position over the heart.
Selections/Invert
Tap the Delete key.
Selections/Modify/Feather
Number of Pixels:
23
OK
Tap the delete key a couple of times to get a soft feathered look.
Deselect.
If any of your image went over the ribbon then use your Eraser tool and carefully erase it.
Apply Xerox - Porcealin:
Default Settings.
Highlight the hearts layer again.
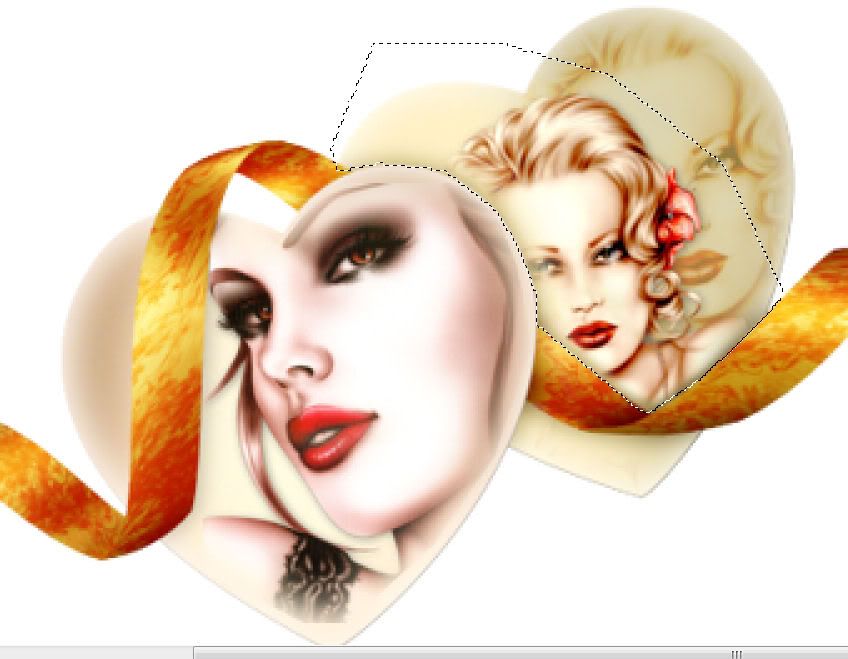
Using your Freehand Selection Tool again, outline the heart on the right.
Copy and paste another tube as a new layer.
(I resized mine a bit smaller because I wanted a shadow of the tube at slighter larger size in the heart also)
Position over the heart.
Selections/Invert
Tap the delete key.
Paste your tube again.
In your layers pallet move it behind the other tube.
Position it slightly off.
Tap the delete key.
Change the Properties to Soft Light.
Selections/Modify/Feather
Number of Pixels:
23
OK
Tap the delete key a couple of times.
Highlight your other tube.
Tap the delete key a couple of times.
If your tube(s) are over the ribbon then zoom in on it and carefully erase it.
OR
You can Duplicate the heart layer.
Move it over all of your tubes in your layers pallet.
Using your Eraser tool erase the majority of it and then zoom in on it and using our Freehand Selection Tool, outline the ribbon:

Selections/Invert
Tap the delete key.
Deselect.
Apply Xero-Porcelain to both of these tubes as well.
Close out your white canvas.
Merge Visible.
Reopen your white canvas.
Phew! Ok, the hardest part is done.
Close out the merged heart layer. It’ll give you a blank canvas to work with for a bit.
Copy and paste Frame 5 as a new layer.
Resize 80%
Free rotate right 5 degrees.
Use your Freehand Selection Tool and outline the frame.
New Raster layer below the frame.
Flood fill with a gradient of choice.
DO NOT DESELECT
Copy and paste your close-up image below the frame.
Selections/Modify/Feather
Number of Pixles:
53
OK
Selections/Invert
Tap the delete key until you have a nice feathered effect.
Deselect.
Close out your white canvas.
Merge Visible.
Reopen all your layers.
Move them into position - see my tag for reference.
Add your embellishments. I used:
Flower 5: Resize 70%
Boot 1: Resize 40%. Duplicate/Mirror
Butterfly 4: Resize 35%
Butterfly 3: Resize 35% and 80%
Highlight your white background.
New Raster layer.
Select All.
Copy and paste a paper of choice Into Selection.
Deselect.
Apply the Mask.
Merge Group.
Add your copyrights.
Add your name.
Convert to Raster layer.
Select All/Float/Defloat
Selections/Modify/Contract by 1
Apply Greg’s Factory Output Vol. II - Pool Shadow
Default Settings
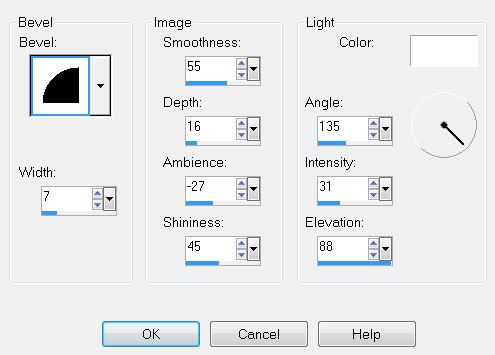
Give it an inner bevel:

Deselect.
Resize all layers 80%.
I hope you enjoyed this tutorial.
I’d love to see your results and show it off in my gallery.
Email me!
Hugs,
Bev


No comments:
Post a Comment