
 Clicking on the image will enlarge to full view.
Supplies
1 tube of choice - I’m using the beautiful artwork of Jennifer Janesko here
Font of Choice - I’m using Evanescence here
Weescotlass Mask 84 here
Kelly’s Kreations template “Dream a Lil Dream” here
Penta - Jeans
Xero: Porcelain
“Sexy Maid” is a PTU tagger size scrap kit created by Fantasy Dreams Designz and can be purchased from her blog here.
Thank you Heiki for such a really beautiful kit.
This tutorial was written assuming you have a working knowledge of PSP.
~♥~ Let’s get started ~♥~
Open up the template.
Shift + D
Close out the original.
Delete the copyright layer.
Shift + D
Close out the original.
Delete the copyright layer.
Highlight Rect1 layer.
Select All/Float/Defloat
New Raster layer.
Flood fill with a gradient of your choice.
Deselect.
Delete the template layer.
Apply Penta - Jeans:
Highlight Rect2 layer.
Select All/Float/Defloat
New Raster layer.
Invert your gradient and flood fill.
Deselect.
Delete the template layer.
Apply Penta - Jeans:
Same settings
Highlight Circle Diamonds.
Select All/Float/Defloat
New Raster layer.
Flood fill with a dark color of choice.
Deselect.
Delete the template layer.
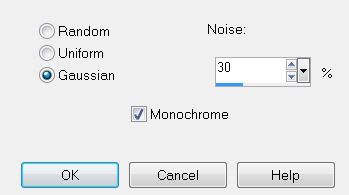
Adjust/Add Remove Noise/Add Noise:
Select All/Float/Defloat
New Raster layer.
Invert your gradient and flood fill.
Deselect.
Delete the template layer.
Apply Penta - Jeans:
Same settings
Highlight Circle Diamonds.
Select All/Float/Defloat
New Raster layer.
Flood fill with a dark color of choice.
Deselect.
Delete the template layer.
Adjust/Add Remove Noise/Add Noise:
***Pay close attention here and just take it line by line***
Highlight Circle 2 layer.
Select All/Float/Defloat
New Raster layer.
Flood fill white
Apply the same noise as before.
DO NOT DESELECT
Selections/Modify/Contract by 10
New Raster layer.
Copy and paste a dark color paper of choice Into Selection.
DO NOT DESELECT
Selections/Contract by 14
New Raster layer.
Flood Fill white.
Apply the same noise.
DO NOT DESELECT
Selections/Contract by 10
New Raster layer.
Copy and paste a light colored paper of choice as a new layer.
Selections/Invert
Tap the delete key.
DO NOT DESELECT
Copy and paste your tube as a new layer.
Position over the circle
Tap the delete key.
Selections/Modify/Feather
Number of Pixels:
43
Tap the delete key until you have a nice feathered effect.
Lower the Opacity to about 57.
Apply Xerox - Porcealin:
Default Settings.
Deselect.
Whew! You’re done with that circle…
Now repeat all of those same steps with Circle 3 layer.
Highlight Stars layer.
Using your Target Tool colorize the stars.
Highlight "Dream A Little Dream Of" layer.
Select All/Float/Defloat
New Rater layer.
Copy and paste a dark colored paper of choice Into Selection.
Deselect.
Delete the template layer.
Copy and paste Element 2 as a new layer.
Resize 70%
Free rotate left 90 degrees.
Position over Stripes layer.
Highlight Stripes layer
Select All/Float/Defloat
Selections/Invert
Highlight the element and using your Eraser Tool erase all that overhangs the circle.
Deselect.
Add your embellishments. I used:
Element 63 & 64: Resize 70%
Element 50: Resize 50%
Element 52: Resize 40%
Highlight your white background.
New Raster layer.
Select All.
Copy and paste a paper of choice Into Selection.
Deselect.
Apply the Mask.
Resize 110%
Merge Group.
Add your copyrights.
Add your name.
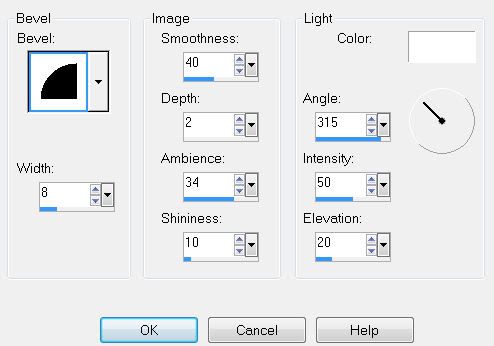
Give it an inner bevel:
Apply the same Noise.
Resize all layers 80%.
I hope you enjoyed this tutorial.
I’d love to see your results and show it off in my gallery.
Email me!
Hugs,
Bev
No comments:
Post a Comment