Supplies
1 tube of choice - I’m using the wonderful artwork of PinUpToons here
Font of Choice - I’m using Cricket here
Weescotlass mask 241 here
My Template 5 here - I have resaved this group as JPG and PNG and re-uploaded so there shouldn’t be any problems for anyone being able to use them now. I apologize for the inconvenience before.
“Splishin and a Splashin” is a PTU tagger size scrap kit created by Kristi of Kristi W. Designs and can be purchased from The Scrappin Divaz Designz. You can visit Kristi’s blog here.
Thank you Kristi for such an adorable kit!
This tutorial was written assuming you have a working knowledge of PSP.
~♥~ Let’s get started ~♥~
Open up the template.
Shift + D
Close out the original.
Delete my credit layer and Flower 1 & 2 layers.
Highlight Circle layer.
Use your Magic Wand and click on the template.
New Raster layer.
Copy and paste Paper 3 Into Selection.
Deselect.
Delete the template layer.
Highlight Rectangle 1 layer.
Use your Magic Wand and click on the template.
Copy and paste Paper 6 as a new layer.
Resize 50%
Selections/Invert
Tap the delete key.
Deselect.
Delete the template layer.
Highlight Rectangle 2 layer.
Use your Magic Wand and click on the template.
Copy and paste Paper 5 as a new layer.
Resize 50%
Selections/Invert
Tap the delete key.
Deselect.
Delete the template layer.
Highlight Rectangle 3 layer.
Use your Magic Wand and click on the template.
Copy and paste Paper 7 as a new layer.
Resize 50%
Selections/Invert
Tap the delete key.
Delete the template layer.
Highlight Rectangle 2 layer.
Use your Magic Wand and click on the template.
Copy and paste Paper 5 as a new layer.
Resize 50%
Selections/Invert
Tap the delete key.
Deselect.
Delete the template layer.
Highlight Rectangle 3 layer.
Use your Magic Wand and click on the template.
Copy and paste Paper 7 as a new layer.
Resize 50%
Selections/Invert
Tap the delete key.
Deselect.
Delete the template layer.
Highlight Rectangle 4 layer.
Use your Magic Wand and click on the template.
New Raster Layer.
Copy and paste Paper 3 Into Selection.
Deselect.
Delete the template layer.
Copy and paste Frame 2 as a new layer.
Resize 50%
Position over the circle paper.
Copy and paste your tube as a new layer.
Position it in front of the left side of the frame.
Once you have it exactly where you want it duplicate/Mirror the tube.
Move the duplicate below the frame.
Use your Eraser Tool and erase any that might be showing outside the frame and down below on your tag.
Change the Properties to Multiply.
Add your embellishments. I used:
Powder: Resize 25%
Bubble Bath: Resize 25%
Towels: Resize 50%
Duck: Resize 25%
Corner 1: Resize 25% and 70%
Journal 3
Bubbles
Bow 1: Resize 25%
Greenery: Resize 70%
Stitch: Resize 50%
Highlight your white background.
New Raster layer.
Select All.
Copy and paste a paper of choice Into Selection.
Deselect.
Apply the Mask.
Merge Group.
Add your copyrights.
Add your name.
In your color pallet:
Foreground: Black
Background: Off
Width: 2
Use your Ellipse Tool set on Circle and made a circle around the frame.
Make your Text tool active and move your curser along the curve of the circle where you want your name until you see a rocking A.
Click your mouse.
The text box will appear.
Type your name.
OK
In your layer’s pallet click on the plus sign.
Close out the New Ellipse layer by clicking on the eye.
Now highlight the top layer where your name is and convert to a raster layer.
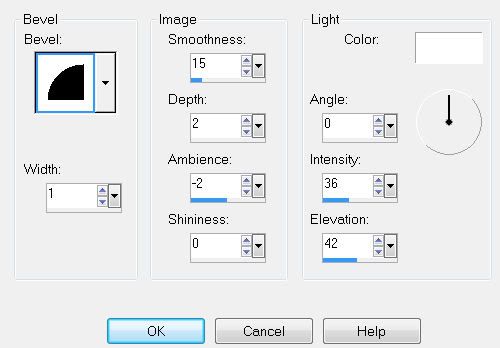
Give it an inner bevel:

Resize all layers 85%.
I hope you enjoyed this tutorial.
I’d love to see your results and show it off in my gallery.
Email me!
Hugs,
Bev
Delete the template layer.
Highlight Rectangle 4 layer.
Use your Magic Wand and click on the template.
New Raster Layer.
Copy and paste Paper 3 Into Selection.
Deselect.
Delete the template layer.
Copy and paste Frame 2 as a new layer.
Resize 50%
Position over the circle paper.
Copy and paste your tube as a new layer.
Position it in front of the left side of the frame.
Once you have it exactly where you want it duplicate/Mirror the tube.
Move the duplicate below the frame.
Use your Eraser Tool and erase any that might be showing outside the frame and down below on your tag.
Change the Properties to Multiply.
Add your embellishments. I used:
Powder: Resize 25%
Bubble Bath: Resize 25%
Towels: Resize 50%
Duck: Resize 25%
Corner 1: Resize 25% and 70%
Journal 3
Bubbles
Bow 1: Resize 25%
Greenery: Resize 70%
Stitch: Resize 50%
Highlight your white background.
New Raster layer.
Select All.
Copy and paste a paper of choice Into Selection.
Deselect.
Apply the Mask.
Merge Group.
Add your copyrights.
Add your name.
In your color pallet:
Foreground: Black
Background: Off
Width: 2
Use your Ellipse Tool set on Circle and made a circle around the frame.
Make your Text tool active and move your curser along the curve of the circle where you want your name until you see a rocking A.
Click your mouse.
The text box will appear.
Type your name.
OK
In your layer’s pallet click on the plus sign.
Close out the New Ellipse layer by clicking on the eye.
Now highlight the top layer where your name is and convert to a raster layer.
Give it an inner bevel:

Resize all layers 85%.
I hope you enjoyed this tutorial.
I’d love to see your results and show it off in my gallery.
Email me!
Hugs,
Bev


No comments:
Post a Comment