Supplies
1 tube of choice - I used the beautiful artwork of Jennifer Janesko here
Font of choice - I used Pavane here
Gems mask 43 here
Scraps of Enchantment Template 20 here
Xero: Porcelain
“Just a Day” is a PTU tagger size scrap kit created by Wilma of Wilma4Ever and can be purchased from her store here. You can visit her blog here.
Thank you Wilma for another beautiful kit!
This tutorial was written assuming you have a working knowledge of PSP.
~♥~ Let’s get started ~♥~
Open up the template.
Shift + D
Close out the original.
Delete Info, Black Flower Brush, Drop Shadow, and White Flower Brush layers.
Image/Canvas Size
700 X 675
Flood fill the background layer white.
Highlight Black Circle layer.
Use your Magic Wand and click on the template.
New Raster layer.
Copy and paste a paper of choice Into Selection.
New Raster layer
Copy and paste Clock 1 Into Selection.
Deselect.
Resize 90%
Delete the template layer.
Highlight Scallop layer.
Select All/Float/Defloat
New Raster layer.
Copy and paste a paper of choice Into Selection.
Deselect.
Delete the template layer.
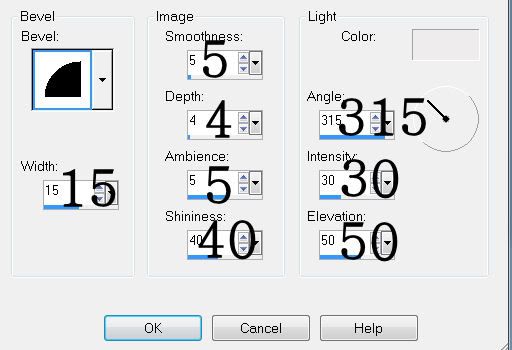
Give it a slight inner bevel:

Copy and paste Frame 4 as a new layer.
Image/Mirror
Resize 80%
Delete the following template layers:
Frame, Rectangle 1, and Rectangle 2
Use your Magic Wand and click inside both rectangles of the frame.
New Raster layer below the frame.
Copy and paste a paper of choice Into Selection.
Deselect.
Highlight the frame layer.
Use your Magic Wand and click inside the left rectangle.
Copy and paste your tube of choice.
Selections/Invert
Tap the delete key.
Deselect.
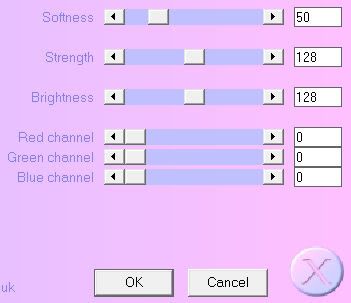
Apply Xerox - Porcelain:

Repeat the above step with the other rectangle in the frame.
Add your embellishments. I used:
Leaves: Resize 60%
Plant: Resize 85%
Key: Resize 50% Free rotate right 25 degrees. Duplicate/Mirror
Bow 2: Resize 45%
Glitter Hearts 2: Resize 70%
Crop your image.
Highlight your white background.
New Raster layer.
Select All.
Copy and paste a paper of choice Into Selection.
Deselect.
Apply the Mask.
Resize 105%
Merge Group.
Copy and paste Door 1 as a new layer at the top of your layers pallet.
Move it to the right side of your canvas.
Duplicate/Mirror
Duplicate and move this into the center to close the gap.
Merge Visible the 3 door layers.
Move it into position so that the bottom of this layer is about at the bottom of where the mask is.
Apply the mask.
Merge Group.
Move it just above our mask in the layers pallet.
Add your copyrights.
Add your name.
Give it the same slight inner bevel.
Resize all layers 80%.
I hope you enjoyed this tutorial.
I’d love to see your results and show it off in my gallery.
Email me!
Hugs,
Bev


No comments:
Post a Comment