Supplies
1 tube and one close-up image of choice - I’m using the wonderful artwork of Ismael Rac here
Font of Choice - I’m using Fortunaschwein here
Gem’s Mask 56 here
Divine Intentions Template 140 here
“Sweet Ness” is a PTU tagger size scrap kit created by Heike of Fantasy Dream Designz and can be purchased from her blog here.
Thank you so much Heike for such a beautiful kit!
This tutorial was written assuming you have a working knowledge of PSP.
~♥~ Let’s get started ~♥~
Open up the template.
Shift + D.
Close out the original.
Resize all layers 130%
Image/Canvas Size
700 X 600
OK
Flood fill the background layer white.
Delete By Missy layer
Highlight Circle 2 layer.
Use your Magic Wand and click on it.
New Raster layer.
Copy and paste a paper of choice Into Selection.
Deselect.
Delete the template layer.
Repeat the above step with all the remaining layers.
Copy and paste your close-up Image as a new layer.
Move into position over the circle.
Duplicate - shut this layer off.
Highlight the circle layer.
Select All/Float/Defloat
Selections/Modify/Feather
Number of Pixels:
43
OK
Selections/Invert
Highlight the Original Image layer.
Tap the delete key until you have a nice feathered look.
Deselect.
Reopen the duplicate image layer.
Using your Eraser Tool erase any on the bottom of the tube that covers the feathered effect.
Copy and paste Element 45 as a new layer.
Resize 40%
Mirror
Move into position over your image toward the bottom of the circle - see my tag for reference.
Some of the ribbon will overhang on the right side - that’s ok!
Highlight the circle layer.
Select All/Float/Defloat
Selection/Invert
Use your Eraser Tool and erase the overhang on the right side.
Deselect.
Make your Burn Tool active and run it along the right edge of the ribbon. It’ll darken the ribbon and it the appearance that it’s wrapped around the circle.
Add your embellishments. I used:
Element 18: Resize 60%
Element 36
Element 25: Resize 30%
Element 14
Highlight your white background.
New Raster layer.
Select All.
Copy and paste a paper of choice Into Selection.
Deselect.
Apply the Mask
Merge Group.
Add your copyrights.
Add your name.
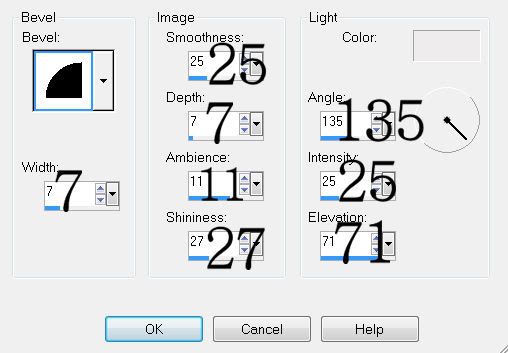
Give it an inner bevel:

Resize all layers 80%
I hope you enjoyed this tutorial.
I’d love to see your results and show it off in my gallery.
Email me!
Hugs,
Bev


No comments:
Post a Comment