Supplies
Font of Choice - I’m using Fabuouos 50’s Normal here
Creative Desires Mask 31 here - If you know who this mask belongs to can you please email me so that I can give proper credit. Thank you.
Blissfully Beth Template 63 here
“Autumn Splendour” is a PTU tagger size scrap kit created by Julie of Bits ’n Bobs and can be purchased at AMI. You can visit her blog here.
Thank you Julie for such an amazing and festive kit!
This tutorial was written assuming you have a working knowledge of PSP.
~♥~ Let’s get started ~♥~
Open up the template.
Shift + D.
Close out the original.
Delete the credit (Blissfully Beth)layer.
Normally I do the mask last, but I fell in love with the papers in this kit and just had to do it first.
New Raster layer above the background layer.
Select All
Copy and paste a paper of choice Into Selection.
Deselect.
Apply the mask.
Merge Group.
Highlight the Black Circle layer.
Select All/Float/Defloat
New Raster layer.
Copy and paste a paper of choice Into Selection.
Deselect.
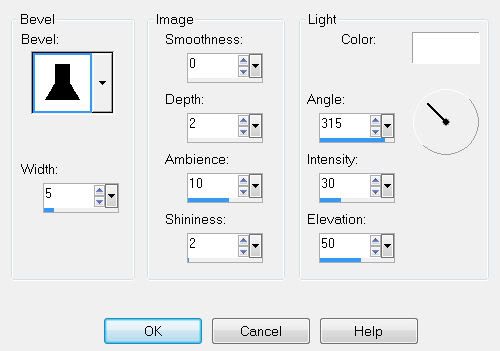
Apply a slight inner bevel:

Delete the template layer.
Repeat the above step with the Gray Circle layer.
Merge Visible Tab Layers 1 2, 3, and 4.
All should be on the same layer.
Select All/Float/Defloat
Copy and paste a paper of choice as a new layer.
Selections/Invert
Tap the delete key.
Delete the template layer.
Highlight the White Frame layer.
Select All/Float/Defloat
New Raster layer.
Copy and paste a paper of choice Into Selection.
Selections/Modify/Contract by 10
Tap the delete key.
Selections/Modify/Expand by 2
New Raster layer below the “frame” you just created.
Copy and paste a paper of choice Into Selection.
Deselect.
Highlight the frame layer and give the same inner bevel.
Highlight the Word Art layer.
Select All/Float/Defloat
Create a new image and flood fill it with a color of your choice.
Copy and paste as a new layer on your working image.
Selections/Modify/Contract by 1
Tap the delete key.
Deselect.
Merge Down.
Give it the same inner bevel.
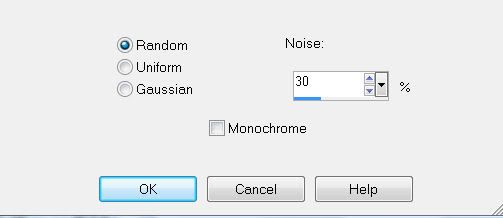
Adjust/Add Remove Noise/Add Noise:

Add your embellishments. I used:
Butterfly 1: Resize 20% Free rotate right 20 Degrees
Butterfly 3: Resize 15% Free rotate left 20 degrees
Vine 1: Resize 50%. Free rotate left 90 degrees
Element 2: I used my Freehand Selection Tool and copied different things onto my canvas.
Element 4: Resize 80%
Add your copyrights.
Add your name.
Type your name out in black.
Select All/Float/Defloat
Copy and paste the same color you used for the Word Art layer.
Selections/Modify/Contract by 2
Tap the delete key.
Deselect.
Merge down.
Give it the same inner bevel.
Apply the same Noise effect.
Resize all layers 90%.
I hope you enjoyed this tutorial.
I’d love to see your results and show it off in my Show Arena.
Email me!
Hugs,
Bev


No comments:
Post a Comment