
 Clicking on the image will enlarge for bigger view.
Supplies
4 tubes of choice - I’m using the artwork of Keith Garvey which you can purchase here.
Font of Choice - I’m using Velvenda Cooler here and Alsandra here
Scrap Dimensions Mask 6 here
Blissfully Beth Template 29 here
“Diva-licious” is a PTU tagger size scrap kit created by Julie of Bits ’n Bobs and can be purchased at Exquisite Scraps.
You can visit her blog here.
Thank you Julie for a terrific kit!
Thank you Julie for a terrific kit!
This tutorial was written assuming you have a working knowledge of PSP.
~♥~ Let’s get started ~♥~
Open up the template.
Shift + D.
Close out the original.
Delete Raster 1.
Highlight the Gray Bars bg Layer.
Select All/Float/Defloat
New Raster layer.
Copy and paste a paper of choice Into Selection.
Deselect.
Delete the template layer.
Highlight Rec 3 layer.
Select All/Float/Defloat
New Raster layer.
Copy and paste a paper of choice Into Selection.
Selections/Modify/Contract by 7.
Tap the delete key.
Selections/Modify/Expand by 2.
Copy and paste a paper of choice below the “frame” you just created.
Resize the paper 50%
Move into position.
Selections/Invert
Tap the delete key.
Deselect.
Delete the template layer.
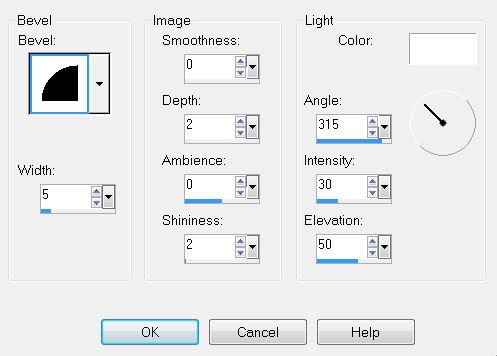
Give the “Frame” a slight inner bevel:
Select All/Float/Defloat
New Raster layer.
Copy and paste a paper of choice Into Selection.
Selections/Modify/Contract by 7.
Tap the delete key.
Selections/Modify/Expand by 2.
Copy and paste a paper of choice below the “frame” you just created.
Resize the paper 50%
Move into position.
Selections/Invert
Tap the delete key.
Deselect.
Delete the template layer.
Give the “Frame” a slight inner bevel:
Merge visible the “frame” and paper back.
Repeat the above steps with Rec layers 1 and 2.
Highlight Heart 1 layer.
Select All/Float/Defloat
New Raster layer.
Copy and paste a paper of choice Into Selection.
Selections/Modify/Contract by 7.
Tap the delete key.
Selections/Modify/Expand by 2.
Copy and paste a paper of choice below the “heart frame” you just created.
Resize the paper 50%
Move into position.
Selections/Invert
Tap the delete key.
Copy and paste your tube below the heart frame.
Tap the delete key.
Deselect.
Delete the template layer.
Give the fame the same slight inner bevel:
Merge visible the heart frame, tube, and paper back.
Duplicate and move into position over the other heart.
Delete that template layer.
Highlight “I’m Crazy for You” layer.
Select All/Float/Defloat
Copy and paste a paper of choice as a new layer.
Selections/Invert
Tap the delete key.
Deselect.
Delete the template layer.
Give it the same slight inner bevel.
Add your embellishments. I used:
Buttons 2 & 3: Resize 15% and 90%
Vertical Wrap: Resize 35%. Use the Pick Tool to stretch as needed.
Fancy Feather 2: Resize 60%. Free rotate 45 degrees
Feather 2: Resize 40%. Free rotate right 110 degrees
Feather 1: Resize 30%. Free rotate right 110 degrees
Show 5: Resize 35%. Mirror/Duplicate. Free rotate left 90 degrees.
Copy and paste your tubes as new layers.
Highlight your white background.
New Raster Layer.
Copy and paste paper of choice Into Selection.
Deselect.
Apply the mask.
Merge Group.
Add your copyrights.
Add your name.
Color pallet: Both foreground and background set on pattern - choose papers from the kit.
Stroke set on 3
Type your name out using the Velvenda Cooler font.
Use your Pick Tool stretch it out a bit if it’s a small name.
Select All/Float/Defloat
Selections/Modify/Contract by3
Give it the same slight inner bevel.
Deselect.
Type your name out again using Al Sandra.
Again, use your pick tool to stretch the name out a bit.
Resize all layers 90%.
I hope you enjoyed this tutorial.
I’d love to see your results and show it off in my Show Arena.
Email me!
Hugs,
Bev
No comments:
Post a Comment