Supplies
1 tube of choice – I’m using the beautiful artwork of Angelica S. which
can be purchased from Scraps and the City. You must have a license to
use.
Font of choice - I used Lydia Puente here
Plug Ins used:
Greg’s Factory Output Vol. II – Pool Shadow
“Santa’s Mistress Kit” is a tagger size scrap kit created by Angelica
S. and can be purchased from Scrapsand the City. You can visit her blog
here.
Thank you, Angelica for such a beautiful art kit!
This tutorial was written assuming you have a working knowledge of PSP.
~♥~ Let’s get started ~♥~
Open up a 700 x 700 blank canvas.
Flood fill white.
New Raster layer.
Make your Selection Tool active set on Rectangle.
Create a rectangle approximately 625 x 400 pixels.
Copy and paste Paper 1 Into Selection.
Adjust/Add Remove Noise/Add Noise:
Gaussian and Monochrome checked
Noise: 30%
OK
Selections/Modify/Contract by 5.
New Raster layer.
Copy and paste Paper 2 Into Selection.
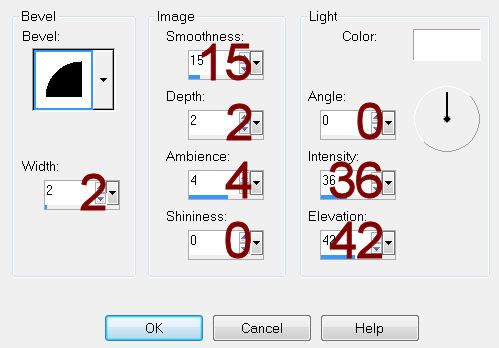
Give it a slight Inner Bevel:

Apply Greg’s Factory Output Vol. II – Pool Shadow:
Use Default Settings accept lower the Opacity bar down to about 60.
OK
Copy and paste Element 8 as a new layer just above the paper layer.
Resize 65%/Move into position at the bottom of the paper layer – see my
tag for reference.
Selections/Invert
Tap the delete key.
Deselect.
Copy and paste Element 11 as a new layer.
Resize 40%
Copy and paste Element 15 as a new layer above the frame.
Resize 37%
Center it over the frame.
Merge Down.
Click inside of the merged frame with your Magic Wand.
Selections/Modify/Expand by 4.
New Raster layer below the merged frame.
Copy and paste Paper 10 Into Selection.
Deselect.
Close out your white background.
Merge Visible.
Reopen your white background.
Duplicate/Resize 85%/Duplicate/Resize 85%
Move all 3 frame layers into position – see my tag for reference.
Copy and paste Element 6 as a new layer just above your white
background layer.
Make your Pick Tool active and pull the bottom and right side in to
shape around the glitter rectangle layer – see my tag for reference.
Copy and paste your tube as a new layer in front of the 3 frames.
If you’re using the same tube as I did, resize 25%
Add your elements. I used:
Element 1: Resize 35%
Element 7: Resize 25%
Element 4: Resize 25%/Mirror
Element 2: Resize 90%
Element 17: Duplicate/Mirror/Flip
Highlight your white background.
New Raster layer.
Select All
Copy and paste Paper 4 Into Selection.
Deselect.
Apply the Mask.
Merge Group
Add your credits.
Add your name.
Foreground and Background: Pattern/Paper 5
Type your name.
Convert to Raster layer.
Select All/Float/Defloat
Selections/Modify/Expand by 2.
New Raster layer below the name.
Flood fill with Gradient/Metal Brass
Adjust/Add Remove Noise/Add Noise:
Gaussian & Monochrome checked
Noise: 45%
OK
Deselect.
Merge Visible both name layers.
Resize all layers 80%.


No comments:
Post a Comment