Supplies
1 tube of choice – I’m using the beautiful artwork of Alena Lazareva
which can be purchased from Up Your Art. You must have
a license to use.
Font of choice - I used Ringbearer here
Tracy F. Designz Template 57 here
Scroll down on the left hand side.
You can download her templates in bulk.
Plug Ins used:
Mura’s Meister - Copies
Eyecandy 5 – Nature: Snow Drift
“Let it Snow” is a tagger size scrap kit created by Gina of Gina’s Gems
Scraps and can be purchased from Scraps from the Heart. You can visit
her blog here.
Thank you, Gina for a beautiful scrap kit!
This tutorial was written assuming you have a working knowledge of PSP.
~♥~ Let’s get started ~♥~
Open up the template.
Shift + D.
Close out the original.
Image/Canvas Size:
700 x 700
Ok
New Raster layer.
Flood fill white.
Send to bottom.
Delete the top 5 layers.
Highlight Circle 1 layer.
Click on it with your Magic Wand.
New Raster layer.
Copy and paste Paper 12 Into Selection.
Deselect.
Delete the template layer.
Highlight Rectangle layer.
Click anywhere outside of it with your Magic Wand.
Selections/Invert
New Raster layer.
Copy and paste Paper 6 Into Selection.
Deselect.
Delete the template layer.
Highlight Circle 2 layer.
Click on it with your Magic Wand.
New Raster layer.
Copy and paste Paper 24 Into Selection.
Copy and paste your tube as a new layer.
Position over the circle paper layer.
Selections/Invert
Use your Eraser Tool to erase the part of the tube you don’t want to
overhang the circle.
Deselect.
Delete the template layer.
Copy and paste Snow Flower 2 as a new layer.
Resize 70%
Apply Mura’s Meister – Copies:
Choose Encircle
Change Number to 12
OK
Resize the circle of flowers 88%
Move into position behind Glittered Circle 2 layer.
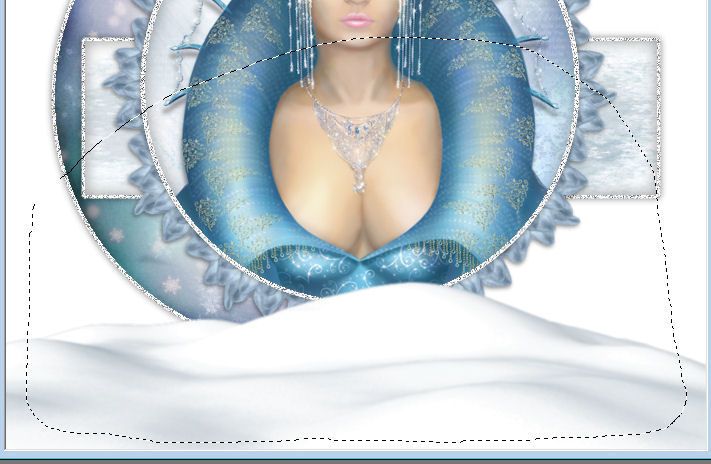
Copy and paste Snow Hill as a new layer.
Position at the bottom of your canvas.
Use your Freehand Selection Tool and section around it:

Selections/Modify/Inside Outside Feather
Both checked
Feather Amount: 30
OK
Selections/Invert
Tap the delete key about 7 times.
Deselect.
Duplicate the snow mound.
Mirror
Move it up on your canvas a little and then in your layers pallet move
it just above your white background.
Add your elements. I used:
Snow covered Tree: Resize 40%
Berries 3: Resize 80%
Lace Bow 4: Resize
30%/Duplicate/Mirror
Frosty Pine Branch: Resize
45%/Duplicate/Mirror
Snow Flower 2: Resize 30%
Snow Flower 3: Resize
25%/Duplicate/Mirror
Diamond Snowflake: Resize
40%/Duplicate
Candles 3: Resize 65%
Fabric Vine of Roses 2: Resize
70%
Highlight your white background.
New Raster layer.
Select All
Copy and paste Paper 16 Into Selection.
Deselect.
Duplicate
Change the Properties to Multiply.
Merge Down.
Apply the Mask.
Merge Group.
Duplicate
Add your credits.
Add your name.
Foreground: #5a416c
Background: Pattern/Paper 16
Stroke: 1
Type your name.
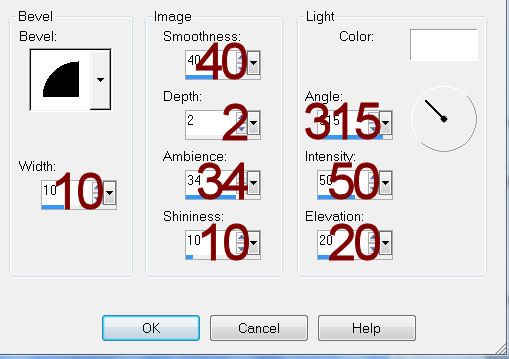
Give it a slight Inner Bevel:

Apply Eyecandy 5: Nature – Snow Drift
Settings Tab:
Small, First Flakes
Use Default Settings on the other tabs.
OK
If you want to decorate your name with the snow mound:
Duplicate the snow mound and move it in front of your name positioning
it so you like the way the slope of the snow is at the bottom of your name.
Use your Eraser Tool and erase all of the snow mound you don’t want,
Resize all layers 80%.


No comments:
Post a Comment