Supplies
1 tube of choice – I used the beautiful artwork of Rachael Tallamy
which can be purchased from Up Your Art. You must have
a license to use.
Weescotlass Mask 236 here
“Epipheny Sampler” is a free to use tagger size scrap kit created by Jessica
of Gothic Inspirations and can be downloaded her blog here.
Please leave a thank you when downloading as it’s a small gesture for
hard work and generosity given freely.
This tutorial was written assuming you have a working knowledge of PSP.
~♥~ Let’s get started ~♥~
Open up the template.
Shift + D.
Close out the original.
Image/Canvas Size:
700 x 600 pixels
OK
New Raster layer.
Flood fill white
Send to bottom.
Delete the following layers:
Info, 3 lines, both Small Circle layers and both frames that are above
each of those small circles.
Highlight Bottom Rectangle Layer.
Click anywhere outside of it with your Magic Wand.
Selections/Invert
New Raster layer.
Copy and paste Paper 2 Into Selection.
Deselect.
Delete the template layer.
Repeat the above step with Bottom Rectangle layer.
Copy and paste Cloud element as a new layer.
Resize 50%
Duplicate 2x’s for a total of 3.
Position each of the clouds over the rectangle paper layers – see my
tag for reference.
To each rectangle:
Click your Magic Wand anywhere outside of the rectangle.
Highlight each of the cloud layers and tap the delete key.
Deselect.
Highlight Frame layer (the one just above the rectangle paper)
Select All/Float/Defloat
New Raster layer.
Flood fill with #5f201d
Adjust/Add Remove Noise/Add Noise:
Uniform and Monochrome checked
Noise: 50%
OK
Deselect
Delete the template layer.
Repeat the above step with the other frame layer, Circle 1 layer, Noise
Circle layer and Dotted Frame layer.
Highlight Gradient Circle Layer.
Click anywhere outside of it with your Magic Wand.
Selections/Invert
New Raster layer.
Copy and paste Paper 3 Into Selection.
Deselect.
Delete the template layer.
Copy and paste your tube as a new layer.
Add your elements. I used:
Tree 1: Mirror/Erase the base of
it
Crows: Resize 50%
Tree 2: Resize 50%
Brush: Resize
50%/MirrorDuplicate
Highlight your white background.
New Raster layer.
Select All.
Copy and paste the Paper 3 Into Selection.
Deselect.
Apply the mask.
Resize 105%
Merge Group.
Add your credit.
Add your name:
Color pallet:
Foreground: #000000
Background: Pattern/Paper 3
Angle: 0
Scale: 100
OK
Stroke: 1.0
Type your name.
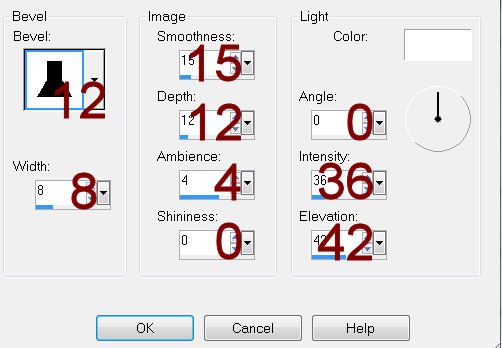
Give it an Inner Bevel 2x’s:

Resize all layers 80%.


No comments:
Post a Comment