Supplies
1 tube of choice – I used the wonderful artwork of Anna Marine which
can be purchased from CDO. You must have
a license to use.
Font of choice – I used Lover’s Quarrel here
Weescotlass Mask 236 here
PlugIns used:
Greg’s Factory Output Vol II – Pool Shadow
“Autumn Indulgence” is a tagger size scrap kit created by me, Bev of
HorsePlay’s Pasture Designs and can be purchased from either of your favorite stores – Lollipops n Gumdrops or Butterfly Blush Designs or Inspirations of Scrap Friends. You can visit
my designing blog here.
~♥~ Let’s get started ~♥~
Open up a 700 x 700 blank canvas.
Flood fill white.
Copy and paste E14 as a new layer.
Resize 80%
Click inside of it with your Magic Wand – be sure to get the little
open areas where the frames overlap.
Selections/Modify/Expand by 4.
New Raster layer below the frame.
Copy and paste Paper 2 Into Selection.
Copy and paste your tube as a new layer below the frame.
Selections/Invert
Tap the delete key.
Deselect.
New Raster layer below the frame.
Make your Selection Tool active set on Rectangle.
Create a rectangle approximately 250 x 500 pixels.
Copy and paste Paper 1 Into Selection.
Selections/Modify/Contract by 7.
Copy and paste Paper 4 as a new layer.
Move into a position you like within the dotted lines.
Selections/Invert
Tap the delete key.
Apply Greg’s Factory Output Vol. II – Pool Shadow:
Use default settings.
Deselect.
Give this paper a drop shadow.
Merge Down.
Move the merged layer into position – see my tag for reference.
Copy and paste your tube as a new layer.
We’re going to add the apples to the basket.
Copy and paste E9 as a new layer.
Copy and paste E24 as a new layer.
Resize 40%
Duplicate 2x’s.
Arrange the apples as you would like to see them in the basket.
Merge Visible all apples.
Lower the Opacity until you can see the basket through them.
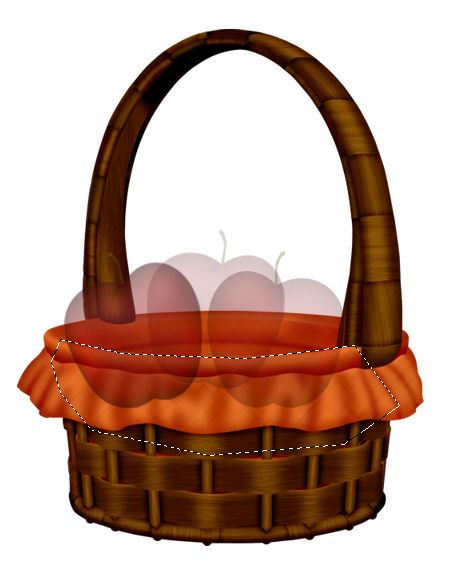
Make your Freehand Selection tool active set on Point to Point and
section off the the lower section of the apples:

Tap the delete key.
Deselect.
Turn the Opacity back to 100%
Merge Visible the apples and basket.
Resize this merged layer 55%
Add your elements. I used:
E53: Resize 75%/Free rotate
Right 90 degrees
E19: Resize 20%
E27: Resize 85%
E20: Resize 25%
E18: Resize 45%
E32: Resize 50%
E69: Resize 70%
Highlight your white background.
New Raster layer.
Select All.
Copy and paste Paper 3 Into Selection.
Deselect.
Apply the mask.
Resize 115%
Merge Group.
Apply Greg’s Factory Output Vol. II – Pool Shadow:
Use same settings.
Add your credits.
Add your name.
Foreground: #281506
Background: Set to Pattern/Paper
3
Stroke: 1
Type your name.
Convert to Raster layer.
Select All/Float/Defloat
Selections/Modify/Contract by 1.
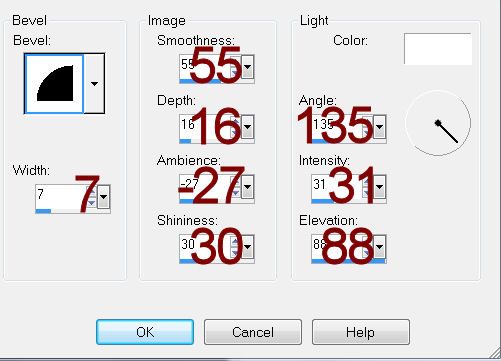
Give it a slight Inner Bevel:

Deselect.
Resize all layers 80%.


No comments:
Post a Comment