Supplies
1 tube of choice – I used the beautiful artwork of Maxine Gadd which
can be purchased from CDO. You must have a license to
use.
Font of choice – I used Frosty here
Weescotlass mask 208 here
Plug Ins used:
Mura’s Meister - Copies
“Let is Snow” is a tagger size
scrap kit created by Melissa of Rabid Designz and can be purchased from Twilight Scraps. You can visit her blog here.
Thank you Melissa for a really beautiful kit.
~♥~ Let’s get started ~♥~
Open up a 700 x 700 blank canvas.
Flood fill white.
Copy and paste Frame 1 as a new layer.
Resize 90%
Click inside of it with your Magic Wand.
Selections/Modify/Expand by 4.
New Raster layer below the frame.
Copy and paste Paper 1 Into Selection.
Deselect.
Highlight the frame layer.
Merge Down.
Copy and paste Frame 3 as a new layer.
Resize 60%
Free rotate Left 10 degrees
Click inside of it with your Magic Wand.
Selections/Modify/Expand by 4.
New Raster layer below the frame.
Copy and paste Paper 3 Into Selection.
Deselect.
Highlight the frame layer.
Merge Down.
Copy and paste Frame 6 as a new layer.
Resize 65%
Free rotate Right 10 degrees.
Make your Freehand Selection Tool active set on Point to Point and
section around the inside area of the frame.
New Raster layer below the frame.
Copy and paste Paper 4 Into Selection.
Deselect.
Highlight the frame layer.
Merge Down.
Copy and paste your tube as a new layer.
If you’re using the same one I did, resize 70%
Add your elements. I used:
31: Position behind the round
frame.
31 again: Resize 70%
3: Resize 60%/Free rotate Left
10 degrees/Duplicate/Mirror
40: Resize 40%
Frame 8: Resize 50%/Duplicate 2x’s
6: Resize 30%
20: Resize 40%
25: Resize 10%/Apply Mura’s
Mesiter – Copies. Choose Wallpaper
(prospective)/use Default settings.
Highlight your white background.
New Raster layer.
Select All.
Copy and paste Paper 8 Into Selection.
Deselect.
Apply the mask.
Resize 110%
Merge Group.
Crop your image.
Add your credits.
Add your name.
Foreground and Background: #f5b8f5
Type your name.
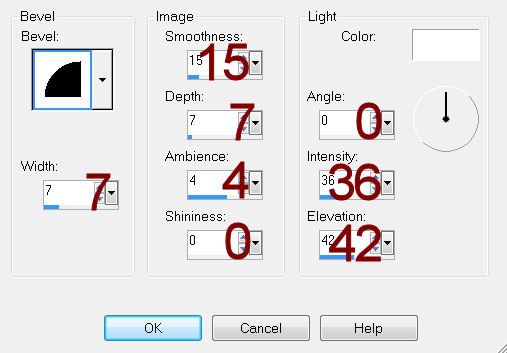
Give it a slight Inner Bevel:

Adjust/Add Remove Noise/Add Noise:
Monochrome and Gaussian checked
Noise: 20%
OK
Select All/Float/Defloat
Selections/Modify/Expand by 2.
New Raster layer below your name.
Flood fill with #ffffff
Deselect.
Merge Visible both name layers.
Resize all layers 80%.


No comments:
Post a Comment