Supplies
1 tube of choice – I used the beautiful artwork of Camilla Drakenborg
which can be purchased from Up Your Art. You must have
a license to use.
Gem Mask 43 here
My template 57 here
Plug Ins used:
Greg’s Factory Output Vol. II – Pool Shadow
“Silver Christmas” is a full size
scrap kit created by Heppy of H.F. Projekte and can be purchased from his store
Inspirations of Scrap Friends. You can visit
his blog here.
Thank you Heppy for a fantastic holiday kit.
~♥~ Let’s get started ~♥~
Open up the template.
Shift + D.
Close out the original.
Delete the credit layer.
Image/Canvas Size:
700 x 700
OK
Highlight the background layer.
Flood fill white.
Highlight Diamond Back 1 layer.
Click on it with your Magic Wand.
New Raster layer.
Copy and paste Paper 6 Into Selection.
Deselect.
Delete the template layer.
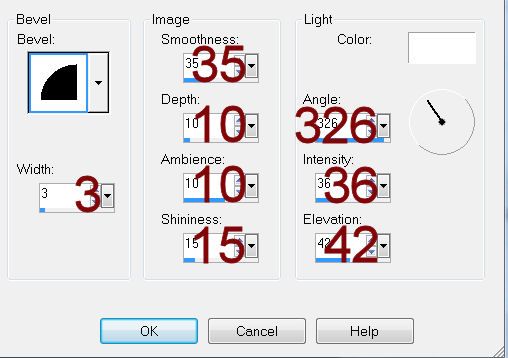
Give it a slight Inner Bevel:

Highlight Diamond Back 2 layer.
Repeat the above step.
Highlight Diamond 1 layer.
Click on it with your Magic Wand.
New Raster layer.
Copy and paste Paper 9 Into Selection.
Deselect.
Delete the template layer.
Highlight Diamond 2 layer.
Repeat the above step.
Highlight Diamond 1 Frame layer.
Click on it with your Magic Wand.
New Raster layer.
Copy and paste Paper 8 Into Selection.
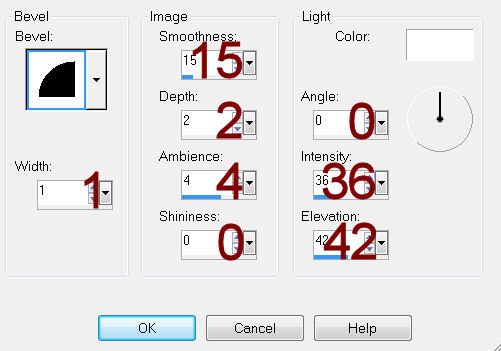
Give it the same slight Inner Bevel.
Adjust/Add Remove Noise/Add Noise:
Gaussian and Monochrome checked
71% Noise
OK
Deselect.
Delete the template layer.
Highlight Diamond 2 Frame layer.
Repeat the above step.
Highlight Circle layer.
Click on it with your Magic Wand.
New Raster layer.
Copy and paste Element 10 Into Selection.
Deselect.
Delete the template layer.
Click inside the frame with your Magic Wand.
Selections/Modify/Expand by 4.
New Raster layer below the frame.
Copy and paste Paper 1 Into Selection.
Deselect.
Highlight Rectangle layer.
Click on it with your Magic Wand.
New Raster layer.
Copy and paste Paper 3 Into Selection.
Deselect.
Delete the template layer.
Give the paper layer a slight Inner Bevel:

Highlight Top Line layer.
Click on it with your Magic Wand.
New Raster layer.
Copy and paste Paper 8 Into Selection.
Deselect.
Delete the template layer.
Give it the same Inner Bevel you used first in this tutorial.
Highlight Bottom Line layer.
Repeat the above step.
Copy and paste your tube as a new layer.
Move it into position over the center diamond paper so that your tube
covers both the top and bottom center diamonds.
Duplicate the tube layer and move it above the other center diamond in
your layers pallet.
To each center diamond layer:
Click anywhere outside of it with your Magic Wand.
Highlight the tube layer just above it in your layers pallet.
Tap the delete key.
Deselect.
Lower the Opacity of the tube layer to about 40.
Copy and paste your tube as a new layer.
Move into position in front of the circle frame – see my tag for
reference.
Add your elements. I used:
35: Resize 10/Duplicate
2: Resize 30%
6: Resize 20%/Duplicate
3: Resize 15%
31: Resize 30%
5: Resize 25%
30: Resize 10% and
70%/Duplicate/Resize 70% - Use Pick tool to turn stars this way and
that/Duplicate and resize as you like
Highlight your white background.
New Raster layer.
Select All.
Copy and paste Paper 8 Into Selection.
Deselect.
Apply the mask.
Merge Group.
Add your credits.
Add your name.
Color Pallet:
Foreground: #000000
Background: Pattern/Paper 8
Stroke: 1.0
Type your name.
Convert to Raster layer.
Select All/Float/Defloat
Selections/Modify/Contract by 1
Apply Greg’s Factory Output Vol. II – Pool Shadow:
Use Default settings accept move the intensity bar to 255
OK
Deselect.
Resize all layers 80%.


No comments:
Post a Comment