Supplies
Font of choice – I used SoPosh here
Vix Mask 452 here
Plug Ins used:
Brush Stroke – Crosshatch
“Christmas Stocking” is a tagger
size scrap kit, also available in full size created by Leanne of Bella’s
Designs and can be purchased from BellaZingara Stuidio. You can visit her
blog here.
Thank you Leanne for a fantastic Christmas kit!
~♥~ Let’s get started ~♥~
Open up a 700 x 700 blank canvas.
Flood fill white.
Copy and paste Frame 2 as a new layer.
Resize 60%
Click inside of it with your Magic Wand.
Selections/Modify/Expand by 4.
New Raster layer below the frame.
Copy and paste Paper 4 Into Selection.
Deselect.
Apply Brush Strokes – Crosshatch:
Stroke length: 9
Sharpness: 6
Strength: 1
OK
Close out your white background.
Merge Visible.
Reopen your white background.
Duplicate the merged layer.
Move both into position – see my tag for reference.
Copy and paste Frame 5 as a new layer.
Resize 90%
Click inside of it with your Magic Wand.
Selections/Modify/Expand by 4.
New Raster layer below the frame.
Copy and paste Paper 8 Into Selection.
Deselect.
Highlight the frame layer.
Merge Down.
The frame and paper should now be on the same layer.
Move into position – See my tag for reference.
New Raster layer.
Make your Selection Tool active set on Circle.
Create a circle approximately 375 pixels.
Copy and paste Paper 1 Into Selection.
Deselect.
Move this circle into its exact position – see my tag for reference.
Click anywhere outside of it with your Magic Wand.
Selections/Invert
New Raster layer.
Copy and paste Paper 11 Into Selection.
Deselect.
Copy and paste the following elements and move into position within the
circle paper – see my tag for reference.
Don’t worry about what overhangs the paper edge. We’ll clean that up in a bit.
Element 52
Element 32: Lower the Opacity to
about 14
Element 32 again: Resize 60%
Element 45: Resize 40%
Element 56: Duplicate/Mirror
Highlight the circle paper layer.
Click anywhere outside of it with your Magic Wand.
Highlight each element and tap the delete key.
Deselect.
Add the rest of your elements. I
used:
Element 46: Resize 40%
Element 14: Resize 50%
Element 26: Resize 60%
Element 38: Resize 25%/Duplicate/Resize
70%/Flip/Duplicate
Element 55: Resize 85%
Highlight your white background.
New Raster layer.
Select All.
Copy and paste Paper 7 Into Selection.
Deselect.
Apply the mask.
Use your Pick Tool and pull the sides out slightly.
Merge Group.
Add your credits.
Add your name.
Color Pallet:
Foreground: #000000
Background: #810406
Stroke: 0.8
Type your name.
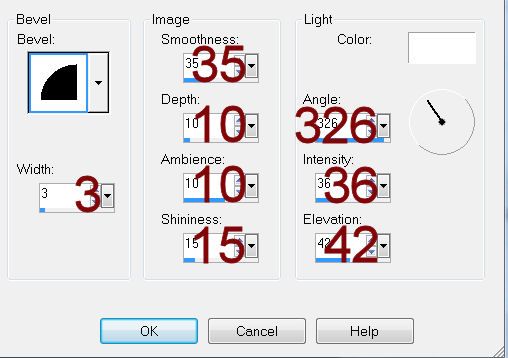
Give it a slight Inner Bevel:

Resize all layers 80%.


No comments:
Post a Comment