

Supplies
1 tube of choice – I used the beautiful artwork of Zindy S.D. Nielsen
which can be purchased from her shop here. You must have a license to use.
Font of choice – I used Wretched here
Vix mask 452 here
Plug Ins used:
Brush Strokes - Crosshatch
“Winter’s Here” is a tagger size
scrap kit created by Melissa of P & A Dezigns and can be purchased from Heartbeatz Creationz. You can visit
her blog here.
Thank you Melissa for a really beautiful kit.
~♥~ Let’s get started ~♥~
Open up the template.
Shift + D.
Close out the original.
Resize all layers 90%
Image/Canvas Size:
675 x 575
OK
Highlight Raster 1 layer
Flood fill white.
Delete the top 2 layers, and Heart layers 1, 2, and 3.
Highlight Glitter Circle 1 layer.
Click anywhere outside of it with your Magic Wand.
New Raster layer.
Flood fill with #f1f1f1
Adjust/Add Remove Noise/Add Noise:
Uniform and Gaussian checked
Noise: 45%
OK
Deselect.
Delete the template layer.
Repeat the above set with:
Glitter Circle Left
Glitter Circle Right
Glitter Circle Center
Highlight Circle 1 layer.
Click on it with your Magic Wand.
New Raster layer.
Copy and paste Paper 1 Into Selection.
Copy and paste Element 5 as a new layer.
Move into position over the paper layer – see my tag for reference.
Selections/Invert
Tap the delete key.
Deselect.
Delete the template layer.
Highlight Rectangle 1 layer.
Click on it with your Magic Wand.
New Raster layer.
Copy and paste Paper 5 Into Selection.
Apply Brush Strokes – Crosshatch:
Use Default settings accept move the Stroke Length to about 22.
Deselect.
Delete the template layer.
Highlight Rectangle 2 layer.
Click on it with your Magic Wand.
New Raster layer.
Copy and paste Paper 1 Into Selection.
Deselect.
Delete the template layer.
Highlight Circle Left layer.
Click on it with your Magic Wand.
New Raster layer.
Copy and paste Paper 3 Into Selection.
Deselect.
Delete the template layer.
Highlight Circle Right layer.
Repeat the above step.
Highlight Circle Center layer.
Click on it with your Magic Wand.
New Raster layer.
Copy and paste Paper 5 Into Selection.
Copy and paste your tube as a new layer – move into position over the
paper layer.
Selections/Invert
Tap the delete key.
Copy and paste Element 5 as a new layer.
Resize 70%
Position over the paper layer – see my tag for reference.
Duplicate – move into position – see my tag for reference.
Highlight each element layer and tap the delete key.
Deselect.
Delete the template layer.
Add your elements. I used:
48: Resize 50%/Flip/Duplicate/Mirror
23: Resize 30%/Duplicate/Resize
70%/Flip/Duplicate
20: Resize 30%/Duplicate/Mirror
32: Resize 30%/Mirror
10: Resize 85%
7: Resize 40%
11: Resize 20%/Duplicate/Resize
70%
43: Resize 40%/Duplicate/Mirror
Highlight your white background.
New Raster layer.
Select All.
Copy and paste Paper 8 Into Selection.
Deselect.
Apply the mask.
Merge Group.
Move it slightly to the left.
Duplicate/Mirror
Position both masks so that you can see a little bit of the it on the
upper portion of your canvas on the left and right side.
Merge Visible both mask layers.
Duplicate
Flip
Add your credits.
Add your name.
Foreground and Background: #384e63
Type your name.
Give it a slight Inner Bevel:
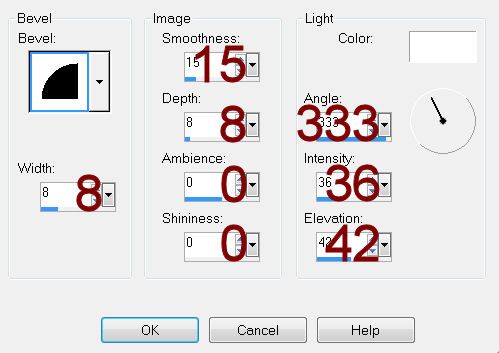
Resize all layers 80%.
Beautiful tutorial, thank you
ReplyDeleteThank you and you're very welcome.
ReplyDeleteMerry Christmas!