Supplies
Font of choice - I used Dragonfly here
“Poseidon’s Adventure 2012 ” is a tagger size scrap kit created by Dianna
of Digicats (& Dogs) and can be purchased from her store CountryCorner Creations. You can visit her blog here.
Thank you for a truly AMAZING kit Dianna!
This tutorial was written assuming you have a working knowledge of PSP.
~♥~ Let’s get started ~♥~
Open up a 700 x 700 blank canvas.
Flood fill white.
Copy and paste Frame 10 as a new layer.
Resize 60%
Duplicate
Position both frames on your canvas – see my tag for reference.
To each frame:
Click inside of it with your Magic Wand.
Selection/Modify/Expand by 35
New Raster layer below the frame.
Copy and paste Paper 12 Into Selection.
Deselect.
Add your elements below each of the frames. Don’t worry about what overhangs the
frames. We’ll clean that up in a bit. I used:
Top Frame:
Castle 1:
Resize 40%
Sea Turtle: Resize
30%
Reef: Resize 30%/Duplicate
(position beneath the bottom frame)
Scalar Fish 1:
Resize 30%/Duplicate
Seaweed 04: Resize
40%/Duplicate 2x’s (position beneath the bottom frame)
Bottom Frame:
Fishies: Resize
30%
Angel Fish: Resize
30%/Duplicate 2x’s
Seaweed 03: Resize
15%/Duplicate 2x’s
To clean the mess up of any elements that are sticking
out from behind the frames-
To each frame:
Highlight the paper layer.
Click anywhere outside of it with your Magic Wand.
Highlight each element that overhangs the frame.
Tap the delete key.
Deselect.
Add the rest of your elements. I used:
Boat: Resize
70%/Mirror
Castle 2: Resize 80%
Seaweed 06
Seaweed 07: Resize
30%
Starfish 02:
Resize 25%
Starfish:
Resize 25%/Free rotate Right 40 degrees
Bubbles: Resize
50%
Highlight your white background layer.
Copy and paste Sand as a new layer.
Resize 90%
Move it to the bottom of your canvas so the bottom of the element is
flush with the bottom of your canvas.
Apply the mask.
Merge Group.
Duplicate
Highlight your white background.
New Raster layer.
Select All.
Copy and paste Paper 16 Into Selection.
Deselect.
Apply the mask.
Merge Group.
Use your Eraser Tool, lower the Hardness to about 40, and erase the
area that you can see below the sand – taking care to blend it neatly where
background paper mask layer and sand mask layer meet.
Add your credits.
Add your name.
Foreground & Background: #404040
Stroke: 1
Type your name.
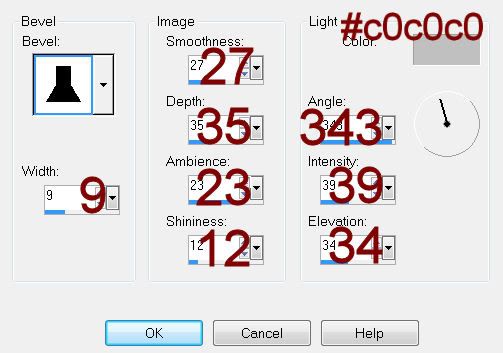
Apply a slight Inner Bevel:

Resize all layers 80%.


No comments:
Post a Comment