Supplies
1 tube of choice – I used the beautiful artwork of Christina Lank which can be purchased from PSP Tube Stop. You must have a license to use.
My Supplies here –
2 elements and 3 papers.
This tutorial was written assuming you have a working knowledge of PSP.
~♥~ Let’s get started ~♥~
Open up the template.
Shift + D.
Close out the original.
Image/Canvas Size:
700 x 600
OK
Highlight the background layer.
Flood fill white.
Delete the credit layer.
Highlight Rectangle 1 layer.
Click on it with your Magic Wand.
New Raster layer.
Copy and paste Paper 2 Into Selection.
Deselect.
Delete the template layer.
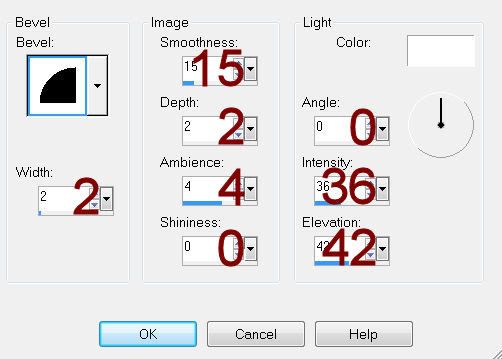
Give it a slight Inner Bevel:

Highlight Rectangle 2 layer.
Repeat the above step.
Highlight Circle 1 layer.
Click on it with your Magic Wand.
New Raster layer.
Copy and paste Paper 1 Into Selection.
Deselect.
Delete the template layer.
Highlight Strip 1 layer.
Click on it with your Magic Wand.
New Raster layer.
Copy and paste Paper 1 Into Selection.
Deselect.
Delete the template layer.
Give it the same slight Inner Bevel.
Open Paper.
Mirror
Copy
Highlight Strip 2 layer.
Click on it with your Magic Wand.
New Raster layer.
Paste Paper 2 Into Selection.
Deselect.
Delete the template layer.
Give it the same slight Inner Bevel.
Highlight Circle 2 layer.
Click on it with your Magic Wand.
New Raster layer.
Copy and paste Paper 3 Into Selection.
Copy and paste your tube as a new layer over the paper layer.
Selections/Invert
Use your Eraser Tool and erase only the parts of the tube you don’t
want to overhang the circle paper .
Deselect.
Delete the template layer.
Color Pallet:
Foreground: #ffc0ff
Background: #006ba5
Highlight Dotted Circle layer.
Make your Color Replacer Tool active.
Hold it over the Dotted Circle layer and double right click.
It should have turned to the blue color.
Repeat the above step with Dotted Line 1 and Dotted Line 2 layers.
Add
your elements. I used:
I used 2 of the birds that came with the tube:
BlueBird 3: Resize 50%
BlueBird 1: Resize 40%
EL 1: Duplicate 2 x’s, mirror
one of them.
EL 2
Highlight your white background.
New Raster layer.
Select All.
Copy and paste Paper 1 Into Selection.
Apply the mask.
Merge Group.
Duplicate
Merge Down.
Duplicate
Flip
Add your credits.
Add your name.
Foreground and Background: #404040
Stroke: 1
Type your name.
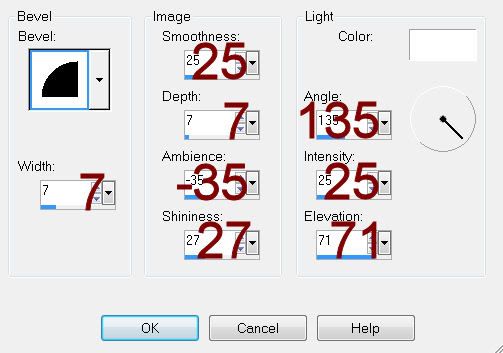
Apply a slight Inner Bevel:

Resize all layers 80%.


No comments:
Post a Comment