

Supplies
1 tube of choice – I used the beautiful artwork of Meg Baker which can
be purchased from PSP Tube Stop. You must have
a license to use.
Vix mask 452 here
Tracy’s Autumn Template 1 here –
Scroll down the blog, on the right side you’ll find it under
“Tracy’s Bulk Templates”, “Tracy’s Autumn Templates 1 - 7”
Supplies which I provide here -
Papers, Ribbon, Paper Hearts, and Flowers
Plug Ins used:
Eyecandy 3.1 - Glow
This tutorial was written assuming you have a working knowledge of PSP.
~♥~ Let’s get started ~♥~
Open up the template.
Shift + D.
Close out the original.
Image/Canvas Size
650 x 625
OK
New Raster layer
Send to bottom
Flood fill white
Delete the top 2 layers.
Highlight Circle layer.
Click on it with your Magic Wand.
New Raster layer.
Copy and paste Paper 1 Into Selection.
Deselect.
Delete the template layer.
Apply Eyecandy 3.1 – Glow:
Width: 3
Opacity: 100%
Opacity Drop off: Fat
Color: White
OK
Highlight Rectangle layer.
Click on it with your Magic Wand.
New Raster layer.
Copy and paste Paper 2 Into Selection.
Deselect for now.
Delete the template layer.
Highlight Squares layer.
Repeat the above step.
Highlight the Frame layer.
Select All/Float/Defloat
New Raster layer.
Flood fill with #04791f.
Adjust/Add Remove Noise/Add noise:
Uniform and Monochrome checked
Noise: 54%
OK
Deselect.
Delete the template layer.
Repeat the above step with Frames layer.
Copy and paste Vines layer from the tube layers.
Resize 65%
Duplicate/Flip
Position both of these frames on the left side of the frame – see my
tag for reference.
Merge Down – both vines should be on the same layer.
Duplicate/Mirror/Position at the right side of the rectangle paper
layer.
Highlight the rectangle paper layer.
Click anywhere outside of it with your Magic Wand.
Highlight the vines layer.
Tap the delete key.
Deselect.
Copy and paste your tube as a new layer over the vines layer.
Resize 65%
Move into position.
Duplicate/Mirror/Move this tube layer above the Squares paper layer.
Change the Property to Burn.
Highlight the Squares paper layer.
Click anywhere outside of it with your Magic Wand.
Highlight the tube layer above it.
Tap the delete key.
Deselect.
Highlight the rectangle paper layer.
Click anywhere outside of it with your Magic Wand.
Highlight the tube layer above it.
Tap the delete key.
Deselect.
Copy and paste Birds from the tube layers as a new layer.
Resize 45%
Add the elements supplied:
See my tag for placement
Highlight your white canvas.
New Raster layer.
Select All.
Copy and paste Paper 2 Into Selection.
Deselect.
Duplicate/Change the Properties to Multiply.
Merge down.
Apply the mask.
Resize 105%
Merge Group.
Duplicate/Change the Properties to Multiply
Add your name.
Foreground: #000000
Background: #f11f52
Stroke width: 1
Type your name.
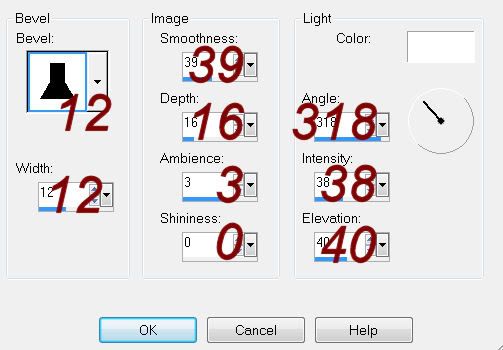
Give it a slight Inner Bevel:
Resize all layers 90%.
Hi Sweetie, love this tut! I just wanted to give you a link for that font, it's a freebie lots of places but here's one link
ReplyDeletehttp://www.fontsquirrel.com/fonts/dancing-script-ot
Hugs, Ellie
Oh wow, thanks so much Ellie!! I really appreciate that:) So thrilled you like the tut!!
ReplyDeleteHugs
Bev
Beautiful work Bev! Thanks :)
ReplyDelete