

Supplies
1 tube of choice – I used the wonderful artwork of PinUpToons which can
be purchased from CDO. You must have
a license to use.
Font of choice - I used Jive here
“Thank You” is a full size scrap
kit created by Cinnamon Scraps. This is an exclusive Facebook freebie. The download link can be found on her blog
here under Thursday, January 5, 2012.
This tutorial was written assuming you have a working knowledge of PSP.
~♥~ Let’s get started ~♥~
Open up a 700 x 700 blank canvas.
Food fill white.
Copy and paste Frame 1 as a new layer.
Resize 25%
Duplicate/Resize 60%
Move both frames into position – see my tag for reference.
Highlight the large frame.
Click inside of it with your Magic Wand.
Selections/Modify/Expand by 2.
New Raster layer below the frame.
Copy and paste Paper 1 Into Selection.
Deselect.
Highlight the smaller frame.
Click inside of it with your Magic Wand.
Selections/Modify/Expand by 2.
New Raster layer below the frame.
Copy and paste Paper 5 Into Selection.
Copy and paste your tube as a new layer below the frame.
Move into position.
Selections/Invert
Tap the delete key.
Deselect.
Change the Properties to Soft Light.
Copy and paste your tube as a new layer.
Position it in front of the large circle frame – see my tag for reference.
Duplicate/Move to the right and below the frame in your layers pallet.
Change the Properties to Soft Light.
Highlight the large Circle paper layer.
Click anywhere outside of it with your Magic Wand.
Highlight the tube just above the paper layer.
Tap the delete key.
Deselect.
Make your Selection Tool active set on Rectangle.
Create a rectangle approximately 350 x 475 pixels.
Copy and paste Paper 4 as a new layer.
Resize 20%
Selections/Invert
Tap the delete key.
Deselect.
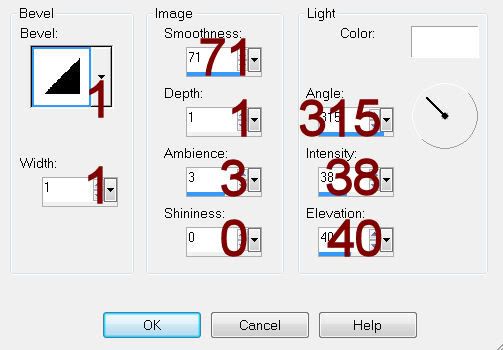
Give it a slight Inner Bevel:
Add your elements. I used:
Bow 3: Resize 25% and 40%
Ribbon 4: Resize 25%/Duplicate
Flower 3: Resize 25% and
45%/Duplicate/Resize 70%
Flower 4: Resize 25% and
60%/Duplicate/Resize 70%
Doodle: Resize 25%
Ric Rac: Resize 25% and 35%
Leaves: Resize 25% and
40%/Flip/Free Rotate Left 40 degrees
Duplicate/Flip
Brush Work: Resize 25%/Use Pick
Tool to pull the top up slightly
Add your name.
Color Pallet:
Foregroud: #211d1d
Background: #ce6385
Stroke Width: 1.4
Type your name.
Convert to Raster layer.
Select All/Float/Defloat
Copy and paste Brush Work as a new layer.
Change the Properties to Overlay.
Move into a position you like.
Selections/Invert
Tap the delete key.
Selections/Invert
Selections/Modify/Contract by 1.
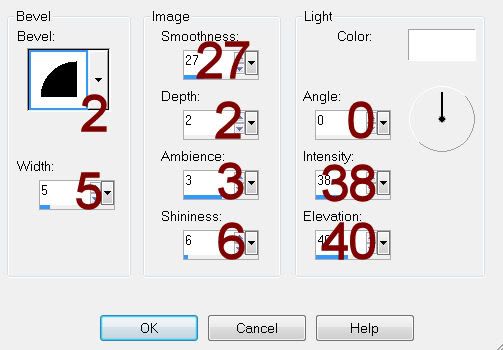
Give it a slight Inner Bevel:
Deselect.
No comments:
Post a Comment