Supplies
1 tube of choice – I used the adorable artwork of Lisa Victoria which
can be purchased from Up Your Art. You must have
a license to use.
Font of choice - I used Ravie which came with my PSP Program
Becky Mask 22 here
Dee’s Sign Post Template “Blingin” which can be found here
under Monday, April 25, 2011
under Monday, April 25, 2011
Plug Ins:
Greg’s Factory Output Vol. II – Pool Shadow
The supplies which I created myself are here:
Paper, Berry Bushes, Ribbons, Flowers, and Twinks
This tutorial was written assuming you have a working knowledge of PSP.
~♥~ Let’s get started ~♥~
Open up the template.
Shift + D.
Close out the original.
Delete the top 3 layers, Pixel Words, Glittered Grunge
Highlight Large Beige Circle layer.
Click on it with your Magic Wand.
New Raster layer.
Flood fill with #629643.
Adjust/Add Remove Noise/Add Noise:
Random and Monochrome checked
Noise: 30
OK
Deselect.
Delete the template layer.
Repeat the above step with Small Black Circle layer.
Highlight Black Circle layer.
Click on it with your Magic Wand.
New Raster layer.
Copy and paste the Image layer (Image LV0060 Magic Fireflies) Into
Selection.
Deselect.
Delete the template layer.
Highlight Beige Rectangle layer.
Click anywhere outside of it with your Magic Wand.
Copy and paste the paper that I supplied as a new layer.
Move into a position you like.
Tap the delete key.
Deselect.
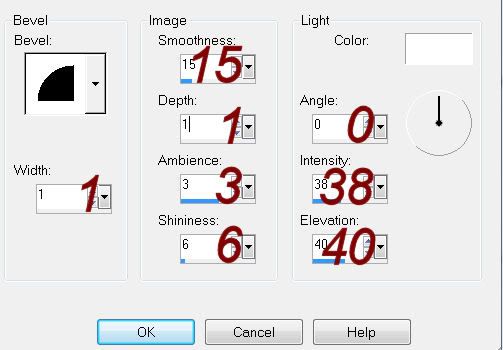
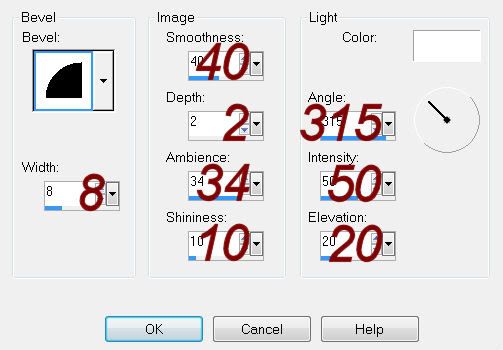
Give it a slight Inner Bevel:

Highlight Brown Rectangle layer.
Click on it with your Magic Wand.
New Raster layer.
Paste the paper Into Selection.
Deselect.
Delete the template layer.
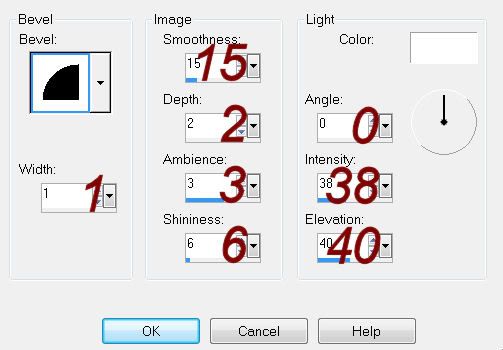
Give it the same slight Inner Bevel.
Highlight Stars layer.
Click anywhere outside of the stars with your Magic Wand.
Selections/Invert
New Raster layer.
Flood fill with #42a37f
Deselect.
Apply the same Noise effect.
Delete the template layer.
Highlight Black Strip layer.
Click on it with your Magic Wand.
New Raster layer.
Flood fill with the same color you just used.
Deselect.
Delete the template layer.
Give it a slight Inner Bevel:

Apply Greg’s Factory Output Vol. II
- Pools Shadow:
Use Default settings accept lower the Intensity bar to about 25.
Highlight the image layer in the tube layer.
Using your Selection Tool set on Rectangle, section out the top left
corner of the image – just get the blue sky area.
Copy.
Highlight Small Beige Circle layer.
Click on it with your Magic Wand.
New Raster layer.
Paste (the sky area) Into Selection.
Copy and paste the tube as a new layer – I used layer Tube (b) LV0060 Magic Fireflies.
Resize 85%
Move into a position you like.
Selections/Invert
Tap the delete key.
Deselect.
Delete the template layer.
Change the Properties of the tube to Soft Light.
Duplicate
Paste the tube again.
Resize 70%
Position in front of the green strip.
Add your elements. I used:
2: Resize 70%/Flip
3: Resize 70%
4: Resize 70%
5: Resize 70%
6: Resize 65%
7: Resize 65%/Duplicate/Resize
70%
8: Resize 65%
9: Duplicate
Layer Tube (d) LV0060 Magic
Fireflies: Resize 25%/Mirror
Highlight your white canvas.
New Raster layer.
Select All.
Copy and paste the Image layer Into Selection.
Deselect.
Adjust/Blur/Gaussian Blur:
Radius: 15
OK
Adjust/Blur/Gaussian Blur:
Radius: 15
OK
Apply the mask.
Merge Group.
Add your name.
Foreground: Black
Background: #4a7294
Stroke Width: 1
Type your name.
Convert to Raster layer.
Select All/Float/Defloat
Copy and paste the Paper Into Selection.
Give it a slight Inner Bevel:

Adjust/Add Remove Noise/Add Noise:
Uniform and Monochrome checked
Noise: 15
OK
Deselect.
Give your name a drop shadow on its own layer.
Click the Layer Link Toggle (at the top of your layers pallet) until it
says “none”.
Use your Pick Tool to squash the shadow a bit and position it better
behind your name.
Resize all layers 80%.


No comments:
Post a Comment