Supplies
2 tubes of choice – I used the amazing artwork of Katerina Koukiotis which
can be purchased from PSP Tube
Stop. You must have a license to use.
Font of choice - I used Before the Rain here
Weescotlass Mask 208 here
Divine Intentionz Template 379 here
Plug Ins used:
Eyecandy 3.1 - Glow
“The Breath of an Angel” is a tagger size scrap kit created by Conchi
of DnScraps and can be purchased from Butterfly Blush Designs. You can visit
her blog here.
Thank you Conchi for a truly breathtaking kit.
This tutorial was written assuming you have a working knowledge of PSP.
~♥~ Let’s get started ~♥~
Open up the template.
Shift + D.
Close out the original.
Image/Canvas Size:
750 x 650
OK
Highlight and open up the background layer.
Flood fill white.
Delete the top 4 layers.
Highlight Square layer.
Click on it with our Magic Wand.
New Raster layer.
Copy and paste Paper 4 Into Selection.
Copy and paste dnLights as a new layer.
Resize 40%/Move into position over the rectangle.
Selections/Invert
Tap the delete key.
Deselect.
Delete the template layer.
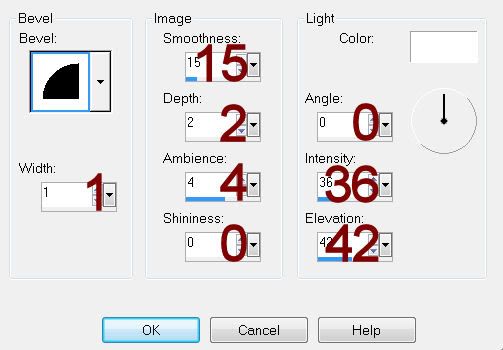
Give the paper a slight Inner Bevel:

Highlight Large Circle layer.
Click on it with your Magic Wand.
New Raster layer.
Copy and paste Paper 5 Into Selection.
Deselect.
Delete the template layer.
Apply Eyecandy 3.1 – Glow:
Width: 3
Opacity: 100%
Opacity Drop Off: Fat
Color: White
OK
Highlight Square 1 layer.
Click on it with your Magic Wand.
New Raster layer.
Copy and paste Paper 16 Into Selection.
Give it the same slight Inner Bevel.
Duplicate
Change the Properties to Multiply.
Deselect.
Delete the template layer.
Highlight Square 2 layer.
Click on it with your Magic Wand.
New Raster layer.
Copy and paste Paper 3 Into Selection.
Deselect.
Delete the template layer.
Give it the same Slight Inner Bevel.
Highlight Large Circle 4 layer.
Click on it with your Magic Wand.
New Raster layer.
Copy and paste Paper 2 Into Selection.
Deselect.
Delete the template layer.
Adjust/Add Remove Noise/Add Noise:
Uniform and Monochrome checked
Noise: 33%
OK
Highlight Large Circle 2 layer.
Click on it with your Magic Wand.
New Raster layer.
Copy and paste Paper 10 Into Selection.
Duplicate
Change the Properties to Multiply.
Deselect.
Delete the template layer.
Highlight Large Circle 3 layer.
Click on it with your Magic Wand.
New Raster layer.
Copy and paste Paper 12 Into Selection.
Copy and paste your tube as a new layer.
Selections/Invert
Tap the delete key.
Deselect.
Delete the template layer.
Change the Properties of the tube layer to Multiply.
Highlight Small Circle layer.
Click on it with your Magic Wand.
New Raster layer.
Copy and paste Paper 15 Into Selection.
Copy and paste your tube as a new layer.
Position it more on the right side of the circle.
Selections/Invert
Tap the delete key.
Lower the Opacity to about 26.
Paste your tube again, resize a little smaller than the other tube.
Position more on the right side of the circle.
Tap the delete key.
Deselect.
Delete the template layer.
Add your elements. I used:
Charm: Resize 80%/Duplicate/Resize
65%
Bow 2: Resize 25% and 80%/Mirror.
Feathers: Resize 30%
Glitter Angel: Resize 35%
Swan: Resize 40%
Lights 2: Resize 25%
Dragonfly: Resize 25%/Duplciate/Mirror
Stars
Highlight your white canvas.
New Raster layer.
Select All.
Copy and paste Paper 2 Into Selection.
Deselect.
Apply the mask.
Resize 115%
Merge Group.
Duplicate
Change the Properties to Multiply.
Lower the Opacity to about 44.
Add your name.
Resize all layers 80%


i love it so much thank you so much for doing such beautiful tutorial and tag with my art so beautiful love it, if it's not too much trouble would love to have one with my name too ,thank you for using my art xoxo
ReplyDelete