Supplies
1 tube of choice – I used the wonderful artwork of PinUpToons which can
be purchased from CDO. You must have a license to use.
Font of choice - I used HFF Thai Dye here
Weescotlass Mask 208 here
Plugs Ins:
Eyecandy 3.1 – Glow
“Rions Heart” is a tagger size scrap
kit created by KissedbyPix and can be
purchased from her store TKO Scraps. You can visit her
blog here.
Thank you Pixie for such a terrific kit.
This tutorial was written assuming you have a working knowledge of PSP.
~♥~ Let’s get started ~♥~
Open up a 700 x 700 blank canvas.
Flood fill white.
New Raster layer.
Make your Selection Tool active set on Circle and create a circle
approximately 450 pixels.
Flood fill with #efefef
Adjust/Add Remove Noise/Add Noise:
Uniform and Monochrome checked
Noise: 33%
OK
Duplicate/Close this layer out.
We’ll come back to it later.
Selections/Modify/Contract by 7.
New Raster layer.
Copy and paste Paper 9 Into Selection.
Duplicate
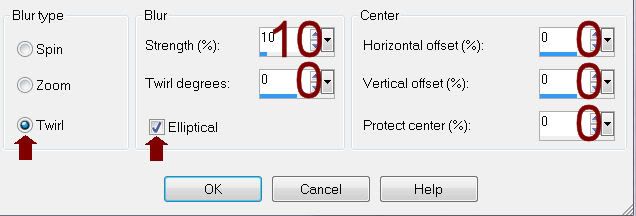
Adjust/Blur/Radial Blur –
Match your settings to mine:

Open up the duplicate glitter layer.
Resize 70%
Move into position – see my tag for reference.
Click anywhere outside of it with your Magic Wand.
Selections/Invert
New Raster layer.
Copy and paste Paper 9 Into Selection.
Duplicate
Adjust/Blur/Radial Blur:
Use same settings.
Copy and paste your tube as a new layer over the radial blur paper
layer..
Selections/invert
Tap the delete key.
Deselect.
Change the Properties to Luminance.
Lower the Opacity to about 57.
OK
Add your elements. I used:
Heart bead Frame 3: Resize
40%/Free rotate Left 20 degrees/Duplicate/Mirror
Heart Frame 3: Resize 110%
Heart Frame 3 again: Resize 65%
Heart Line 4
Bow 4: Resize 25%/Duplicate
Heart Dangles 4: Resize 60%
Highlight your white canvas.
New Raster layer.
Select All.
Copy and paste Paper 9b Into Selection.
Deselect.
Apply the mask.
Merge Group.
Add your name.
Color Pallet:
Foreground and Background: #000000
Apply Eyecandy 3.1 Glow:
Width: 3
Opacity: 100%
Opacity Drop Off: Fat
Color: white
Resize all layers 80%.


No comments:
Post a Comment