

Supplies
1 tube of choice – I used the wonderful artwork of Tim Lowery which can
be purchased from PSP Tubes Emporium. You must have a license to use.
Font of choice - I used Luna Bar here
Dee’s Sign Post Template “Cleavage” here under December 29, 2011
Weescotlass Mask 208 here
Plug Ins:
Eyecandy 3.1 – Glow
“Girls Night Out” is tagger size FTU scrap kit created by Lorraine of Artlor
Deisgns and can be purchased from Lollipops n Gumdrops. You can visit her blog here.
Thank you Lorraine for an awesome kit.
This tutorial was written assuming you have a working knowledge of PSP.
~♥~ Let’s get started ~♥~
Open up the template.
Shift + D.
Close out the original.
Resize all layers 85%
Image/Canvas Size
700 x 600
OK
Open up Bg layer and flood fill white.
Delete the top 8 layers, Purple Shape, Dotted Rectangle, and White
Rectangle.
Highlight Purple Oval layer.
Click on it with your Magic Wand.
New Raster layer.
Copy and paste Paper 6 Into Selection.
Deselect.
Delete the template layer.
Highlight Purple Rectangle layer.
Click inside of it with your Magic Wand.
New Raster layer.
Copy and paste Paper 14 Into Selection.
Deselect.
Delete the template layer.
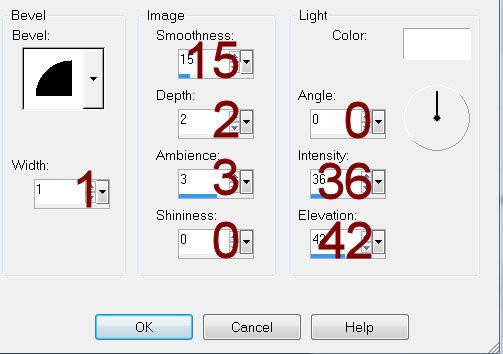
Give it a slight Inner Bevel:
Highlight Drk Purple Strip layer.
Click on it with your Magic Wand.
New Raster layer.
Copy and paste Paper 13 Into Selection.
Deselect.
Delete the template layer.
Give it the same slight Inner bevel.
Highlight Black Strip layer.
Click anywhere outside of it with your Magic Wand.
Copy and paste Paper 9 as a new layer.
Tap the delete key.
Deselect.
Delete the template layer.
Give it the same slight Inner bevel.
Highlight Purple Strip layer.
Click on it with your Magic Wand.
New Raster layer.
Copy and paste Paper 15 Into Selection.
Deselect.
Delete the template layer.
Give it the same slight Inner bevel.
Copy and paste Frame 6 as a new layer.
Resize 33%
Duplicate twice for a total of 3 frames.
Position them over Dotted White Circles template layer.
Delete Dotted White Circle template layer, White Circles, and Purple
Circles.
To each frame:
Click inside of it with your Magic Wand.
Selections/Modify/Expand by 4.
New Raster layer below the frame.
Copy and paste Paper 12 Into Selection.
Deselect.
To the left and right frames:
Highlight the paper layer.
Click anywhere outside of it with your Magic Wand.
Copy and paste your tube as a new layer above the paper.
Move into a position you like.
Tap the delete key.
Deselect.
Change the Properties to Luminance (Legacy).
Copy and paste your tube as a new layer.
Position in front of the center frame.
Add your elements. I used:
Ipod: Resize 95%/Free rotate
Left 10 degrees
Bow 2: Resize
25%/Duplicate/Mirror
Star Dangles 2: Resize
25%/Duplicate/Mirror
Fan: Resize 60%/Free rotate
Right 10 degrees
Record and Discs: Resize 40%
Tunes: Circle around the group
of notes with your Magic Wand/copy/Paste as a new layer on your canvas. Resize 70%
Pearl Swag 1: Resize 75%
Highlight your white canvas.
New Raster layer.
Select All.
Copy and paste Paper 4 Into Selection.
Deselect.
Apply the mask.
Merge Group.
Add your name.
Type your name.
Convert to Raster layer.
Apply Eyecandy 3.1 – Glow
Width: 3
Opacity: 100
Opacity Drop off: Fat
Color: White
OK
Resize all layers 80%
No comments:
Post a Comment