Supplies
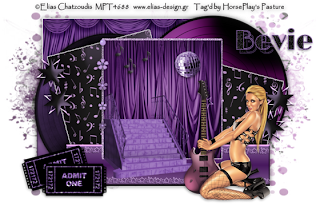
1 tube of choice - I used the artwork of Elias Chatzoudis which can now be purchased from PSP Tubes Emporium. You must have a license to use.
Font of choice - I used Lime Light here
Divine Intentionz Template 401 here
Vix mask 431 here
Eyecandy 3.1 - Glow
“Amelia Rock Princess” is a scrap kit created by Shell of Shell’s Scraps and can be purchased from Aussie Scrap Designs. You can visit her blog here.
This tutorial was written assuming you have a working knowledge of PSP.
~♥~ Let’s get started ~♥~
Open the template.
Shift + D.
Close out the original.
Resize all layers 85%
Image/Canvas Size
700 x 450
OK
Open up Raster 1 layer and flood fill white.
Delete by Missy layer, Word Art, and Word Art Shadow layer.
Because the rectangle layers are named the same and just so you won’t become confused - we’ll be working from the bottom of the layers pallet upward to the top.
Highlight Rectangle layer. (just above the white canvas in the layers pallet)
Click on it with your Magic Wand.
New Raster layer.
Copy and paste Paper 2 Into Selection.
Deselect.
Delete the template layer.
Apply Eyecandy 3.1 - Glow:
Width: 3
Opacity: 100
Opacity Drop off: Fat
Color: White
OK
In your layers pallet:
Foreground: choose a light purple color
Background: choose a dark purple color
Set the foreground to gradient:
Style: Linear
Angle: 0
Repeat: 1
Invert checked
OK
Highlight Rectangle layer. (just above the curtain paper layer)
Click on it with your Magic Wand.
New Raster layer.
Flood fill with the gradient.
Deselect.
Delete the template layer.
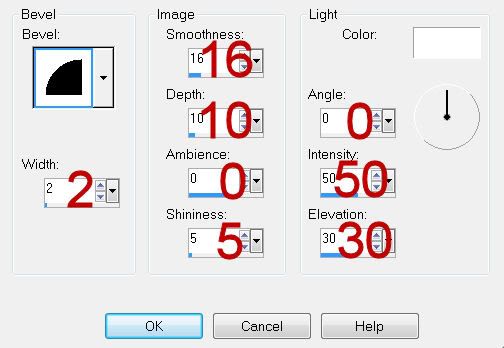
Give it the same slight Inner Bevel:

Highlight Circle 1 layer.
Click on it with your Magic Wand.
New Raster layer.
Copy and paste Record 3 Into Selection.
Deselect.
Close this template layer out.
Highlight Circle 2 layer.
Click on it with your Magic Wand.
New Raster layer.
Copy and paste Record 4 Into Selection.
Deselect.
Delete the template layer.
Highlight Square 1 layer.
Click on it with your Magic Wand.
New Raster layer.
Copy and paste Paper 10 Into Selection.
Deselect.
Delete the template layer.
Apply the same Glow effect.
Highlight Copy of Square 1 layer.
Click on it with your Magic Wand.
New Raster layer.
Make Paper 10 active
Mirror/Flip/Copy
Make your working canvas active.
Paste it Into Selection.
Deselect.
Delete the template layer.
Apply the same Glow effect.
Highlight Rectangle layer (just above the last paper you pasted)
Click on it with your Magic Wand.
New Raster layer.
In your layers pallet uncheck “invert” on the gradient.
Flood fill with the gradient.
Deselect.
Delete the template layer.
Give it the same Inner Bevel.
Highlight Square 2 Back layer.
Click on it with your Magic Wand.
New Raster layer.
Flood fill with a light purple shade.
Adjust/Add Remove Noise/Add Noise:
Monochrome and Gaussian checked
Noise: 43%
OK
Deselect.
Highlight Square 2 layer.
Click on it with your Magic Wand.
New Raster layer.
Copy and paste Paper 1 Into Selection.
Deselect.
Copy and paste Star 2 as a new layer.
Resize 25% and 50%
Duplicate 4 times for a total of 5.
Line them up to make a straight line across of stars.
Merge them all visible.
Center them over the long rectangle that’s at the bottom of your canvas - see my tag for reference.
Highlight the rectangle layer.
Click anywhere outside of it with your Magic Wand.
Highlight the merged star line.
Tap the delete key.
Deselect.
Copy and paste your tube as a new layer.
Add your embellishments. I used:
Disco Ball 4: Resize 25% and 50%
Musical Notes 7: Resize 25% and 30%
Stairs 1: Resize 25%
Star 3: Resize 25% and 40%/Duplicate/Flip/Duplicate and Mirror both stars
Star 4: Resize 25% and 35%/Duplicate/Flip/Duplicate and Mirror both stars
Ticket: Resize 25% and 75%/Duplicate/Free rotate Left 15 degrees
Highlight your white canvas.
New Raster layer.
Select All.
Copy and paste Paper 3 Into Selection.
Deselect.
Apply the mask.
Use your Pick Tool to pull the sides out.
Merge Group.
Add your copyrights.
Add your name.
Color Pallet:
Foreground: Light Purple color
Background: Black
Stroke: 1
Type your Name.
Convert to Raster layer.
Select All/Float/Defloat
Selections/Modify/Contract by 1
Apply the same noise effect.
Deselect.
Duplicate your name and move it slight to the right and down.
Move it below the original name layer.
Highlight the template layer you pasted the record into.
Click anywhere outside of it with your Magic Wand.
Highlight the duplicated name layer.
Tap the delete key.
Deselect.
Lower the Opacity to about 53 or so.
Resize all layers 80%.
I hope you enjoyed this tutorial.
I’d love to see your results and show it off in my gallery.
Email me!
Hugs,
Bev

No comments:
Post a Comment