Supplies
1 tube of choice and 1 close up image - I used the artwork of Robert Freeman which can be purchased from CDO. You must have a license to use.
Font of choice - I used Aquarelle here
Gem mask 161 here
“Tequila” is a tagger size scrap kit created by Digicats (&dogs) and can be purchased from Butterfly Blush Designs. You can visit her blog here.
This tutorial was written assuming you have a working knowledge of PSP.
~♥~ Let’s get started ~♥~
Open up a 700 x 700 blank canvas.
Flood fill white.
Copy and paste Frame 3 as a new layer.
Resize 60%
Free rotate Left 8 degrees.
Duplicate
Mirror
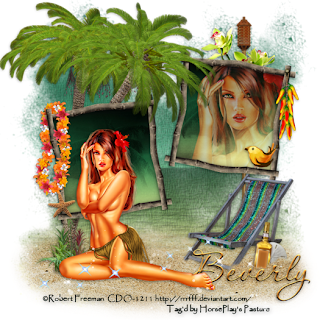
Move both frames into position - see my tag for reference.
Highlight either frame - it doesn’t matter which one right now.
Click inside of it with your Magic Wand.
Selections/Modify/Expand by 4.
New Raster layer below the frame.
Copy and paste Paper 7 Into Selection.
Deselect.
Repeat the above step with the other frame.
Highlight the paper layer that’s below the top right frame.
Use your Magic Wand and click anywhere outside of the paper.
Copy and paste your image as a new layer below the frame.
Tap the delete key.
Deselect.
Change the Properties to Screen
Lower the Opacity to about 65.
Copy and paste your tube as a new layer.
Copy and paste Palm Tree as a new layer.
Resize 70%
Mirror
Position it behind the left frame.
As you can see the length of the tree isn’t long enough, but we’ll fix that.
Make your Selection Tool active set on Rectangle.
Section off the bottom half of the tree.
Edit/Cut
Deselect.
Edit/Paste as new layer.
Move the tree trunk into position.
Add your embellishments. I used:
Lei: Resize 35%/Free rotate Left 90 degrees
Flower 1: Resize 40%
Jalapeño: Resize 40%
Torch: Resize 75%
Bird 2: Resize 25%
Deck Chair: Resize 50%/Mirror
Tequila - Gold: Resize 25% and 75%/Free rotate Right 8 degrees
Sand Dollar: Resize 25%
Starfish: Resize 30%
Sparkles
Highlight your white canvas.
New Raster layer.
Select All.
Copy and paste Paper 6 Into Selection.
Deselect.
Apply the mask.
Merge Group.
Copy and paste Sand as a new layer.
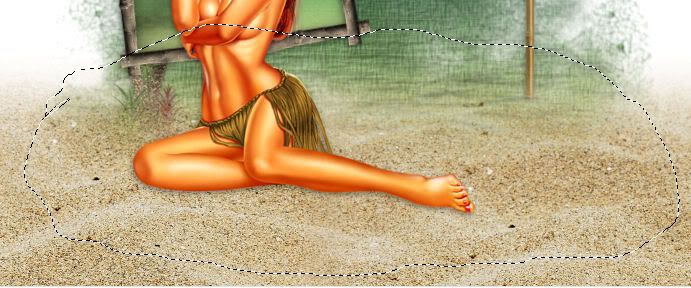
Move it into position - I moved mine so it looked as if the woman were sitting in the sand.
Make your Freehand Selection Tool active set on Freehand and section out the area of the sand you want to keep:

Selections/Modify/Inside Outside Feather:
Both checked
Feather: 43%
OK
Selections/Invert
Tap the delete key until you have a nice feathered effect.
Deselect.
I duplicated the sand layer and erased the areas I didn’t want to give the effect the deck chair, bottle, and sand dollar were sunk into the sand.
Add your copyrights.
Add your name.
Color Pallet:
Foreground: #fee46e
Background: #ae6a2b
Stroke: .50
Type your name.
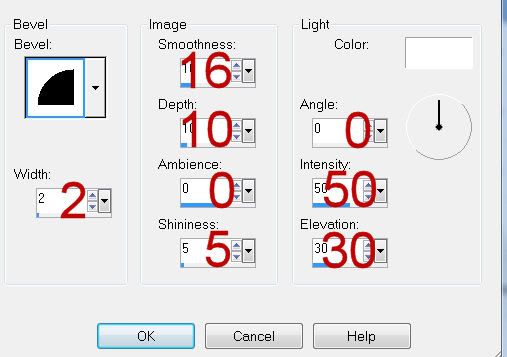
Give it a slight Inner Bevel:

Resize all layers 80%.
I hope you enjoyed this tutorial.
I’d love to see your results and show it off in my gallery.
Email me!
Hugs,
Bev

No comments:
Post a Comment