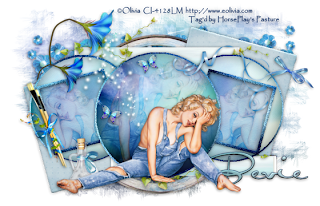
Supplies
1 tube of choice - I used the artwork of Olivia which can now be purchased from CDO. You must have a license to use.
Font of choice - I used Al Sandra here
Divine Intentionz Template 400 here
Weescotlass mask 297 here
“Artistic Magic” is a scrap kit available in full and tagger size and created by Kesha of KnC Scrapz and can be purchased from her store Lollipops n Gumdrops. You can visit her blog here.
This tutorial was written assuming you have a working knowledge of PSP.
~♥~ Let’s get started ~♥~
Open the template.
Shift + D.
Close out the original.
Resize all layers 85%
Image/Canvas Size
700 x 450
OK
Open up Background layer and flood fill white.
Delete the top 4 layers.
Highlight Center Circle 2 layer.
Click on it with your Magic Wand.
New Raster layer.
Copy and paste Wheel Into Selection.
Deselect.
Delete the template layer.
Highlight Square 1 layer.
Click on it with your Magic Wand.
New Raster layer.
Copy and paste Paper 10 Into Selection.
Deselect.
Delete the template layer.
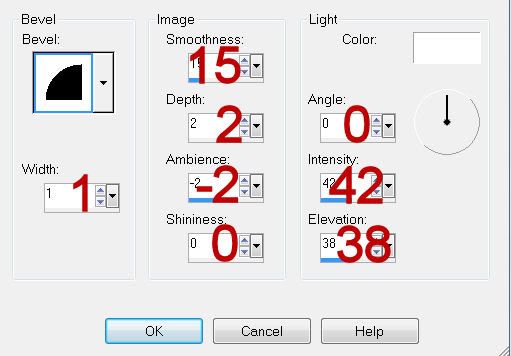
Give it the same slight Inner Bevel:

Highlight Square 2 layer.
Repeat the above step.
Highlight Rectangle 1 layer.
Click on it with your Magic Wand.
New Raster layer.
Copy and paste Paper 5 Into Selection.
Deselect.
Delete the template layer.
Highlight Rectangle 2 layer.
Repeat the above step.
Highlight Circle Back layer.
Click on it with your Magic Wand.
New Rater layer.
Copy and paste Paper 1 Into Selection.
Adjust/Add Remove Noise/Add Noise:
Gaussian and Monochrome checked
Noise: 43%
OK
Deselect.
Delete the template layer.
Repeat the above step with the other two Circle Back layers.
Highlight Frame 1 layer.
Click on it with your Magic Wand.
New Raster layer.
Copy and paste Paper 1 Into Selection.
Give it the same slight inner bevel.
Apply the same noise effect.
Deselect.
Delete the template layer.
Highlight Frame 2 layer.
Repeat the above step.
Highlight Circle 1 layer.
Click on it with your Magic Wand.
New Raster layer.
Copy and paste Paper 7 Into Selection.
Deselect.
Delete the template layer.
Highlight Circle 2 layer.
Repeat the above step.
Highlight Frame Back layer.
Click on it with your Magic Wand.
New Raster layer.
Copy and paste Paper 9 Into Selection.
Duplicate
Change the Properties to Multiply.
Copy and paste your tube as a new layer.
Selections/Invert
Tap the delete key.
Deselect.
Delete the template layer.
Highlight the other Frame Back layer.
Repeat the above step accept mirror your tube layer.
Highlight Center Circle layer.
Click on it with your Magic Wand.
New Raster layer.
Copy and paste Paper 3 Into Selection.
Copy and paste your tube as a new layer.
Selections/Invert
Tap the delete key.
Deselect.
Delete the template layer.
Copy and paste your tube as a new layer.
Add your embellishments. I used:
Flower 1: Resize 25%
Butterfly: Resize 25% and 25%/Duplicate/Mirror
Vine: Resize 45%
Brushes: Resize 25% and 60%/Free rotate Left 25 degrees
Bow: Resize 25% and 50%
Bottle: Resize 25% and 40%
Flowers 1: Resize 40%/Duplciate
Ribbon: Resize 25%
Highlight your white canvas.
New Raster layer.
Select All.
Copy and paste Paper 3 Into Selection.
Deselect.
Apply the mask.
Merge Group.
Add your copyrights.
Add your name.
Color Pallet:
Foreground: #153162
Background: Pattern/Paper 7
Stroke: 1
Type your name.
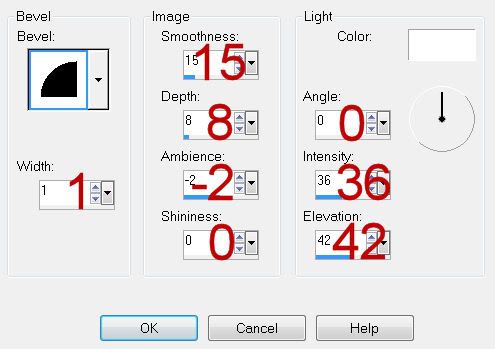
Give it a slight Inner Bevel:

Resize all layers 80%.
I hope you enjoyed this tutorial.
I’d love to see your results and show it off in my gallery.
Email me!
Hugs,
Bev

No comments:
Post a Comment