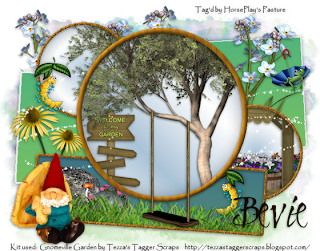
Supplies
Font of choice - I used Clive Barker here
Artmama’s template 21 here
Becky mask 22 here
Eyecandy 3.1 - Glow
“Gnomeville Garden” is a tagger size scrap kit created by Tezza of Tezza’s Tagger Scraps and can be purchased from Butterfly Blush Designs. You can visit her blog here.
This tutorial was written assuming you have a working knowledge of PSP.
~♥~ Let’s get started ~♥~
Open the template.
Shift + D.
Close out the original.
Image/Canvas Size
700 x 550
OK
Flood fill the background layer white.
Delete the following layers:
Credits, Dots, Summer, Summer Glitter, Break Break, and Tiny Text.
Open up the ladder.
Using your Selection Tool set on rectangle, section off an area of the ladder:
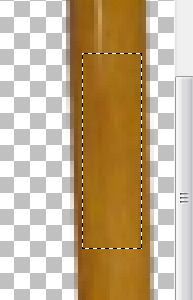
In your color pallet set the foreground to Pattern and find the ladder pattern.
Make your working canvas active.
Highlight Large Circle Frame layer.
Select All/Float/Defloat
New Raster layer.
Flood fill with your ladder pattern.
Deselect.
Delete the template layer.
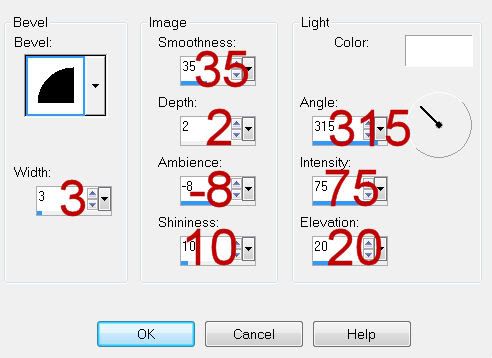
Give it a slight Inner Bevel:
Highlight R. Circle Frame layer.
Select All/Float/Defloat
New Raster layer.
Flood fill with your pattern.
Give it the same slight inner bevel.
Adjust/Add Remove Noise/Add Noise:
Gaussian and Monochrome checked
Noise: 43%
OK
Deselect.
Delete the template layer.
Repeat the above step with:
L. Circle Frame layer
Bot. Rec Frame layer.
In your color Pallet:
Foreground: #aac3d7
Background: #efefef
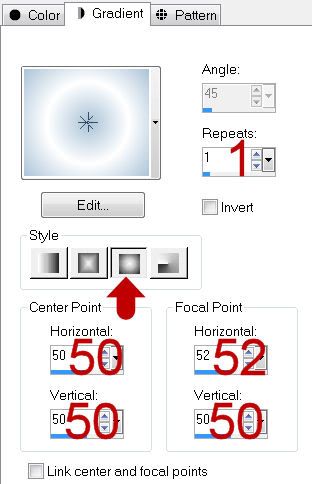
Set your gradient to match mine:
Highlight R Sm Circle layer.
Click anywhere outside of it with your Magic Wand.
Selections/Invert
New Raster layer.
Flood fill with your gradient.
Deselect.
Delete the template layer.
Highlight L Sm Circle layer.
Repeat the above step.
Change your gradient to match mine:
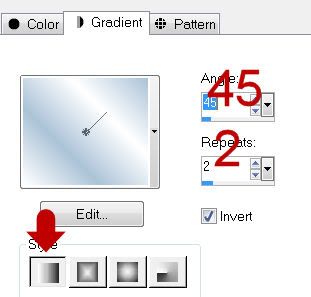
Highlight Lg Circle layer.
Click anywhere outside of it with your Magic Wand.
New Raster layer.
Selections/Invert
Flood fill with your gradient.
Deselect.
Delete the template layer.
Highlight L. Lg Rectangle layer.
Click anywhere outside of it with your Magic Wand.
Copy and paste Paper 16 as a new layer.
Move into the position you want.
Tap the delete key.
Deselect.
Delete the template layer.
Highlight R. lg. Rec. layer.
Repeat the above step.
Highlight Bottom Rec layer.
Click anywhere outside of it with your Magic Wand.
Copy and paste Paper 18 as a new layer.
Move into a position you like.
Tap the delete key.
Deselect.
Delete the template layer.
Copy and paste Tree as a new layer over the large circle layer.
Move it into the position - see my tag for reference.
(You’ll notice the branch on the right are covering the small left circle)
Duplicate the tree layer and close it out.
Highlight the large circle gradient layer.
Click anywhere outside of it with your Magic Wand.
Highlight the tree layer.
Tap the delete key.
Copy and paste Garden Sign 2 as a new layer just above the gradient layer.
Resize 40%
Move into position.
Tap the delete key.
Deselect.
Open up the duplicate tree layer.
In your layers pallet move this just above the R. small circle gradient layer.
Highlight the small gradient circle layer.
Click anywhere outside of it with your Magic Wand.
Highlight the tree layer.
Tap the delete key.
Deselect.
Copy and paste Garden Cart as a new layer.
Move into position over the R small circle gradient layer.
Highlight the gradient circle.
Click anywhere outside of it with your Magic Wand.
Highlight the cart layer.
Tap the delete key.
Deselect.
Copy and paste Grass 2 as a new layer.
Free rotate right 5 degrees.
Duplicate
Move these grass layers just over the bottom rectangle layer.
Highlight the rectangle layer.
Click anywhere outside of it with your Magic Wand.
Highlight each grass layer and tap the delete key.
Copy and paste Rock Garden 2 as a new layer.
Position just behind the grass.
Tap the delete key if any of it is hanging outside of the rectangle.
Deselect.
Add your embellishments. I used:
Forget Me Not bush: Duplicate
Daisy: Resize 50%/Duplciate/Mirror/Resize 70%
Gnome Statue: Resize 45%
Happy Caterpillar: Resize 30%
Happy Frog: Resize 25%
Swing: Move into position - Erase the extra rope
Highlight your white canvas.
New Raster layer.
Select All.
Copy and paste Paper 16 Into Selection.
Deselect.
Adjust/Blur/Gaussian Blur:
Radius: 5
OK
Apply the mask.
Merge Group.
Add your copyrights.
Add your name.
Resize all layers 80%.
I hope you enjoyed this tutorial.
I’d love to see your results and show it off in my gallery.
Email me!
Hugs,
Bev

No comments:
Post a Comment